Tag Archives: seat cushions (H3-40 sofa)

2015/11/14 (S) Tiling the Cockpit, #1

I was up at 6:30 AM and got a shower.  Linda got up closer to 7 and we were on our way to our ham radio club breakfast by 7:20; but not before I released two more mice.  Either we have a significant colony living nearby or the same few animals are finding their way back into the house.  We find it hard to believe, however, that if they are returning they would re-enter the trap.

We had a good showing for breakfast, minus a few regulars due to the ham fest in Ft. Wayne, Indiana today and tomorrow.  We were the second two people to arrive so we got to sit across from the other Bruce and Linda.  They are leaving for their new place in Florida before the next breakfast so the next time we see them will be in the Sunshine State.  We had a lot of work to do on the bus this weekend so we did not linger over breakfast and were on our way home by 9:15 AM.

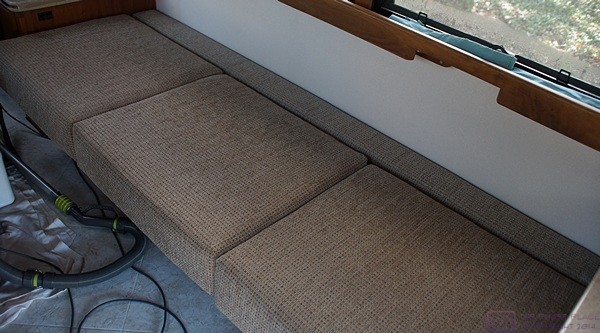
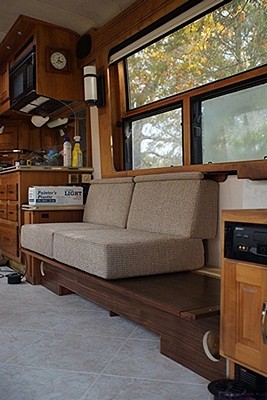
The seat cushions and spacer cushion for the built-in sofa in the bus.

The seat cushions and spacer cushion for the built-in sofa in the bus.

By 10 AM we were working on the floor tile for the front of our motorcoach, which I often refer to here as the “cockpit” as a convenient shorthand.  In a sense the cockpit consists of several sub-areas.  I think of the “entry” as consisting of the stairs and the first landing.  At the same level as the landing is the “driver’s area.”  I sometimes refer to this as the pilot’s seat as most of the controls for operating the bus when it is in motion are located here.  The dashboard, however, extends into the landing area and contains controls for some of the house systems.

One step up from the landing level is the “front passenger seat platform” which I often refer to as  “the platform” as a convenient shorthand.  The portion of the platform closest to the entry door side of the bus is where the front passenger seat is located, which I sometimes refer to as the co-pilot and/or navigator seat.  It’s really not a co-pilot seat as you cannot operate the bus from there, so navigator is really the more appropriate term.  In the center of the platform, and extending towards the driver’s side of the bus, is a step which gets you up to the main floor level.

Because the pilot and navigator seats are on different levels from the main floor those seats are not usable as part of the living room, making the front portion of the interior a distinct and dedicated space with its own character, much like a cockpit in an airplane or ship.  Nonetheless, we used the same fabric on the these two seats as we did on all of the other living room furniture and we are using the same tile on the floors and walls as we used on the main floor.

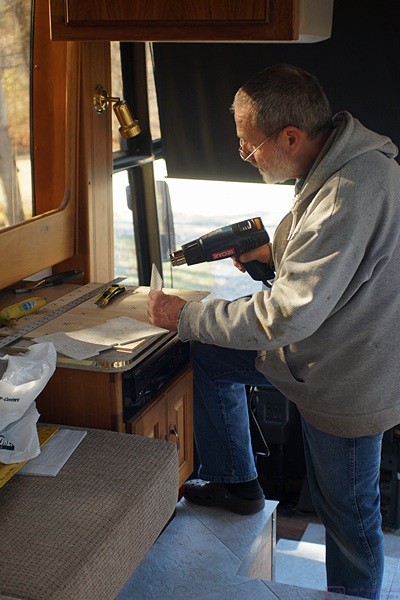
Bruce uses the heat gun to soften a piece of the floor tile so he can cut it.  (Photo by Linda. )

Bruce uses the heat gun to soften a piece of the floor tile so he can cut it. (Photo by Linda. )

We worked from 10 AM until almost 4 PM measuring, cutting, and dry fitting the tiles for the landing and driver’s area.  The driver’s area in particular took a lot of time as every tile had to have something special done to it.  Intricate curves had to be cut to fit around the steering column, brake pedal, and the perimeter of the area and holes had to be drilled for the seat base bolts.  All of this intricate trimming was done by heating the back side of the tiles with a heat gun (much hotter than a hair dryer) and cutting the softened tile with a razor knife.

We quit working for the day at 3:45 PM and changed clothes.  By 4:15 we were on our way to meet John and Diane Rauch at the Livonia 20 Cineplex on Seven Mile Road just west of I-275 for a 5 PM movie.  Ever since Daniel Craig started playing the role of James Bond in the 007 movies we have gone to see them with John and Diane not long after opening day.  After the movie we went to the Macaroni Grill, which is walking distance from the theater on the northeast corner of the intersection of Seven Mile Road and Haggerty Road.

We had to wait awhile for a table but we had plenty to talk about and the time passed quickly enough.  We were seated by 8:20 PM and finally left our table at 10:20.  We started with bread, olive oil, and wine.  We split a two liter bottle of the Chianti house red wine.  It was priced the same as five glasses, but we each had more than two glasses, so it was a good deal.  All four of us had a “make your own pasta” dish with a salad, and each one of us chose a different pasta and add-ins.  I had linguine with a garlic olive oil sauce, mushrooms, tomatoes, and fresh spinach.  Linda had farfalle (bow tie) pasta with arrabiata (spicy tomato) sauce, garlic, mushrooms, and spinach.  Both dishes were well prepared and tasty, and they were vegan!

I stopped at our local Shell station to fill the fuel tank in Linda’s car and it was a little after 11 PM when we got home.  We had another mouse in the trap so I took the trap to woods on the southwest part of our property and released it.  Back inside I went straight to bed.  It had been a long but productive and enjoyable day that ended with too much food and too much wine too late in the evening but we were glad to have had a wonderful conversation with our longest standing Michigan friends.


2015/10/20 (T) Pop-X Pickle

It’s a good thing there are still five weeks until we depart for Florida; there are a lot of unfinished items that need to be taken care of on the bus and around the house/property before we go.

When Phil is here my attention tends to be on what he is doing.  He really knows his stuff, and is an excellent contractor to work with, but since he is not working from drawn plans there are inevitably questions and discussions about just exactly what it is I want and whether that is the best idea or even doable.

Phil had ordered a load of sandy soil for delivery first thing this morning and the “train” (double trailer) showed up not long after he did.  The sandy soil he wanted was not available so he got clean sand instead.  The train driver of the backed it over our third culvert and into the part of our yard were Phil wanted the material dumped.  That took a lot of skill and was impressive to watch.  I took a few photographs but video was really required to capture what was happening.  The Sony SLT-a99v does video in several different modes but I am just beginning to learn how to use it as a still camera and did not want to mess around with shooting video.  Besides, I am not a videographer; it’s a completely different way of thinking than being a still photographer.

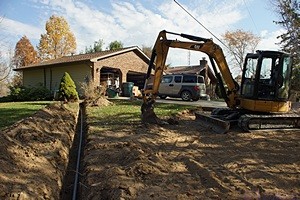
Phil digs the trench for the electrical conduit from the SW corner of the garage to the far side of the driveway extension where he also dug a hole for the post that will support the RV outlet box.

Phil digs the trench for the electrical conduit from the SW corner of the garage to the far side of the driveway extension where he also dug a hole for the post that will support the RV outlet box.

With the material on site Phil was at the point where he needed to dig the trench for the RV electrical feed.  That meant I had to quickly make some final decisions.  I had an 8 foot 4″x4″ treated post and the PVC conduit pieces I needed to go from the post under the driveway to the other side but not enough to go all the way to the garage.  If I only put conduit under the driveway I could cap it, let Phil bury it, and then dig it up later and finish trenching from there to the garage.  I would not do that by hand, however, so it would mean having Phil come back next year just to dig this little trench.  Although I could have him dig the foundation hole for the ham radio tower at the same time that still did not make any sense to me.  Among other considerations I would have to fill the trench in by hand after I ran the cable.

Another option was to still use conduit just under the driveway but go ahead and run direct burial cable like we did two years ago for the pull-through driveway in front of the house.  I would need three (120VAC) or four (240/120VAC) large wires (or equivalent service entrance cable, each at least 80 feet long to get from the outlet box location in the post to the riser pipe on the garage and through the wall into a circuit breaker box.  Not only would I have to get the wire, which would be expensive, I did not have the outdoor outlet box or other parts I needed, so it would take me quite a while to go buy everything.  I also did not know exactly where/how I would feed the circuit.  (I had some ideas about that but they depended on just what the electricians do tomorrow.)

The most expeditious, and least expensive, option was to get more conduit and additional fittings and run the conduit all the way from the post to the southwest corner of the garage.  I left at 9:30 AM for Lowe’s as Phil started digging the trench and the hole for the post.

At Lowe’s I picked up five more 10′ pieces of 2″ PVC conduit, a 45 degree elbow, another 90 degree elbow, a right angle entry box, and a bag of 2″ conduit clamps.  By the time I got back to the house Phil had the post set in place and most of the trench dug.  I got all of the conduit pieces laid out on the ground and got the PVC cement, a hack saw, and the rope and weight.

Since Phil could not do anything else on the driveway until the conduit was installed he helped me install it (or vice-versa).  We joined 10′ sections to both ends of one of the 90 degree elbows and then dropped the weighted rope through it.  We then set the elbow and one of the straight sections in the trench with the elbow at the base of the post and the other straight section going straight up the post where I secured it with two clamps.  We proceeded to drop the weighted rope through additional straight sections of conduit, applied PVC cement to the ends, and put them together.  The conduit had to be inserted about 3″ into the mating piece and twisted as it went in.  I was glad Phil was there to help with this as I did not have the grip strength to do it by myself.  (I don’t have a lot of physical limitations but the arthritis in the base of my thumbs makes itself known in specific situations.)

When we got near the southwest corner of the garage we measured and cut a section of straight pipe to get us to a turn in the trench.  Because of a decorative grass plant the trench could not go directly to the desired location on the west side of the garage and had to go between the grass plant and a nearby small evergreen bush and then turned towards the garage.  We installed a 45 degree elbow to get around the corner and it ended up in the center of the trench.  When I said Phil knew what he was doing I meant it.  We again measured carefully and cut a short section of straight pipe to get us to a 90 degree elbow that would turn up and bring the conduit out of the trench and up the side of the garage.  I measured and cut the vertical riser section and we cemented it into the elbow.  We now had a complete run with conduit coming out of the trench vertically on both ends.

Phil back fills the trench for the electrical conduit from the corner of the garage to the RV electrical post.

Phil back fills the trench for the electrical conduit from the corner of the garage to the RV electrical post.

While Phil used his excavator to scoop and push dirt back into the trench and tamp it down I closed off both ends of the conduit.  At the garage end I removed the gasketed cover from the entry box, cut a short piece of 2″ conduit, and put it in the fitting hole on the back side.  Next I brought the weighted rope up through the bottom fitting hole of the box and used Gorilla tape to secure it inside the short back pipe.  I put a cap on the other end of the short back pipe and then put the entry box on top of the riser sideway.   I coiled up the extra rope, taped it inside the box, and put the gasketed cover back on.   I did not cement any of these connections.  When permanently installed the gasketed cover will point away from the wall and the hole in the back will have a longer piece of paper 2″ conduit cemented in and going through a hole into the wall of the garage.

At the post I used a Rigid brand pipe cutter, designed specifically for cutting large plastic pipe and conduit, to cut off the vertical riser at a convenient height above the top of the post.  I threaded the rope through a 3/8″ hole in the center of a 4″ disc of 3/4″ plywood and tied a big knot in it.  I modified the 2″ cap by drilling three adjacent holes lengthwise from the bottom up and cutting out material with a hacksaw to make a slot.  With the rope hanging over the edge of the conduit I lined up the slot in the cap with the rope and put the cap over the end of the conduit.

Since I decided to not have Phil build the area leading up to the planned barn location I wanted to pull all of the unneeded yellow plastic stakes out of the yard and put them away.  Re-staking the layout, however, is a time-consuming task so I put 10″ metal (iron) spikes at the locations of the front corners of the barn and the center point for the curved transition into the driveway.  I drove them flush with the soil so Keith would not hit them with his mower but we can find them later with a metal detector.

With the conduit installed and the trench filled and tamped, Phil filled started building the “curbs” for the driveway.  He had excavated parts of the driveway path and filled in other areas to create a base for the construction fabric and road gravel that was eight inches below the finish grade.  The construction fabric is 12’6″ wide and Phil likes to wrap it up on the sides about 8″ so when he staked out the driveway to be 11′ 2″ wide.  Phil used the sand to build up the areas along both sides of the driveway so that it looked like he had cut the driveway out, but that is not, in fact, what he had done.

My main bus project today was cleaning up the kitchen and living room, which mostly involved moving tools back to the garage.  It is a confined workspace and tends to get cluttered over time as we fetch tools for this and that.  I also wanted to be able to see the desk and its Corian countertop.

Two of the three sets of cushions in place on the new built-in custom walnut sofa/storage base.

Two of the three sets of cushions in place on the new built-in custom walnut sofa/storage base.

I called Butch in Quartzsite, AZ regarding the distributor tester.  He suggested that I send him an e-mail requesting Bill’s e-mail address and he would send it in his reply.  We then discussed the refrigerator and he suggested that I set the freezer to a colder setting, leave the fresh compartment setting as is, and monitor it for a while to see if it changes.  I did that and reset the min/max memory for both compartments.

Phil is not done with the French drain yet and spent part of the afternoon working on that instead of the driveway.  He made lots of trips back and forth with the front loader to take the topsoil he had removed to create the driveway, spread it out along on top of the pea gravel that fills the drain trench, and grade it off to blend with the undisturbed yard along either side of the drain.  Before he is all done with these two separate, but inter-related projects, he will have to bring in several truckloads of topsoil.  It will be used to fill low spots, especially at the west end of the property, and to cover everything that has been disturbed.  All of the topsoil will be finish graded to blend into the existing contours of the property and then seeded with grass seed.

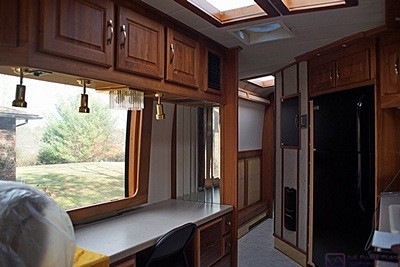
The view from the living room looking towards the hallway.  The new built-in custom walnut desk has its Corian countertop in place and the new refrigerator is in place next to the built-in custom pull-out pantry.

The view from the living room looking towards the hallway. The new built-in custom walnut desk has its Corian countertop in place and the new refrigerator is in place next to the built-in custom pull-out pantry.

I did not want to get involved in any complex or time-consuming projects so I hung out on the west half of our yard where Phil was working and took lots of pictures with the new camera.  Actually, I had been doing that all day trying to document the work as it progressed.  When I wasn’t taking photos I gathered up broken branches and larger deadfall and carried or dragged it to the brush pile on the west side of the line of large fir trees that separate the east and west halves of our five acres.

Linda called around 3:30 and asked me to see if her wallet was on her desk.  She thought she had it with her but could not find it.  She finally located it in her car where it had been since falling out of her case this morning.  She was on her way home by 3:50 PM.

I had a final chat with Phil, who won’t be back until Saturday, and then closed up the bus and the garage.  We were headed to Ann Arbor this evening and I needed to get cleaned up and put on nicer, more appropriate clothes for our evening out.  I used to wear Oxford shirts and nicer pants every day for work, and sometimes a sport coat and tie or even a suit.  These days it’s mostly polo shirts and blue jeans or sometimes REI ripstop nylon convertible cargo pants.  And this summer it has mostly been my work jeans and work shirts.

We left around 5:15 PM and were parked in Ann Arbor before 6 PM.  We agreed to meet Kate at the Lab Cafe which was just around the corner from the Thompson Street parking garage.  (This garage is behind the former Border’s book store #1 which also housed the company’s corporate headquarters.  Our daughter started with Border’s as a cashier at this store and within four years was a regional manager for their PaperChase product line before the company imploded and went bankrupt.)

Kate was sending Linda text message updates on her travel status and ETA so we ordered a couple of decaf coffees to go.  At $3.75 each they were pricier than we are used to paying for coffee but they were “hand-crafted” and the coffee was very good.  It took the barista at least 10 minutes to make our cups, grinding the beans just before brewing and then slowly pouring hot water through individual filter holders after pre-wetting the filters.  In the time it took to make our coffee I would have been on my second cup at Panera.

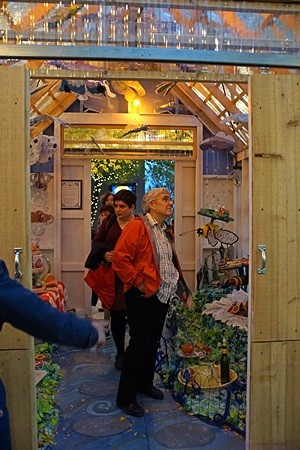
Linda (front) and Kate (behind) take in the interior of one of the Pop-X art exhibit sheds.

Linda (front) and Kate (behind) take in the interior of one of the Pop-X art exhibit sheds.

The music was too loud and really awful, a bad combination in our opinion, so we sat outside in spite of the occasional attempt to rain.  When Kate showed up we walked the short distance to Liberty Park to see the Pop-X Art Exhibit.  Organized by the Ann Arbor Art Center, all of the art was displayed in “sheds” designed by an architect, one artist per shed.  The sheds were approximately 10 feet square with steep pitched roofs.  The roofs, and the two sides they pitched down to, were covered in clear wavy plastic panels to let in a lot of natural light.  The back end was solid and the front had a pair of sliding “barn style” doors hung from tracks.  There was a solid floor that was elevated relative to ground level and provision for electrical power.  They were designed to be sold as potting sheds after the exhibit was removed at the end of the week.  Although the light was fading I was still able to get some decent shots with the new Sony a99v DSLT camera.  It has much greater light sensitivity than the Sony alpha 100 it is replacing as my primary camera and this was my first opportunity to take advantage of that since getting it.

Our main reason for coming to Ann Arbor was to have dinner with Kate but Pop-X was a nice bonus.  Ann Arbor has a LOT of dining options; hundreds I would guess just in the very walkable downtown area.  We decided to try the Grizzly Peak Brewing Company after Linda confirmed that they had some things on the menu we could eat.  It was a bit of a walk but the rain held off and it was an otherwise pleasant evening.

Linda had a dark Porter with definite chocolate tones and I had a hard cider with distinct cinnamon/vanilla tones.  It was also supposed to have roasted pecan notes but I did not detect that.  Kate had a red beer that was not hoppy and thought I might have liked it.  I had a sip of Linda’s Porter and it was very agreeable.  We both had small couscous and greens dinner salads, which were very nice, and both had wild mushroom burgers, which were excellent.  Linda said her chips were also very good and my French fries were tasty and generously portioned.  Kate had a burger and all of our meals came with pickles.  Kate does not care for pickles, which I knew, and does not care for vinegar in general, which I did not know, so Linda and I split her pickle rather than have it go to waste.  The waiter was very attentive and a good sport when I asked for a gallon of ketchup for my fries.  He brought two very full bottles for the table and a bottle of Frank’s hot sauce.  We tipped him accordingly.

At 9:30 PM we started a slow stroll back to the parking garage and chatted a while longer by our cars, which coincidentally were parked very close together.  It was 10:40 PM by the time we got home.  I fed the cats and we went straight to bed.  I was up later than I wanted to be trying to outline this post but I had not had much opportunity to work on it throughout the day.


2015/10/19 (M) Flashless

Linda was up at 5:45 AM and out the door by 6:15.  I woke up but went back to sleep and finally got up at 7:30 and got dressed.  I turned on the furnace in the garage and turned up the thermostats in the bus and then had breakfast.  Rather than grind up a small quantity of coffee beans and get the coffee maker dirty I had a cup of tea.  I retrieved Butch’s e-mail and called Clyde in Canton to arrange pickup of the antique Sun distributor tester that Butch bought from him last night on Ebay.  I will drive down Friday to pick it up.

Phil showed up around 8:30 AM, unloaded his front loader, and got to work on the French drain.  I went out around 10 AM and talked to him briefly.  I then walked through the southwest corner of our property looking for a corner marker.  I did not find one but I did discover some REALLY big trees with REALLY BIG vines woven through them.  The base of the vines was as big as one of the trees, about 30″ in diameter.  I had never seen a vine root that size.

Back at the house I called John Palmer, of Palmer Energy Systems in Florida, to update him on my recent call to Magnum Energy technical support.  He said he would talk to Tom in the next couple of days and try to get me the connector (terminal block) I need.  We agreed I will call him back on Friday.

Next I called A-1 Upholstery in Elkhart, Indiana and talked to Terry.  I ordered a bolster cushion to fill in the space behind the sofa seat cushions and below the sofa back cushions.  It will be 6″ high x 4-3/4″ deep x 78″ long and will be one density of firm foam rather than a firm center layer with softer outer layers on top and bottom (like the seat cushions).  She will use a plain beige fabric as it will not be visible and so it does not have to match the other sofa cushions.  She said it would be ready in early November, which is plenty of time for us to drive down and get it.  The price was $125, which sounded like a fair price to me.

I got out my old Sunpak DX-8R ring flash and connected it to one of my Quantum high voltage battery packs but the battery pack appeared to be dead.  The two battery packs I have are almost unused but have apparently self-discharged and are now dead.  This also happened to my original battery packs.  The only flash equipment I have is set up to run off these packs but I am not inclined to replace them again as I do not use them enough to keep them charged which makes it hard to justify the cost as they are expensive.  Unfortunately that leaves me, for the moment, without any flash capability for the new Sony SLT-A99V DSLT camera.  Buggers.

I sent a TXT message to Joe to let him know that I did not see any indication of axle/hub seal leaks on the inside of the bus wheels.  I then called Bill in Mexico, Indiana and left him a message regarding the antique Sun distributor tester.  I will drive it at least as far as Elkhart, Indiana when I pick up the bolster from A-1 Upholstery and transfer it to Bill if he can meet me there.  There is also the possibility that I will drive it all the way to Bill’s place in Mexico, Indiana and stop by Jarel Beatty’s cabinetry shop in Logansport to have him cut down the connector on the passenger side HVAC duct cover.  If I do I will also pick up the drawings for the desk, sofa, and pull-out pantry as long as I am there.

Phil checks the grade of the new driveway extension.  The laser level is set up by the utility pole.

Phil checks the grade of the new driveway extension. The laser level is set up by the utility pole.

I went back outside and walked through the layout of the driveway extension with Phil.  He then set up his laser level, took elevation measurements at various points, and made an annotated sketch.  He needed to think about the data and figure out what we could actually do given the change in grade from the existing concrete driveway to the road at the third culvert and the need to flatten out before reaching the culvert to tie in with where the barn will (might) eventually go.

Keith, from Kish Lawn Care, showed up around 11 AM to mow the grass.  I got out our leaf blower and let Phil know that I would be occupied for a little while with yard work.  I blew the leaves off of the rear decks, out from under/around various bushes, and off of the two boulder retaining walls into the yard where Keith could mulch them with his riding lawn mower.

About the time I was done blowing leaves Phil had a plan to discuss.  The elevation drops 7-1/2 feet from the concrete driveway (that goes from the street to the garage) to the street at the third culvert some 200 feet away.  Phil thought that our best bet was to slope down from the driveway over a distance of 40 feet, level out for 40 feet, and then gently slope down for 70 feet to the area in front of the future barn location.  That would leave another 50 feet with a slight drop to get to the street.  Some of the area down there will be close to level, however, so another RV could park down there.

We also discussed running power and agreed that I would buy about 40 feet of plastic conduit to get under the level area and headed towards the southwest corner of the garage.  We would need the conduit first thing tomorrow morning so I decided I would go to Lowe’s this evening.

I finally got to work in the bus around 1:30 PM.  I positioned the sofa seat, secured the piano hinge to the stationary backboard with four screws and then drilled all of the other screw holes using my smallest VIX bit.  I installed all of the little screws, dialed back the thermostats, and closed up the bus.  My time-on-task was short but it was a big item to check off of my “list.”

The Sunpak DX-8R ring flash can operate on four AA batteries so I put a set in and connected it to the hot shoe on top of the camera.  The camera was able to trigger the flash (more than once) but the shots were seriously overexposed.  I did not take the time to try and figure out if the flash can be controlled by the camera based on light coming through the lens.  If not it won’t be usable in most situations.

It was a mild day with blue skies and white puffy clouds so I took the new camera outside to capture some images of the work Phil is doing.  I shot a few frames of the more colorful trees in our yard while I was at it.

Linda texted me at 3:40 PM to let me know she was leaving the bakery and stopping at the store on the way home.  Phil continued to find rock, concrete, and brick debris as he dug out the driveway extension.  He used the 30″ toothed bucket on his excavator to sift out the larger pieces and pull them into a pile and then used his front loader to put all of it into his dump truck.  I got a metal tine rake and raked out some of the smaller stuff, not because it needed to be removed but because I needed to do something physical and wanted to smooth it out to get a better idea of how it will look when finished.

Phil started securing his equipment at 5 PM and we were wrapping up our last discussion of the project for the day when Linda got home at 5:30.  After unloading a few groceries she started fixing dinner.  Phil took off and I continued raking for another half hour until dinner was ready.  Linda served the rest of the polenta with puttanesca sauce and steamed sliced parsnips.  I thought we finished the Cupcake Black Forest wine last night but I was pleasantly surprised to find out that we still had enough for our meal this evening.

After dinner I went to The Home Depot looking for a fuel filter for our Cub Cadet lawn tractor.  THD sells Cub Cadet equipment but only had generic fuel filters so I did not buy one.  I went to Lowe’s, where we get a 5% discount on everything we buy! and bought the following:  four 10-foot pieces of 2″ PVC non-conductive conduit, a 90 degree elbow, a coupler, two end caps, 1″ and 1-1/4″ self-drilling screws, an 8′ long pressure treated 4×4′, and a clamp on saw guide.  The saw guide was an impulse purchase but I had a $10 Off card for a total purchase of $50 of more.  We have struggled with makeshift saw guides all summer and fall and I still have more careful cutting to do.  I already have a saw guide but could not find it and should have bought a new one at the beginning of the bus remodeling project.

Phil called the house while I was out so I called him back.  He had figured out that extending the driveway to within 10 feet of the front of the proposed bus barn would add 25% to the cost of the project.  That was more than I was prepared to spend at this time so we will defer that work until we build the barn, probably in summer 2017.  We watched Scorpion and NCIS Los Angeles and then went to bed.


2015/10/16 (F) Desk Installation

We were up at 8 AM, fed the cats, made coffee, and had breakfast.  Phil showed up around 8:30 AM, unloaded his front loader, dropped his flatbed trailer, and left in his dump truck.  I turned on the fireplace and we enjoyed our coffee while iPading until 10:15 AM.

Our first task today was to cut up several large limbs that I pulled out of the woods last evening to get them out of Phil’s way.  I cut them up with the chain saw and then we stacked them on the disposal pile for Phil to haul away.

Phil returned at 10:30 and moved his Caterpillar 305C excavator into the woods across the street by the culvert.  I went down to chat with him briefly to make sure I understood what he was going to work on.  There were a lot of small trees (3″ diameter), saplings, and bushes scattered around the site.  Some of them had been dead for years and some had just been knocked over by Phil.  I decided to work in that area with my chain saw cutting everything up into five foot lengths so Phil could use his front loader to get them into his dump truck.  I worked at this until 11:30 AM and then turned my attention to the bus.  Linda worked on her needlepoint while I cut wood.

Before getting started on construction tasks I took two pieces of filter material and set them on the wire shelf in the freezer compartment of the new refrigerator, one on top of the other.  I then set the two remote thermometer sensors on the filter material.  Butch had suggested the other night that I set the sensor on a sponge to get it off of the floor of the freezer compartment as it was likely responding to the automatic defroster heat strips when they come on.  I figured the filter material would work just as well and that placing the sensors on the shelf would definitely get them away from the floor.

Linda brought out a bag of ice from the house fridge and put it in the bus freezer.  She also filled several 1/2 gallon juice and milk cartons with water, put the caps on, and put them in the fresh food compartment.  The purpose of all of this was to add thermal mass to the compartments to cause the refrigerator to run less often and reduce large swings in temperature.

Inside the bus our first sub-project was installing the desk, which included putting the front passenger side HVAC duct cover in place even though it is not finished.  It took us quite a while to get everything positioned just right.  With Linda holding things in position I screwed the right pedestal to the wall, adjusted the position of the base and screwed the pedestal to the base.  We then repeated that process for the left pedestal and base.
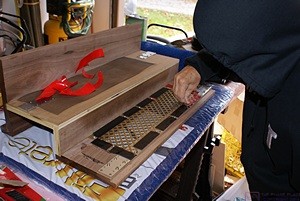
Linda removes the backing from the double-sided tape on the back side of the air grate in the center connector/cover for the desk.

Linda removes the backing from the double-sided tape on the back side of the air grate in the center connector/cover for the desk.

At this point we had several things to do with, and under, the center connector/cover so I removed it and took it into the garage/shop.  We cut a piece of the decorative brass colored metal grate and secured it to the back of the air opening with small screws every few inches.  Next we cut a piece of black plastic mesh to fit over the grate.  We then cut pieces of 3M Extreme Mounting Tape (double-sided) and attached them to the back side of the grate in between the screws.  Linda peeled off the protective layer and we carefully placed the plastic mesh.  Using one of the scrap pieces of the protective layer I rolled the plastic into the take with our wallpaper seam roller.  Finally, we had a piece of filter material already cut to cover this air intake opening so we set that on top of the mesh, pressed it down to take advantage of the tape, and then secured it with Gorilla Tape on all four edges, rolling it with the seam roller to get good bonding.
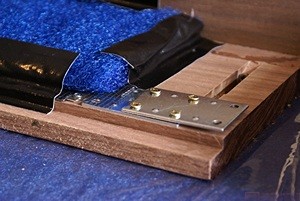
A detailed view of one of the homebrewed tongue and groove alignment assemblies made from flat mending plates.

A detailed view of one of the homebrewed tongue and groove alignment assemblies made from flat mending plates.

Back in the coach I had to tie in the outlet strip to the 120VAC power feed.  I shut off the breaker for this circuit and checked with my tester to make sure it was not live.  The hot and neutral wires were accessible but the ground wires were back under the left pedestal where they were not easy to reach and manipulate.  It took a while, certainly longer than it should have, but I got the three ground wires tied together with a grounding clamp.  I connected the hot and neutral wires (three each) relatively easily using wire nuts.  I turned the circuit breaker back on and checked that the outlet strip had power between the correct terminals and did have power between any other terminal pairs.

I went to the garage to get a four foot long piece of 1″X1″ aluminum angle that I bought weeks ago to use as a support bracket for the upper rear edge of the center connector/cover.  I was going to cut off a 26″ long piece and then drill countersunk holes but I noticed a piece of 1/2″X1/2″ light gage angle that was about 26″ long and already had holes in it.  It was long enough to span the space between the pedestals and go under each one about an inch.  That was sufficient to position it correctly so Linda held it there while I secured it to the wall with four round (pan) head screws.  I then put the center connector/cover back in place.
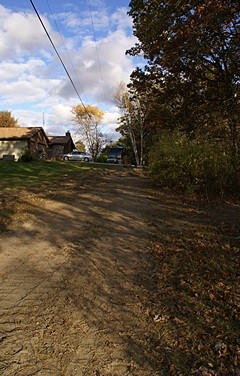
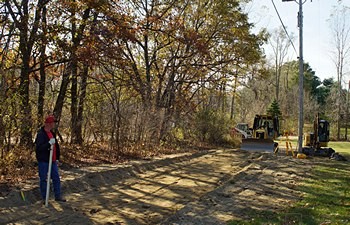
Phil has cleared all of the organic debris from the area where the driveway extension and RV pad will be located.
Phil has cleared all of the organic debris from the area where the driveway extension and RV pad will be located.

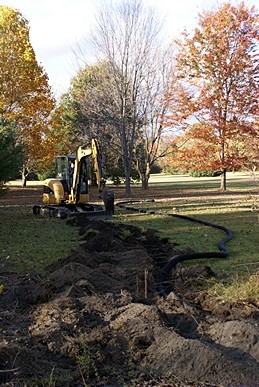
Phil starts trenching and placing the plastic drain tile tubing for the French drain.

Phil starts trenching and placing the plastic drain tile tubing for the French drain.


Phil had long since left in his truck to dump all of the wood debris.  We had a light lunch of Amy’s Lentil Vegetable soup and fresh organic grapes.  While we were eating a group of three deer came to our back yard and eventually ended up eating apples that had fallen from our tree onto the ground.  These same deer, along with two others, were here yesterday at twilight and were very frisky.  We saw them later in our neighbor’s yard across the street.
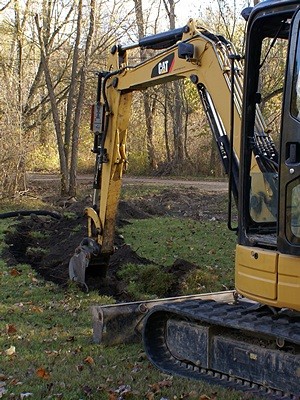
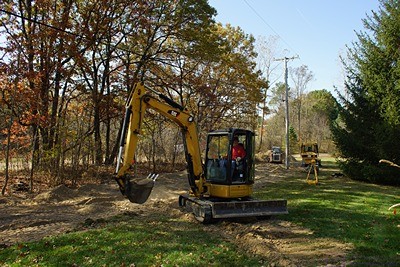
Another view of Phil’s smaller excavator with the 12” bucket being used to trench the French drain in the southwest portion of our property.

Another view of Phil’s smaller excavator with the 12” bucket being used to trench the French drain in the southwest portion of our property.

Phil returned around 3 PM and started working on the French drain.  He replaced the 30″ wide toothed bucket with the 12″ one and started at the high end if the culvert on this side of the road.

The grand finale was the installation of the Corian desktop, which has been sitting on a blanket in the middle of the living area floor since Tuesday.  I drilled countersunk holes through the four corner plates in each desk pedestal from underneath.  I then inserted 1-1/4″ #8 self-drilling outdoor wood screws into each hole, again from underneath, until they just protruded above the corner blocks and then backed them off until the tips were just below the surface.  We set the desktop across the pedestals and pushed it as tight to the back and right end wall as we could.  Linda put her weight on it and I ran the screws home, pulling the top tight to the pedestals.  We reinstalled the four drawers in the right pedestal, finally getting them off the floor in the hallway where they have been since Tuesday.  We stepped back to admire the desk and agreed it was a thing of beauty and a joy to behold.  Linda also marveled, once again, at how much space she now has to work in the kitchen.
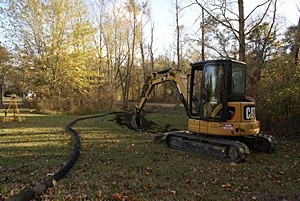
A wider shot showing the excavator and drain tile.  The laser level is at the left edge of the frame.  The main arm of the excavator (with the bucket attached) has a laser sensor on it that tells Phil exactly where the lower edge of the bucket is relative to the laser level.

A wider shot showing the excavator and drain tile. The laser level is at the left edge of the frame. The main arm of the excavator (with the bucket attached) has a laser sensor on it that tells Phil exactly where the lower edge of the bucket is relative to the laser level.

The “denouement” was mounting the outlet strip and adding felt pads to the two fake drawer fronts on the left pedestal and then adjusting the magnetic catches.  I originally had the outlet strip (temporarily) mounted to the wall between the two pedestals with two screws a few inches below the cord notch in the center of the back edge of the desktop.  Rather than put it back there I decided to mount it on the underside of the desktop just in front of the cord notch.

The underside location will work just as well as the wall mount location for regular 2- and 3-prong plugs but probably not as well for small AC adapters.  The added pluses of this location, however, are: 1) it will not interfere with cords coming through the notch, 2) it will be up out of the way of the UPS (uninterruptible power supply) that will sit on the shelf at the top of the center connector/cover, and 3) if liquids are accidentally spilled and run over through the notch they will not run into the outlet strip.  Besides, devices with an AC adapter will probably be plugged into the UPS so this was a better overall approach.

Our next task was to adjust the sofa seat until it was deep enough to be comfortable.  We slide the plywood seat out a couple of inches and then got the seat and back cushions (three each) from the house where they have been stored since September 21st.  We put the cushions in place and sat down.  We pulled the cushions out and pulled the seat board out until it was five inches farther out than originally designed and put the cushions back in.

The front edge of the seat cushions were out farther than I liked but we both agreed the sofa was now comfortable to sit on.  The distance from the bottom front edge of the back cushions to the front edge of the seat cushions was originally only 16 inches and that turned out to just be too short.  With the seat board moved out it will now be 21 inches.

In order for the sofa to work correctly, both as a sofa and as a bed, we will need a cushion that is 5″ wide by 6″ high, by ~76″ long to fill in the space behind the seat cushions and below the back cushions.  The height and foam makeup will be such that it is level with the tops of the seat cushions and have the same firmness and feel.  Would that I had designed the sofa for this depth to begin with and had the seat cushions made accordingly, but we were trying to open up the living room by not having the sofa protrude into the aisle any more than absolutely necessary.

Next up was reinstalling the wood trim in hallway.  We have an interesting plan for the lower half of the hallway but in case we do not get it finished before we leave for the winter we wanted the trim off the bed and back on the wall.
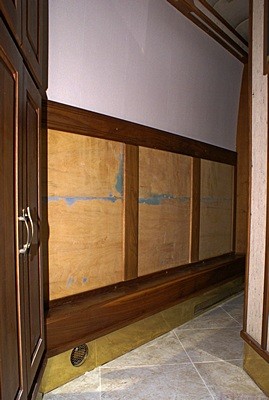
The lower outside hallway wall.  There were originally three framed panels of vertical strip mirrors here.  We will replace them with wood panels, probably in a lighter color to contrast with the walnut trim.

The lower outside hallway wall. There were originally three framed panels of vertical strip mirrors here. We will replace them with wood panels, probably in a lighter color to contrast with the walnut trim.

This trim originally framed three panels of vertical strip mirrors.  We were able to remove the mirrors as they were glued to wallpaper.  In the process we discovered that the left and right panels were the same width but the center panel was wider.  The trim consisted of six pieces of wood; a long upper and lower horizontal piece and four vertical pieces.  The six pieces were screwed to the lower half of the outer wall but not attached to each other.  The left and right vertical pieces were tight to adjacent woodwork, but the two intermediate pieces were free to be repositioned.

We reattached the upper horizontal piece first making sure the mounting screws went back in the same holes.  Next we pushed the lower horizontal piece into place but did not screw it to the wall.  We then attached the left and right verticals.  The horizontal distance between the inside edges of the left and right verticals was 75 inches.  The two intermediate verticals were each 4-1/2″ wide so the distance between verticals needed to be 22″ (75 minus 9 = 66 divided by 3 = 22).  We carefully positioned and secured the two intermediate verticals to achieve this spacing.

The trim boards all have rabbited edges on the back side.  I need to measure them carefully, but they are ~3/16″ deep by 3/8″ wide.  Our current plan is to use 3/16″ underlayment or other 3/16″ high quality plywood to make three panels that will fit within these rabbits with a little room to spare.  The panels will either have a hardwood face or we will cover them with a hardwood veneer of a wood that contrasts with the walnut trim.  We can get the veneer from Rockler once we decide what we want.

Linda spread out several towels on the new desktop and we moved tools and supplies from the A-V cabinet, behind the driver’s seat, to the new desk.  I then removed the Corian top of the A-V cabinet and put in on the bed.  We still have a small amount of wallpaper to install in the front of the living room and into the cockpit on the driver side, but it will not be easy to do.

These areas, such as the one behind the A-V cabinet, are small with limited access so most of my sanders cannot be used.  The only one that might work is the Porter-Cable oscillating tool but I did not get it out today.  I got some sanding sponges instead and tried those on the wall under the passenger side window trim next to the co-pilot seat.  When I sanded a dark area about 6″ long by 3″ wide the wood in the center crumbled and I ended up with a hole 3″ long by an inch and a half wide.  I could see one of the stainless steel structural members through the hole.  Given what was obviously water damage I was glad we bought a bus with welded stainless steel as the main structural material.

Based on what I could see, the walls in the bus appear to be 1/2″ plywood although I did not measure the thickness.  This area had obviously gotten very wet over a long period of time and some of the wood has rotted.  It is the only spot we have discovered that is this damaged and we immediately realized that we will not be able to wallpaper this area.  We will probably panel over it, similar to what we plan to do with the veneered panels in the hallway, but today was not the day to figure that out.

It was going on 5 PM and we decided we were done for the day.  I turned off all of the electric heaters, turned on the Aqua-Hot, turned on all three thermostats, and set the temperature to 20 degrees C.  The refrigerator was also indicating much colder freezer temperatures than it had been before I moved/isolated the remote sensors so I reset the freezer and fresh food controls to their “normal” center positions.  Tomorrow we will replace the alkaline batteries with the Lithium batteries we bought specifically for the TempMinder thermometer system, reset the min/max data, and monitor it for a few days.

I walked down to see what Phil was doing.  He was making good progress with the French drain but did not have enough of the plastic drain tile to finish it today.  He plans to work tomorrow and will have the additional tile he needs to finish the drain.  I left him to his work and took photos of the fall colors in our yard as I worked my way back to the house.

I spent an hour at my computer dealing with e-mail and transferring photos from the Sony a100 to my laptop.  Linda called me to dinner at 7 PM.  It was a simple meal of vegan Coney dogs with mustard, onion, and beans served open-faced on a whole wheat hotdog bun.  As a side dish Linda steamed Opo squash.  It was the first time either of us had this particular squash.  It was very mild with a hint of cucumber.  It is available all over the world and widely consumed as it is relatively inexpensive.  It was OK, but I thought it might work better as an ingredient rather than a stand-alone side dish.

I exchanged a couple of text messages with Chuck and confirmed that we would be at his shop tomorrow after breakfast to retrieve our two bus windshields.  The rest of the evening was spent in the living room by the fireplace reading and writing on our iPads before turning in and watching episodes of Rick Steeves’ Europe and Joseph Rezendo’s Travelscope on Detroit PBS (WTVS).