Tag Archives: refrigerator cabinet (H3-40)

2015/08/27 (R) In and Out

Linda was up at 5:45 AM and on her way to the bakery at 6:15.   I got up an hour later and also got an early start to my day; early is relative, after all.  After a bowl of granola I brewed some Cafe Europe / Columbian decaf coffee, turned on the gas fireplace, and continued reading Number Theory and its History.  A week ago Jim (N8KUE) e-mailed some questions to us regarding RVing and bus conversions.  I felt that too much time had passed without a response so I settled in at my computer to answer his questions as best I could.  I sent my reply at 9:30 and turned my attention to our bus project.

I got the pull-out pantry (mostly) installed yesterday.  Before we could place the refrigerator in the alcove, however, I needed to do four things:

  1. Install a piece of aluminum angle to prevent the fridge from sliding to the left;
  2. Secure the water line that went to the old refrigerator;
  3. Plug up openings in the cabinet with steel wool; and
  4. Install the 10th drawer slide on top of the pantry to reduce lateral movement at full extension.

I decided to tackle these tasks in that order, which meant a trip to Lowe’s to get the aluminum angle.  I chatted briefly with Mike (W8XH) on the drive and stopped at The Home Depot first but did not find what I wanted.  Lowe’s had a 3 foot length of 1/8″ thick 1.5″X1.5″ angle.  I wanted aluminum because it is light, easy for me to work, and won’t rust or need to be painted, but I wanted the 1/8″ thickness for strength.  While I was there I picked up another foam brush, a bottle of Mineral Spirits, and a package of #8-1.75″ stainless steel self-drilling exterior wood screws.

The road graders were out today in our part of the county and I passed the one working on Golf Club Road going to, and returning from, Lowe’s.  There was also one working on our road that I could not get around, so I followed it slowly until it reached our driveway and I could turn in.

Back home I cut the aluminum angle to a length of 26.5 inches, the same as the depth of the refrigerator base section and the top piece of plywood in the base of the alcove. I selected a drill bit that was just barely larger in diameter than the stainless steel screws.  Starting with the midpoint I drilled holes every three inches along the centerline of one side of the angle.  I then countersunk each hole, checking with a screw until the head was just slightly recessed.  A light back bore with the countersink bit removed any rough edges.

With the pantry pulled all the way out I placed the side of the angle with the holes on the 2nd piece of plywood in the alcove base with the other side of the angle against the edge of the 3rd piece of the base.  Since these pieces of plywood are all 3/4″ thick the vertical side of the angle extended above the plywood by 3/4 of an inch, more than enough to catch the left side of the refrigerator.  I held the angle tight against the edge of the 3rd piece of plywood, with the front edge back about 1/2″, and used the #8 VIX self-centering drill bit to drill a pilot hole in the back hole.  I then secured it with one of the stainless steel screws, penetrating both the 2nd and 1st layers of plywood and probably a heavy 1/8″ of the subfloor.  I held the front of the angle tight and secured the 2nd hole from the front in the same way, as I could not access the first hole due to the pantry.  I drilled all the remaining holes except the first and put in the screws.  I then pushed the pantry all the way in so I could access the front hole and secured it.  The angle was now held in place by nine strong screws fastened into a lot of wood.

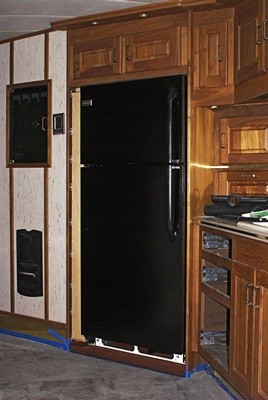
The pantry and refrigerator installed in the alcove.

The pantry and refrigerator installed in the alcove.

The old refrigerator had an ice maker and cold water dispenser in the freezer door so there is a flexible copper water line at the back of the alcove.  The line runs through an inaccessible area and into the cabinet under the kitchen sink so removing it would be difficult and impractical.  It was easier to secure the water line, and besides, we might want to use it again someday.  I found some used screws with broad #2 SR heads and used them to secure cable ties with mounting tabs to the back wall of the alcove.  I re-shaped the copper tube as best I could so it would lie relatively flat against the back of the alcove and used the cable ties to hold it in place.

I noticed when I moved the tube that a little water came out of the end.  That struck me as odd as I had it in my head that the line was out of service.  After a little investigation I remembered that the shutoff valve for this line was still attached to the water inlet tube on the back of the old refrigerator.  If we had pressurized the fresh water system this would have been an open line.  Yikes!

I now had another, unexpected, task that had to be done before I could do anything else.  I gathered up a few tools, parts, and materials, got my head and arms into the under sink cabinet (which is never comfortable), shut off the supply line valves (just to be safe), and disconnected the copper tube to the refrigerator alcove.  I wrapped the threads of the open end of the T-fitting with several turns of Teflon tape, threaded a cap into the fitting, and snugged it up tight.  I did not, however, pressure test it as I did not want to take the time and I did not want to pressurize the fresh water system with the toilet disconnected.

With the water line secured I got one of the old packages of steel wool and used it to stuff the openings in the lower rear corners of the alcove where lots of wires, the water line, and two air lines pass in and out.  I meant to use the #1 steel wool but grabbed the 4/0 by mistake.  It will work just as well but the 4/0 is what Linda is using to clean all of the walnut woodwork, so it was a bit of a waste.

The pull-out pantry is very stable vertically and horizontally except when it is all the way out where it can move side-to-side about 1/2″.  I decided to install the last of the 10 slides on the flat between the top of the pantry box and the ceiling of the alcove, which is also the base of the upper cabinet.  The ceiling of the alcove is not parallel to the floor and so it was not parallel to the top of the pantry box.  I was able to slide a piece of 3/4″ oak veneered plywood between the ceiling and the upper edge of the top slide. With the 10th slide on top of the pantry I had about a 1/8″ gap between the slide and the plywood at the front, opening to about a 1/4″ gap at the rear.

My first attempt at a solution was to try cutting blocks from the end of a 2×4 to be just the right thickness for the front, middle, and rear.  That quickly proved to not be a workable solution without some form of stationary saw.  After further pondering I decided to cut a 4.5″ wide piece of the oak veneered plywood from one of the leftover pieces that happened to be 26.5″ long.

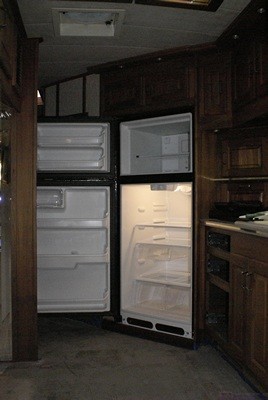
The new refrigerator in the alcove with the doors open.

The new refrigerator in the alcove with the doors open.

I set the piece of plywood in place on top of the two slides, one mounted to the alcove side panel and the other resting on top of the pantry box, and shimmed it with wood shims between the plywood and the ceiling to remove the gap between the plywood and the slide without making it tight.  I pulled the pantry out slightly so I could drill and screw the rear hole of the stationary part of the slide.  I then pulled the pantry all the way out, pushed the center section of the slide part way back in, and secured the front hole of the moveable part of the slide to the top of the pantry.  I used a slot that allowed side-to-side adjustment, just in case.  I also secured the center slot on the moveable slide to the top of the pantry box.

I fiddled with the slide until it went in and out smoothly.  It is tight enough that I don’t think it will come open when driving, but it pulls out easily enough and will be easier once we get a handle on it.  Linda called at 4 PM as I was finishing this task to let me know she was on her way home from the bakery.  It would be 60 to 90 minutes before she got home so I moved on to the next task.

The first piece of underlayment to go in will be a full 4’x8′ sheet minus a notch for the middle air-conditioner drain line and part of one short side that has to fit around the built-in pantry.  I measured for those cuts and then laid the sheet out in the driveway on top of 2x4s (on the flat).  I tried plunge cutting most of the 21″ long by 1″ wide strip off the end with my circular saw without using a guide and finished the cut with my saber saw.  My plunge cut wasn’t very good so I trimmed it with the saber saw.  That edge will go under the mirror tiles against the back of the built-in pantry so it will be OK.

Linda got home around 5:30 PM.  After unloading her car and changing clothes she examined my work for the day and was pleased with the way the pull-out pantry worked.  She helped me carry the 4’x8′ sheet of underlayment into the bus at which point I decided that we needed to get the refrigerator into the alcove before doing anything else.

We set the underlayment aside and uncovered the fridge which we had previously wrapped in painter’s plastic to keep it clean while grinding and sanding.  Linda cleaned off packing tape adhesive with Goo Gone, wiped it off with a wet rag, and then I wiped it off with a dry towel.  We rolled it over to the alcove, shut off the circuit breaker, plugged it in, and secured the cord to the back.  It rolls very easily but to get it into the alcove we had to tilt it forward to get the bottom back edge of the unit onto the 2.25″ high plywood base.  Oops; the left edge of the fridge space overlapped the built-in pantry opposite and prevented the unit from tilting enough to get the back edge up high enough.

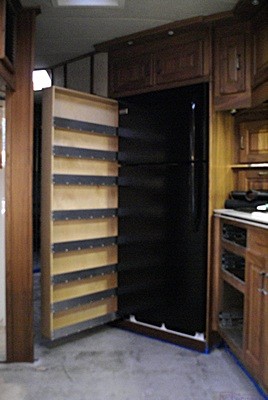
The pantry pulled out with the refrigerator installed.

The pantry pulled out with the refrigerator installed.

We have learned not to panic, and after a moment’s thought we turned it slightly to the right, got the right rear bottom corner up onto the plywood and slid it into the alcove a couple inches.  We were then able to turn it to the left and get the left rear bottom corner onto the plywood base, making sure it was inside the aluminum angle.  Fortunately we had enough clearance above the unit to do that.  (If not we would have used the leftover 3/4″ plywood in front of the alcove, gotten the fridge onto those pieces, and then rolled it straight into its space.).   We lifted the front bottom of the unit and rolled it back into its cubby.  It was a perfect fit; snug to the aluminum angle on the left, tight to the right side of the alcove at the rear with a small (3/16″) gap at the right front, and far enough into the alcove that we can open the three drawers to the left of the sink.  High five!  Good job team.

I turned on the breaker to make sure the refrigerator still worked.  It did, and we were both pleased with how much quieter it is than the old one.  We did not need it running at the moment, however, so I turned the breaker off.  Linda got a towel and propped the doors open.

We got the underlayment flat on the floor and slid it into position.  It needed to be trimmed in three spots and I did not want to get into that at this hour so Linda started preparing diner while I put tools and materials away, locked the bus, and closed up the garage/shop.  I plugged in the old refrigerator (in the garage) to let it cool down overnight as DTE Energy’s recycling program is picking it up tomorrow between 8 AM and noon.

Dinner was mock riblets in BBQ sauce, green beans with onions and carrots, and fresh peaches, all very tasty.  After dinner I worked at my desk.  I replied to several e-mails from Gary at Bus Conversion Magazine, and looked at my Habitat For Humanity article to see if I could split it into two or three parts.  It looked like that was possible so I let Gary know.  I chatted briefly with Steve (N8AR) on the Novi 440 repeater and with Jim (N8KUE) on the South Lyon 2m repeater.  I processed three photos of the finished pantry/fridge installation showing that everything goes in and out and e-mailed it to a dozen people.

I came to bed just before 10 PM.  We watched TV for a while until Linda drifted off to sleep.  I stayed up a bit longer to finish this post.
 

2015/08/26 (W) Delux Delay

We were a bit sore last night, and needed a good night’s sleep, so we both took some Advil PM right before going to bed.  As a result we did not wake up until almost 8 AM this morning.  The Advil, combined with the very cool temperatures, made for good sleeping.

Our son had called yesterday to see if Linda could watch Madeline today while he did some work on the rental property that he and Shawna own.  It was Shawna’s house before they got married, and is a nice little place, but with Madeline on the way they wanted a slightly larger place.  They also wanted to be on the other side of Stadium Boulevard in the attendance area for Burns Park Elementary School and walking distance to both the school and adjacent Burns Park without having to cross any major streets.

Ann Arbor is a major rental housing market because of the University of Michigan and the local government is very involved in this market.  Rental properties must be inspected at least every 30 months and meet code requirements.  The rental house was scheduled for inspection on Friday and needed some minor repairs, so Brendan set aside today to take care of things.  What I find interesting about this inspection requirement is that most of the rental houses our son and daughter lived in while at U of M looked to me like they had not been inspected in over a decade.

Linda was due at Brendan and Shawna’s house around 10:30 AM so she left our house at 9:15.  She took the three books of wallpaper samples with her and went directly to Delux Drapery and Shades in Ann Arbor to return them and placed the order for four bolts (double roll packs) of Sellers and Josephson Just Textures Lamar paper.  Not long after she left Delux I got a call at home from the store.  They were looking for Linda to let her know the wallpaper was back ordered until September 11.  (I’m not the least bit superstitious but September 11.  Really.)  To cancel the order we would have to let them know today but I told them to let it ride.  I then texted Linda to let her know and she agreed with my decision.

I had a feeling this might happen and it’s what we get for waiting so long to look for, select, and finally order a wall covering.  But it is what it is and we were not going to settle for something that wasn’t “right” for our interior just because it was available more quickly.  If the paper actually comes in on the 11th we will have the 12th and 13th to at least install it in a few critical areas before the new seating goes in.  If it doesn’t arrive by then we will deal with it when it does.  Either way the only big issue is that we wanted to paper the wall behind where the desk will go before the desk is installed.  As things stand we will either uninstall/reinstall the desk or paper around it.

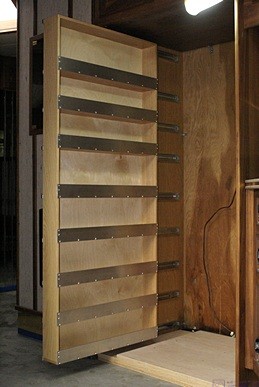
The pantry supported by plywood and 2x4s.

The pantry supported by plywood and 2x4s.

There were several small tasks that I could have worked today but the thing that needed to be done was the installation of the pull-out pantry, so that is what I did.  The pantry was already in the coach, which was a good start.  I got two of the small leftover pieces of 3/4″ oak veneered plywood and set them in front of the alcove base.  I then set a 5′ length of 2×4 on the flat in the space where the pantry goes and extending out beyond the alcove by more than the depth of the pantry.  I then set the pantry on the 2×4, pushed it snug to the side of the alcove, and slid it towards the back of the alcove until the front was approximately one inch behind the vertical front edge of the left side panel.

There were two main reasons for using the 2×4.  First, the lowest slide attached to the pantry box extends below the box so the bottom of the box needed to sit on something that was thicker than the amount by which the slide hung down.  Second, a 2×4 on the flat is 1.5″ thick and that turned out to be a good thickness for positioning the pantry vertically in the alcove.

The reveal between the front of the pantry and the front edge of the alcove side panel was wider at the top than the bottom so I placed two wood shims side-by-side under the back end of the 2×4 to raise it slightly and tilt the top of the front out.  I fussed with this for quite a while and each time I adjusted the shims I had to pick the pantry up, set it aside, and put it back.  I eventually got the reveal to be the same along the entire length (height) of the front.

Once I knew where I wanted the pantry to be when it was closed I had to figure out how to mount the slides to the side panel of the alcove.  I pondered this for quite a while.  If nothing else, I have learned that when it is not clear how to proceed the best course of action is to do nothing.  I have also learned that if I ponder long enough I will eventually see a way forward.  Sometimes that takes days or weeks of conscious and subconscious thinking, but luckily the solution came to me relatively quickly.

The pantry box is 27″ deep.  The full extension slides are 26″ deep and they are mounted so they are flush with the front of the pantry box when they are fully closed.  I wanted a 1″ reveal along the front, so I needed to place the back edge of the slides 27″ back from the front edge of the alcove side panel.  With the pantry box out of the alcove I used a metal ruler to measure back at three points and make very fine scratch marks.  I then used the metal ruler to draw a fine pencil line through the three scratch marks.

I returned the pantry to the alcove, pushed it tight to the alcove side panel, and then pulled it out about three inches.  Measuring on the back side outside the alcove I made final adjustments to the shims to get a consistent reveal.  I then pulled each of the nine slides back, carefully aligned the back edge of the slide to the reference line, drilled a hole with a self-centering VIX bit, and secured it with a #6-3/4″ SR (square recessed) screw.  (I was not able to initially secure the bottom slide as the 2×4 was in the way.)  I pulled the pantry out a little farther until the next mounting hole in the top slide was visible and then drilled that hole on all eight slides and secured it with a screw.  I proceeded in this way until all but the bottom slide were attached to the alcove side panel through every available mounting hole; 88 screws in all (11 screws for each slide x 8 slides).

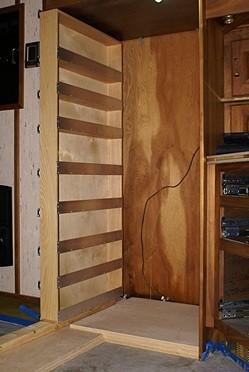
The pantry with the installation boards removed from underneath it.

The pantry with the installation boards removed from underneath it.

To secure the bottom slide I needed to get the 2×4 out from under the pantry.  I slid the pantry all the way in, slid the two pieces of 3/4″ plywood out from under the 2×4, and tried to slide the 2×4 out.  Unfortunately I used a 2×4 that was too long to just slide out as part of the original pantry cabinet is directly across from the pull-out pantry.  So I got my circular saw and cut about 4″ off the end of the 2×4.  Close, but not quite, so I cut off another 2″ and was finally able to slide it out.

With the pantry all the way out I was able to drill and secure the mounting holes for the back half of the bottom slide.  The holes for the front half were a bit tedious as I had to move the box to reveal each one.  To avoid going back and forth between the drill and the screw driver bit I drilled all of the holes first and then put in the screws.  I should also mention that I used the Shop Vac to vacuum up any debris that got in the slides as a result of the drilling.  I also wiped the slides out (carefully, they have sharp edges) with a paper towel.

The pantry slides all the way in and out but is a little tight the closer it gets to being fully closed.  I know that Jarel was very meticulous in attaching the slides to the pantry box so they were all parallel.  My working hypothesis is that either I did not get them attached to the alcove exactly parallel (entirely likely) and/or there is more drag on them because of the one-sided installation (probably, but no way for me to quantify) than there would be if they were installed on both sides of a drawer.

All of the slides are on the same side, which is not how they are normally used.  A pair of these slides is rated to support 100 pounds when used on both sides of a drawer, so four and a half pairs would, conservatively, support 400 to 450 pounds in a normal application.  Even if they will only support 1/3 that much weight in a single-sided application that is still 133 to 150 pounds for our nine slides.  I think the box weighs about 30 pounds so that leaves at least 100 pounds for stored items and I doubt that we could get 100 pounds of stuff in the pantry even if we loaded it with canned goods.  Because the pantry is narrow and tall with lots of slides I suspect most of the load on the slides is vertical, which is what they are designed for, rather than sideways, which would tend to pull them apart, so I suspect that it can safely carry considerably more than 100 pounds of staples.

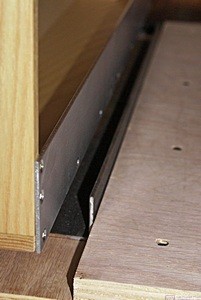
The piece of aluminum angle that will prevent the refrigerator from sliding sideways into the pantry.  It is not installed yet as the plywood refrigerator base is not stained yet.

The piece of aluminum angle that will prevent the refrigerator from sliding sideways into the pantry. It is not installed yet as the plywood refrigerator base is not stained yet.

I had just finished installing the pantry and was cleaning up my tools and materials when Linda got home around 3 PM.  I had skipped lunch and she had a PB&J sandwich while she was out so we agreed to have dinner at 5:30 PM.  Linda picked up where she left off yesterday cleaning and waxing the drawer fronts and the woodwork in the bedroom.  I decided that the oak veneered plywood base in the alcove needed to be painted or stained and then sealed so I went to Lowe’s and got a small can of Rustoleum American Walnut stain, a small can of Rustoleum satin finish polyurethane, and two foam brushes.

I brushed the stain on liberally, working in sections, let it sit for two minutes per the instructions, and then wiped it off with a lint-free cloth.  The stain required mineral spirits for cleanup so I threw the brush and cloth away.  The instructions said to wait one hour before applying a finish.  It was 5 O’clock by then so I went to my office to check e-mail while Linda prepared dinner.

She made a nice salad and grilled a couple of vegan burgers and added some vegan cheese.  Mustard, ketchup, pickles, onions, and lettuce on a nice bun made for a tasty sandwich.  Two deer, a doe and her young fawn, came to our deer block while we were eating and a ruby-throated hummingbird stopped at our plants and feeders.  For dessert we had half of a small, very sweet watermelon.

By the time we were done with dinner it was 6:30 PM so I went back out to the bus and applied the polyurethane.  The directions said to apply it sparingly so that is what I tried to do.  They also said that it could take 48 hours to be usably dry and seven days for a full cure.  Drying time was dependent, however, on temperature and humidity, with higher temps and lower relative humidity promoting quicker drying.

I had run the Aqua-Hot earlier in the day and determined that there was still a little too much coolant in the system as the expansion reservoir overflowed into my catch bottle.  I closed the three windows that were open, leaving them just slightly ajar, turned on the Aqua-Hot, turned on all three thermostats, and set them for about 72 degrees Fahrenheit.  I will not be applying a second coat of polyurethane and cannot spare 48 hours for this one to dry.

I had thought that we might get the first sheet of underlayment installed this evening but decided we had done enough for one day.  It will be the only full 4’x8′ sheet we install but it needs a notch cut out of it before it goes in.  I thought it would require several cuts but then realized I had some floor leveling compound that I had not removed.  I got my chisel and mini-sledgehammer and knocked off the big chunks.  I then used the oscillating sander with 50 grit sandpaper to smooth everything out.  It was 7:45 PM and I was done working on the bus for today.

I went to my office and spent a couple of hours dealing with e-mails.  Linda was still up when I turned in at 10 PM but drifted off to sleep as I finished up this post.  She has to go to the bakery tomorrow which means she will be up very early.


2015/08/25 (T) Turning The Corner

It got pleasantly cool overnight and with the bedroom doorwall open it made for nice sleeping conditions.  Between being up a bit late last night and not wanting to get out from under the warm covers we slept in a few minutes longer than usual.  I put on my sweats, which I find very comfortable on a cool (or cold) morning, and made a pot of Costa Rican decaf coffee.  We had our usual granola for breakfast, took a few minutes to enjoy our coffee in the living room without our cats, who were off somewhere and probably up to no good, and then got to work.

In order to install the new seats in September we need to have the desk installed and in order to install the desk we need to have the floor installed and in order to install the floor we need to have the underlayment installed and in order to install the underlayment we need to have several things done.  First and foremost was finishing the patching and leveling of the subfloor, so that was my first task today.  While I pursued that Linda continued working on cleaning and waxing the walnut drawer fronts.  Given the limited work surface in the garage Linda can only work on three to six drawer fronts at a time depending on their size.  When she reached a stopping point with those and started working on the woodwork in the bedroom.

I have spent the last week patching, skimcoating, and sanding the entire area where the old tile was installed which I estimate to be about 80 square feet.  I went over it one more time this morning with 80 grit sandpaper on the orbital sander.  The sander has an integral dust collection bag so it did not get the coach too dusty.  I was satisfied with most of the job but still had some unevenness along the edges by the walls and especially in the toe kick spaces extending out about three inches from the cabinet bases.  That is because I did not get the last skimcoat as smooth as I needed to in those areas and the orbital sander cannot reach them.


I figured I would need to do one more application of floor leveling compound but did not want to open the second bag of mix for such a small job.  I decided to go the Lowe’s and buy a small pail of pre-mixed floor patching compound and the 3/4″ #8-32 machine screws we needed to install the new handles.  While I was there I noticed that they had 50 grit hook and loop sandpaper triangles designed to fit our Porter-Cable oscillating saw.  I was aware that we had a sanding pad attachment for the tool but had not considered using it until I saw the 50 grit paper.  I bought a pack and picked up some 120 grit as well.  I would also have bought 80 grit but they were out.  I had to go to The Home Depot for the machine screws as I wanted the same brass ones we had already purchased.

Back at the bus I decided to try sanding out the imperfections rather than filling them in with another round of patching and sanding.  I was, admittedly, tired of this phase of the work and anxious to be done with it so I could move on to next step.  August is slipping away and I am very aware of the date.  I was also not keen on creating more sanding dust inside the coach.

I don’t know why I did not try this tool sooner.  The design of the tool and shape of the sanding pad allowed me to work in the all of the areas the orbital sander could not reach and it worked very well with the 50 grit sandpaper.  The circular air sander can also reach these areas, and was the right tool for grinding down the old thinset and mastic, but the oscillating tool was the right one for this final smoothing.

When I thought I was done I vacuumed the floor and used the Revel Damp Mop to pick up any residual dust.  We then went inside to have lunch while the floor dried.  Linda heated up a can of Amy’s vegetable soup, made roll-up sandwiches, and served fresh black grapes and plums.  It beats fast food hands down.

After lunch I inspected the floor carefully and decided that the patching and leveling was done.  Although it was one task out of many, and there was no fanfare attached to the moment, I was very much aware that we had finally turned the corner.  We still have some minor disassembly to do, but from this point forward most of our tasks will involve putting the interior back together and installing new things.  All things being equal (which they never are) the building work should be more fun than the deconstruction work.

The major exception is the wallpaper.  We still need to remove the old paper, much of which is stained from old water leaks, and install the new paper, which Linda will be ordering tomorrow from Delux Drapery and Shades in Ann Arbor.  The critical pieces are the ones that go behind the desk and the built-in sofa.  Most of the rest of it can be finished later but we would prefer to have it all done by September 12th if possible.  The more stuff that gets installed the more awkward it will be to work on the walls.

With the floor leveling done the next impediment to installing the underlayment was getting the refrigerator out of the living room and into its alcove.  That, however, required three other things to be done.  First I needed to replace the electrical outlet with a recessed one.  Second, we needed to build up the base of the alcove and finally, we needed to install the pantry as we cannot get to the slides to mount them to the side of the alcove with the refrigerator in place.

The electrical outlet only took a few minutes to change.  With Linda’s help I used the template I made last Thursday to cut the base pieces from the 4′ x 8′ sheet of 3/4″ plywood we bought on Tuesday.  The bottom piece was the full width of the refrigerator alcove (34″ wide at the front and 33.75″ wide at the back) and 25.75″ deep.  We set it in place, checked the front setback, and screwed it to the subfloor.  The next piece was the same width as the first but 1/2″ deeper (26.25″).  We set it in place on top of the first piece and made sure the front edges were flush with the back edge extending 1/2″ farther back.  I used longer screws to go all the way through both pieces into the subfloor.

I was not happy with the way my circular saw blade was cutting and a few raindrops gave us an excuse to take a break.  We were working just outside the small garage bay and moved everything into the garage to keep it from getting wet.  I went to Lowe’s and bought a new 7.25″ blade with 60 teeth, which should give a very clean cut through plywood but still work on 2x4s and trim boards.  While I was there I checked their selection of driver bits again.  I was looking for a 3″ long No. 1 SR (square recessed) bit but they did not have any that long.  I found a 2″ bit for $2.48 but then I spotted a pack of seven 2″ long bits for under $4.  It had two #1, three #2 (the most common size), and two #3 bits from the same manufacturer as the single bit.  Can someone explain that pricing structure to me?  Apparently most of the cost is retail packaging.

Linda prepared large, wonderful salads for dinner.  She made her own dressing using balsamic vinegar, walnuts, raisins, garlic, and seasonings, and it was very good.  We finished the Pinot Grigio with the meal and then resumed our work.

I changed the blade on my saw and then we moved the wood and 2×4 supports back out into the driveway.  The new blade made very clean cuts confirming that changing it was long overdue.  The third piece of the alcove base was not as wide as the first two, measuring 28.25″ across the front and 28″ across the back.  (The alcove tapers in 1/4″ from front to rear along the right side.)  The depth was 26.75″ to match the refrigerator base depth, and a half inch deeper than the second piece.  I set it in place, snug to the right side of the alcove and flush with the front edge of the other two pieces, and checked for an even reveal along the left side of 5.75″.  Everything looked good so I screwed it down.

There are several reasons for this design/construction.  First, there is a large bundle of wires and two air lines that run across the floor of the alcove at the rear wall.  Using three layers of plywood allowed the top layer to be high enough for the base of the refrigerator to extend over the wire bundle and have its back about 1″ from the back wall (thus the reason for the recessed electrical outlet).  It will also leave about 1″ of clearance above the fridge, which is enough.  The second reason is that the 5.75″ width at the left, with only two pieces of plywood under it, is where the pull-out pantry will go.  But third, I will install a 24″ long 2″ x 2″ angle (steel or aluminum) on the middle sheet against the left edge of the top sheet to prevent the refrigerator from shifting to the left.  The front edges of the plywood base pieces will be covered (eventually) by a something, probably a piece of 3/4″ thick walnut hardwood, that will stick up above the top surface of the top piece just enough to keep the fridge from rolling out.  That piece, however, will have to be removable so I am still thinking about just how I want to secure the refrigerator case in the alcove.

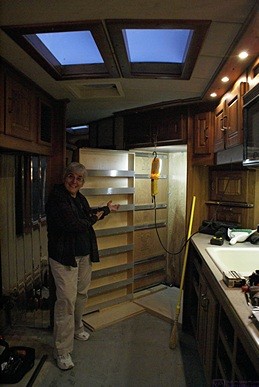
Linda does her Vanna White impersonation, highlighting how the new pull-out pantry will look when it is installed.  The pantry is in its extended position revealing the slides sections that will mount on the cabinet wall.  The refrigerator is out so we can work in the alcove.

Linda does her Vanna White impersonation, highlighting how the new pull-out pantry will look when it is installed. The pantry is in its extended position revealing the slides sections that will mount on the cabinet wall. The refrigerator is out so we can work in the alcove.

We still had some light but with the heavy cloud cover it was darker than usual in the coach for this time of day (6:30 PM).  We rigged up a piece of twine to hang the work light and turned on as many interior lights as we could.  We then carried the pull-out pantry from the library (in the house) to the bus.  We brought all of the slides in as well, along with two pieces of 3/4″ plywood and a 4′ length of 2×4.

We set the two pieces of 3/4″ plywood in front of the left edge of the alcove flush with the two bottom base pieces.  We then set the 2×4 on flat (3.5″ side down) spanning the plywood inside and outside the alcove.  We installed the cabinet halves of the nine slides onto the pieces attached to the pantry and then set the unit in place with the bottom resting on the 2×4.  We moved the pantry in and out checking its position and considering where the slides needed to be attached to the alcove wall and exactly how we would do that so the front has an even reveal relative to the vertical front trim of the left alcove wall.

By this point it was after 8 PM, it was getting dark, and we were too tired to start something as critical as attaching the slides to the alcove wall.  We are behind schedule, but had enough sense to not push beyond our limits.  We closed up the bus, relaxed on the couch for a bit with our kitty cats, took some Advil PM, and went to bed at 9 PM.


2015/08/13 (R) Sanding Success

Linda was scheduled to go into the bakery today but knew before we went to bed last night that the visit was postponed.  That was just as well; we were very tired from our long day yesterday and slept in this morning.

Before I even had a chance to make coffee I spotted wild turkeys by the road in our easternmost driveway entrance.  They walked past the east end of the house into our backyard.  They hung around by the deer block for quite a while so we had a good long look at them and I took a few pictures.  There was a big tom, a younger/smaller tom, and a half-dozen hens, one with a surprisingly small chick for this late in the season.  The turkeys eventually moved on and we got back to our normal routine.  While I made the coffee Linda made her own version of raisin, date, walnut oatmeal with some quick oats that she had in the pantry.  It was very good.

We read for a bit but I needed to finish the blog posts for the last several days and Linda needed to return some items to the Howell Library and run a couple other errands.  While working on the blog post for yesterday I realized that we had not loaded all of the pieces for the built-in sofa.  I checked the pieces we had against the drawings, which we should have done yesterday, and confirmed that we were missing the two top pieces (E) for the support boxes (HVAC plenums) and the top piece (H) for the return air plenum.  I texted Jarel and he replied quickly that he would try to take care of it in time for me to drive back down on Wednesday to pick up them up.  It’s a 12-17 hour, 550 mile day, for me and costs about $60 in gasoline, so hopefully he will have the pantry done by then as well.

Linda got word from our son via TXT message that Shawna’s father, Mick, had passed away.  He had an aggressive but non-cancerous brain tumor that did respond to two separate surgeries and was moved to hospice care about two weeks ago.  Brendan, Shawna, and Madeline are cutting their vacation short by a day to head to the Grand Rapids area but are still leaving Tuesday to fly to Denver to visit Shawna’s mother, Carol, and her husband, Cliff.  It appears that a memorial service may be in the works for the weekend of the 22nd and 23rd, in which case we will probably drive over.

My sister tried to call me today.  Linda was on the house phone quite a bit today with bakery-related business so Patty tried my cell phone but did not leave a message.  I was working in the bus at the time, did not have it with me, and Linda could not find it in time when it was ringing.  Being deaf in one ear she cannot locate where sounds are coming from.  She does a little better when she uses her BAHA, but rarely wears it around the house.  I called my sister back and left a message and she eventually called me back and we got to talk.

Our father, who is 90, had been admitted to a hospital near where he lives.  The staff said he appeared to have severe dementia, but he was fine (for his age) just a couple of weeks ago, so I suspected a stroke or some other sudden change.  Patty sent me a text latter that the CAT scan of his brain revealed two recent lesions (last few weeks), the telltale sign of two strokes.  She also said he was being transferred to Missouri Baptist Hospital, which is much closer to where she lives, for further care.

Those two pieces of news certainly put a damper on the day, and may cause an adjustment in my plans if I have to travel to St. Louis.  In the meantime there is stuff that has to get done, so even though it was warm today and I wasn’t really in the humor, I kept working in the bus, off and on.  I vacuumed up loose material, including inside the bases of cabinets, and then cleaned the wiring in the refrigerator alcove with Lysol.  I decided to make a template for the refrigerator alcove plywood base filler panels so I could cut them the right size/shape on the first try.  I then used one of the new ceramic sanding belts on the residual thin-set and mastic, and it worked!  My sense of hope was renewed that I will be able to install the new floor correctly.

By 7 PM I was feeling drained so I wrapped up my work and took a shower.  For dinner Linda made pan-grilled BBQ tofu with caramelized onions and served it open faced on a hamburger bun with a side of fresh steamed asparagus.  It was delicious.

After dinner I went to Lowe’s and The Home Depot in search of several items but only ended up buying another 36 grit sanding belt.  I needed floor leveling compound but was not prepared to choose between their limited options.  I also needed a self-centering drill bit but neither store had them.  Lowe’s and THD really are focused on the tools and materials one needs to work on a house and its surrounding property.  Things like self-centering drill bits, though useful for things like drilling holes for door hinges, are really cabinet-making tools.  As big as these stores are they can’t, and don’t, sell everything.

I talked to Butch on the drive home.  The self-centering drill bit that Jarel recommended for installing the pull-out pantry slides is a Vix and Butch suggested four places where I could buy it:  Rockler, Custom Service Hardware, McFeeley’s, and Grizzly’s.  Before ordering one I need to e-mail or text Jarel and ask him what size screw I need to mount the pull-out pantry extension slides.

Back home I thought of four other things I could have bought while I was out so I added them to my list.  I then went to my office and worked on blog posts, updated the BCM Group page on RVillage, e-mailed Gary Hatt at BCM, responded to an e-mail from Howard (PlayaDog) re: screens for sliding bus windows, and started downloading Adobe Creative Cloud 2015 updates.  Jack Conrad had responded to my earlier e-mail asking if he knew what was going on with the Arcadia rally and I sent him a reply.  By the time I dealt with all that I was ready to recline and rest.


2015/08/11 (T) Sanding Prep

Our day started with our usual morning routine.  We were out of Linda’s homemade granola, so she made Quaker brand Raisins, Dates, and Walnuts instant oatmeal.  This has long been my favorite oatmeal and I still like the taste and texture.

After breakfast we removed the containers of water from the bus fridge, rolled it out of the alcove, and unplugged it.  We then moved it farther up into the coach, behind the front passenger seat, so I could work in the alcove and on the floor.  We then got the Shop Vac up into the coach.

Linda left around 9:30 AM to meet Diane at Kensington Metropark.  They decided they want to get together and walk once a week and the Metropark, which is about half way between their houses, has as an extensive trail system.

While Linda was away I went to the FedEx Office store in Brighton and got a copy of the 11″ x 17″ sheet with the drawings of the seat and back cushions for the built-in sofa.  I stopped at the Shell station and filled the tank as we would be leaving very early in the morning for Indiana.

Back at the house I vacuumed up as much loose debris as I could inside the coach.  After checking my pantry drawings I decided I could stack at least two pieces of 3/4″ plywood, one atop the other, to get the base of the refrigerator high enough to allow the back to go over the bundle of wires that run along the junction of the floor and back wall without interfering with the pull-out pantry.  This will allow the refrigerator to go into the alcove far enough that we can open the kitchen cabinet drawers under the counter to the left of the sink.

Linda got back around 12:30 PM.  After lunch we were going to mask off the inside of the coach with painter’s plastic and tape.  Our goal was to upkeep the dust that resulted from sanding the thinset and mastic out of cabinets and off of counters and woodwork.  We planned to run the Shop Vac while sanding but knew, a priori, that it won’t suck up all of the dust.

After considering what would be involved in masking off the inside of the coach we decided instead to wrap the refrigerator in plastic to protect it and then tried using the belt sander on the residual thin-set from the old ceramic tiles.  The old aluminum oxide belts failed fairly quickly, which was discouraging, but the sanding did generate a lot of airborne dust, which was encouraging as it indicated the sanding was actually removing material.  Our Craftsman belt sander has a built-in dust collection bag and Linda was running the vacuum so both of those things helped.

Late afternoon we went to Lowe’s and bought a 4′ x 8′ sheet of 3/4″ (nominal) maple veneered plywood and a 4′ x 8′ sheet of 1/4″ SurePly underlayment plywood.  We also got two #36 (very coarse) 4″ x 24″ ceramic particle sanding belts and a box of 200 3/4″ self-drilling screws.

Back home we unloaded everything and I then called Josh to confirm that he could still meet us at the Martin’s supermarket in Elkhart in the morning.  I also called Butch to remind him that we were still coming down.  The rest of the evening is lost to me, as I did not record our activities soon enough, but they probably involved e-mails, computer updates, and iPads.


2015/08/07 (F) Arrangements

We had our usual, but never boring, homemade granola with fresh blueberries for breakfast.  I brewed a pot of the Costa Rican half-caff coffee we bought yesterday without tasting it first.  We found it to be somewhat bitter, which is not our taste in coffee, so we probably will not buy more after this batch is gone.

We spent a good part of the morning researching cabinet pulls on the Cabinet Service Hardware (CSH) website.  We found a pull on the CSH website that appeared to be identical to the one from The Home Depot, which is a Rockefeller Antique Brass from Liberty Hardware.  The one from CSH was a Belwith Keeler HH.P135-AB for $2.47 each.  The one from The Home Depot was $2.48 plus tax but no S&H.  Since we have the one from THD in hand and like how it looks we will probably buy them locally.

Many of the drawers in the bus have the pulls attached to the walnut face and then the face attached to the front of the drawer box.  Thus, the only way to remove the pulls is to first unscrew the box from the face.  I took the face off of one drawer and installed the new pull.  It fit perfectly, confirming that the mounting hole spacing is 3″ center-to-center.   The one from THD comes with 1″ and 1.5″ #8-32 machine screws but it looks like we will need something shorter than 1″ for the framed drawers and shorter than 1.5″ for the solid drawers.  The cabinet doors have 3/4″ thick frames so the 1″ machine screws may work for those.  Thus we should be able to use some of the machine screws that come with the pulls from THD but will have to buy some as well.  The pulls from CSH do not come with screws so we would have to buy those anyway.

Linda left around noon to meet Diane in Livonia to see a movie (Ricki and the Flash) starring Meryl Streep, Kevin Kline, and Rick Springfield.  I went on an errand run while she was away.  At The Home Depot in Howell I found 10 packs of the drawer pull we like so the price came out to under $2 per pull compared to $2.48 when purchased individually.  We need 58 to replace all the ones in the coach plus at least four for the new desk drawers so I bought six 10-packs.  We have not decided if we will replace the single screw round pulls on the two TV cabinet doors with the double screw pulls.  If we do we will need a couple more pulls.  If not, we will need two round pulls in the same style and finish, which THD also carries.  I bought small packs of #8-32×3/4″ and #8-32×1-1/4″ lengths so I can figure out what lengths work best in each location.

Jarel called while at was THD.  The plans for the built-in sofa had arrived in today’s mail and he had a few questions.  We talked through the issues and came to the conclusion that it would be better for us to come down on Wednesday instead of Tuesday to pick up the desk.  That will give him time to cut the sofa pieces and do some minor assembly and finishing.  The plywood seat and side pieces need to be stained to resemble the walnut hardwood and a 3/4″x3/4″ piece of walnut hardwood needs to be attached to the front edge.  He also needs to cut the piece of walnut veneered plywood for the front and then spray everything with the same lacquer he has used on all of the walnut desk pieces.

As I was finishing up at THD I also got a call from Chuck letting me know that everything was on track for the refrigerator swap tomorrow.  My next stop was at the Howell Lowe’s for a 4′ x 4′ sheet of 3/4″ plywood but I did not like their selection any better than THD.  I ended up buying two quarter sheets (24″ x 48″) of birch plywood.  This plywood has a lot of thin layers, so it is very flat and dimensionally stable, with defect free surfaces that are sanded smooth and very clean edges.  These sheets will go on the bottom of the refrigerator alcove in the bus to elevate the new refrigerator above the new vinyl tile floor.

Back home I texted Josh at Coach Supply Direct, called Terry at A-1 Upholstery, and called Butch regarding the change in our visit date for next week.  Linda got home shortly thereafter and helped me reattach the edge trim to the two doors of the old refrigerator and load them into the back of my car.  We covered everything with blankets and then loaded all of the drawers, shelves, racks, and bins.  Once the old fridge is out of the bus we will clean it, reassemble it, plug it in, and make sure it is cooling.  We will then call DTE Energy to arrange pick up through their recycling program.

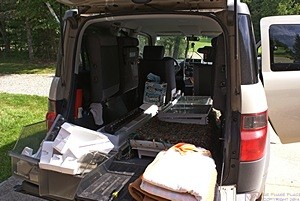
Loading pieces of the old refrigerator into the back of the Element to take to Chuck's shop.

Loading pieces of the old refrigerator into the back of the Element to take to Chuck’s shop.

Linda bought an Amy’s Roasted Vegetable Pizza while she was out and cooked it for dinner.  It is our favorite store bought pizza, and much better (for us) than what we can usually get at restaurants and pizzerias (with the exception of Satchel’s in Gainesville, Florida), but not as good as the pizza we had while Mara was here.  That pizza was memorable.

After dinner I got a shower and then worked on the design/drawings for the seat and back cushions for the built-in sofa for the bus.  I started editing blog posts for July but did feel like uploading them.  We went to bed earlier than usual as we had to up at 7 AM tomorrow to go to our weekly ham radio club breakfast.


2015/05/26 (T) Reflections

I decided to put off doing the laundry until later in the week.  Linda made a grocery shopping list while we had our morning coffee.  I called Pat Davidson at Apex Roofing to discuss the installation of a roof access hatch.  We did some online research for pest control companies in the Brighton-Hartland-Howell area and decided to call Best Pest Control LLC.  I talked to the owner, Ryan, about his perimeter defense package, and decided to give his company a try.  They will spray outside the house for ants, spiders, hornets, wasps, and yellow jackets.  I called Phil Jarrell from Precision Grading and left him a voice message regarding some additional driveway work, a French drain for the west end if the property, and a hole for a ham radio tower foundation.

I showed Linda the pullout pantry slide hardware I found last night on the Rockler website, a German made top-bottom pair specifically designed for this application and able to support up to 450 pounds.  It’s pricey, but it looks like the right stuff for the job.  We also found some assembled pullout pantries online, including some that were 5″ wide, but they were not deep enough and getting just the right height looked tricky.  We really want to maximize the use of our available cubic inches.

Keith showed up around 10 AM with his new Scag riding lawn mower.  He is still going to have the Hustler repaired as a backup, but the Scag is a nicer/better machine.  It is fuel injected, which should be more reliable, and it is faster, which makes more efficient use of Keith’s time.  It also has a seat that can be adjusted from soft to firm, making for a more comfortable operator experience over the course of a long day.

As much as I need to work at my computer and drafting table I need to work even more in the bus right now.  I started by reassembling the inside of the cabinet above the refrigerator, except for the liner carpet, and reinstalled the fluorescent light fixture on the ceiling.  I am keeping the carpet pieces for now, but mostly to use as templates for new material.  I would have preferred white Formica interior surfaces, as they are brighter and easier to keep clean, but the bus has a lot of curves and carpet is a very conformable and forgiving material.

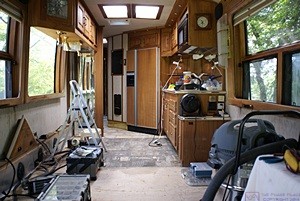
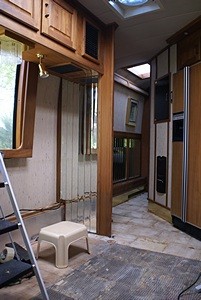
The interior of the bus deconstructed in preparation for a new floor, seating, and custom desk.

The interior of the bus deconstructed in preparation for a new floor, seating, and custom desk.

My next task was cleaning out and securing the area under the bed platform.  I removed the half box covers, the flexible ducts, and the floor-mounted cleats.  I threw the ducts away and stored the other pieces in the garage.  I then reattached the strip light on the top edge of the forward side of the base, reinstalled the two circular HVAC registers (so the cats could not try to get under the bed through the holes), put the cover plates back on the two duplex AC outlets and reinstalled the outlet expanders which also have dual USB charging ports.  I need to put some sort of temporary netting over the port holes in the section of the HVAC chase under the bed, but I need to find a suitable material for that.  The long term plan is to seal those holes and install registers in the sections of chase outside the bed base.  I thought about disconnecting the lift struts for the bed platform so I could raise it higher and reinstall a drawer onto its glides, but decided to leave that for another day.

While I was working in the bus Ryan from Best Pest Control called me back and said he had a crew that could fit us in within the hour so I said “sure.”  I closed up the house as they would be spraying around all of the windows, doors, and doorwalls.  Two guys showed up a little while later and I walked them through the job, wrote a check, signed the work order, and they got busy.  They found two hornet nests by the east end of our deck and destroyed them.  I hate to kill even a hornet but they have been buzzing around our windows and doors, poking at voids in the mortar on the face brick, and occasionally getting into the house and we need to put a stop to their use of our residence as a place to build their homes.

The pest control guys were already gone and Keith was driving away as Linda returned from the supermarket.  I helped get the groceries into the kitchen.  After they were put away we had a light lunch around 1 PM of fresh baby carrots, mini bell peppers, sourdough pretzel nibblers, hummus, and red grapes.

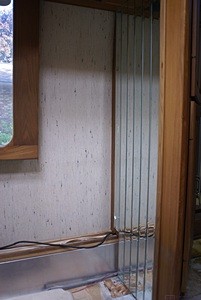
The dinette seat used to fit in this corner The strip mirrors have been removed from the outside wall next to the window.

The dinette seat used to fit in this corner The strip mirrors have been removed from the outside wall next to the window.

I have been taking a lot of short breaks while working on the bus.  It was warm and humid again today and warmer still in the coach even with windows open and the roof vent fans exhausting air.  But the breaks are not just to rest, they are also to ponder the details of how the interior will get rebuilt and what additional deconstruction still needs to take place.

In the front of the coach there was a 120 VAC electrical cable coming out of an access hole in the passenger side HVAC chase, passing through a 4″ flexible duct adapter, and disappearing through a hole in the floor.  I originally thought the cable came from the duplex outlet on the wall just above the access hole but I discovered that it did not.  It was routed through the chase from somewhere farther back in the bus.  I determined that that the hole in the floor appeared to go into the OTR HVAC bay and sure enough, when I opened the bay there was the cable coming through the ceiling.  It turned towards the center of the bus and then went through the wall into the bay to the front.  It was then easy to determine that it was the power feed for the electric heater mounted on the rear wall of the front bay.

The storage area under the end platform with the 4" flexible ducts and cover boxes removed.

The storage area under the end platform with the 4″ flexible ducts and cover boxes removed.

At that point I knew which circuit breaker to turn off and was able to cut the cable in the living room without risking an electrical shock.  I slipped the 4″ duct adapter off and set it aside.  We don’t generally use the electric heater in the front bay, and certainly do not need it this time of year, so I wire-nutted the ends of the hot and neutral wires, coiled them up, and stowed them in the HVAC chase for the time being.  I coiled the end of the wire coming out of the floor around one of the Aqua-Hot coolant hoses so it would not drop into the bay below.

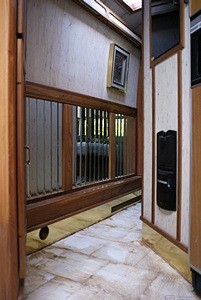
The area of the bus that was the outside rear corner of the dinette kept drawing my attention.  That corner was decorated with vertical strip mirrors with beveled edges.  There are also strip mirrors used as wainscoting on the lower portion of the outside wall of the hallway and at the end of the hallway opposite the bathroom door.  The strip mirrors are the one thing in this bus we have never liked but they did not bother us enough to not buy the coach.  Now that we are involved in a major interior remodeling, however, we are looking for ways to remove them or cover them up.  We really do not like them.

In the case of the former dinette mirrors, I had previously determined that the ones against the wall of the coach were mounted (glued) onto a sheet of plywood that appeared to be mounted to a pair of cleats along the two vertical edges.  I tried prying under the bottom of the first strip but it cracked and chipped.  It quickly became apparent that removing these strip mirrors from whatever they are glued to was probably not a viable option.

The beveled strip mirrors in the hallway of our bus.  We really do not like these things.

The beveled strip mirrors in the hallway of our bus. We really do not like these things.

[p4 R]  After removing a 1-1/4″ wide piece of thin trim wood I was able to loosen the left (forward) edge at the bottom.  The walnut trim around the fixed window just forward of the mirrors, however, prevented me from pulling it out any farther.  I had a reasonably good idea how the window trim was attached but first I had to remove another piece of 1-1/4″ thin trim that covered the gap between the window trim I needed to remove and the trim for the next window forward.  With Linda’s help I removed eight screws and the 3-sided window trim came right off.  We set it carefully aside and returned to the mirrors.

With the window trim removed we were able to pull the left (forward) edge of the plywood mirror backing out enough to see behind it.  Our lucky “break” (no pun intended but, whoops, there it is) was that the screws holding the plywood to the left cleat pulled out of the cleat.  I say lucky because the screw heads were under the glass mirror strips and none of the mirror strips broke.  We kept working it out until the upper edge bumped into the return air grill trim on the underside of the upper cabinet.  We removed the grill and set it aside.  We were then finally able to pull the left edge out far enough that I could remove a couple of screws that were holding the right cleat to the panel that forms one of the back walks of the pantry.  Something was still holding it and when I changed position I saw that there was another screw near the top.  I removed that screw and the whole panel came out with the right cleat still attached.  Three more screws and the left cleat was also out.  We reattached the return air grill to the underside of the upper cabinet and then reattached the window trim.

The wallpaper behind this panel was in very good shape except for the screw holes where the cleats were attached.  We plan to put shelves in this corner to utilize the space and they may get used for some ham radio equipment.  Regardless of what ends up there having the mirrors out gives us more room for the shelves and will just plain look better.

A view from the kitchen of the dinette corner and hallway.  A custom desk will go where the dinette seating used to be and double as work surface for the kitchen.

A view from the kitchen of the dinette corner and hallway. A custom desk will go where the dinette seating used to be and double as work surface for the kitchen.

The mirrors on the other wall of this corner are glued directly to the walnut panel that forms one of the backs of the pantry.  I tried loosening the bottom edge of the one in the corner and it cracked.  That area will be concealed by the desk, but we will cover all of the mirror strips with some sort of thin panel.  We have the same problem with the mirror strips across from the bathroom door and may just have to live with those as I have not come up with an attractive way to cover them.  I need to investigate the strip mirrors in the hallway.  There is a good chance that they are glued to plywood panels that are screwed to the wall at locations covered buy wood trim.  If we are lucky removing the trim will allow us to unscrew and remove the mirror panels.  If not, we will just put the trim back on.

I have had the idea for a while that we could make another low pantry or shallow storage area along the hallway wall above the HVAC chase where the strip mirrors are currently located.  Linda does not like the idea as she is concerned it will make the hallway to narrow.  The storage would not be any deeper than the HVAC chase is now, and would not be any higher than the wood trim along the top of the strip mirrors, which serve as a kind of wainscoting.

By this point it was 5:30 PM.  Linda headed inside to fix dinner while I got trash and materials out of the coach and carried them to the garage.  Linda let me know that a severe thunderstorm watch had been issued effective until 10 PM.  It rained lightly off and on until we sat down to eat and then the downpour came but we did not have anything severe, just heavy rain for a while.  She made a dish using garbanzo beans, garlic, kale, salt, pepper, and fresh lemon juice.  It was delicious and the fresh lemon juice really made it sparkle.  She also served the last of the risotto she made for dinner when Steve and Karen were here on Saturday.  We had strawberries with Lotus brand Biscoff cookies for dessert.  I worked on this post on my iPad, took a shower, and went to bed.  I never did make it to my office today.


2015/05/24 (N) Nuts to That

We had our usual coffee and breakfast granola but made a more leisurely morning of it than normal.  We finally got dressed around 11 AM and headed to the Howell Farmers Market at 11:20 where we bought another bar of soap from Marjorie.  I got to pick this time and chose the ginger-grapefruit.  We bought the Eucalyptus soap two weeks ago and Marjorie suggested letting them air dry for two weeks before using them.  We will see how long the Eucalyptus bar lasts once we start using it and that will tell us how often we need to purchase from her to stay ahead of our usage, allowing for drying time.

We stopped at Lowe’s to return the “white” toilet seat and buy a “biscuit” colored one.  We looked at pipe wrenches but did not buy one.  I did by a 14 TPI, 6″ long blade for my Sawz-All that said it would cut metal up to 1/2″ thick.  I still hoped to get the nut off of the trailer ball on the lawn tractor without having to cut the threaded stud, but the blade was my backup plan.

We had a brief confab regarding the motorcoach refrigerator alcove and cabinet.  I found my small plumber’s toolbox and it had several pipe wrenches inside.  I took the largest one and checked to see if/how it would fit the trailer ball on the lawn tractor.  It opened more than wide enough and looked like it would snug down tight around the throat of the ball (between the ball and the hex flange base).  Linda kept the pipe wrench from slipping out of position on the ball while I used the torque wrench with the 3/4″ drive, 1-1/8″ socket to remove the nut.  It was still a bit of work but we got the ball off without cutting, cracking, or heating.  I then backed the lawn tractor up to the utility trailer and Linda connected the trailer yoke to the tractor tow plate.

Next we tackled the hall bathroom toilet seat replacement.  Once again we encountered nuts that would not come off.  This time the nuts were a hard plastic but the bolts were rusted and the nuts would not turn.  I eventually cut through the two plastic nuts with a utility knife and pried them apart allowing us to remove the old retaining bolts.  We installed the new seat/lid which came with its own special bolt and elongated plastic nut.  The nuts had special tips designed for 1/2″ sockets and engineered to break off when tightened to just the right point.  We had both nuts torqued down and broken off but the seat was slightly crooked so I had to loosen then, reposition the seat, and re-tighten them by feel.  What should have been a simple, short job ended up being a long and difficult one, in part because there was not a lot of room on the sides of the toilet bowl to get under here and work.  As we were cleaning up Linda noticed that the toilet tank was leaning slightly to the right relative to the base/bowl and thought we should adjust it.

I was already aware of the leaning tank, and the fact that it was not as tight as it should be.  The tank is held to the bowl by two bolts that go through the bottom of the tank and are sealed by gaskets under the heads.  I tried tightening the wing nut on the left bolt.  Even though it was rusty I was able to turn it, but the tank immediately started leaking from the bolt hole in the bottom.  We shut off the water and flushed the toilet to get most of the water out of the tank.  Linda held the left bolt head with a long flat blade screwdriver while I turned the wing nut on the underside of the bowl, first by hand and then with pliers.  I was careful not to over torque it and the tank was still a bit wobbly, but it was straighter and it did not leak when we refilled it.  We will keep an eye on it.  A leaky tank will result in water continuously running onto the floor and causing major damage of not detected quickly and stopped.

Linda cleaned up the bathroom while I put the tools away.  We then changed the primary whole house water filter.  The filter we use is the same 10″ length as a standard potable filter element but is about 5″ in diameter and has two micron ratings.  It’s a spun polypropylene media that is 50 microns at the large outer surface and 5 microns at the small inner surface.  In principle it filters better and longer than a single micron rating element by filtering out larger particles first and thus not clogging up the 5 micron material with large particles.  The same thing would be accomplished, of course, with two filters in series, or three, or four, each with progressively smaller micron ratings.

The Post-It note by the filter said we had last changed it on 11 November 2013.  If that was true it was way overdue to be replaced.  The element was completely black from outside to in so it had been in there longer than the fall of 2014 for sure.  We are starting to get some slime in the toilet tanks again and the water seems to have a slight black tinge, but that may have been due to the filter element needing to be changed.  I may need to have Adams Water Treatment come out again to discuss installing an iron filtration system.  Our drinking/cooking water still goes through a reverse osmosis system, so it is very pure.

Having accomplished several rather physical tasks I decide to sit in the living room and work on my blog posts for the last few days.  Linda made hot tea for us to enjoy while iPading, after which she reheated the leftover risotto and asparagus from last night’s dinner and we finished the open bottle of 2013 Egri Merlot.  After dinner I finally settled in to work on computer-based tasks.  I had a long list of things to do but did not get to most them.  I did manage to off-load recent photos of the bus interior from my camera to my computer, select a few to use in blog posts, and processed them.  I edited a few more blog posts but did not get them uploaded to our website.  I then dealt with e-mails and went to bed.


2015/05/23 (S) Radio Cabinet Company

Today was “V. E.” testing day (volunteer examiner) so a half-dozen members of our amateur radio club were at breakfast even earlier than usual.  (Our club does not test volunteer examiners, we have members who volunteer to give amateur radio licensing exams to people who want to get or upgrade an amateur radio license.)   We were later than usual and ended up at the far end of a very long table arrangement, as there was a large turnout, but that gave us a chance to chat with a different group of people.

Mike Sharpe (W8XH) had a flyer he printed on his mother’s car, a 2005 Ford Taurus in excellent condition with only 21,000 miles.  He was asking $5,800 which is slightly below the suggested Blue Book value.  I texted our son to see if they might be interested in the car.  Linda and I both had Ford Taurus cars starting in 2000.  I had a beige station wagon with a beige interior and Linda had a red sedan with a gray interior.  Our children eventually ended up with these vehicles, Brendan with my car and Meghan with Linda’s.

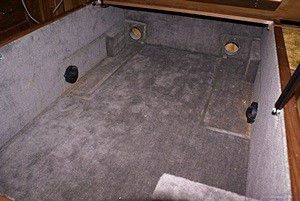
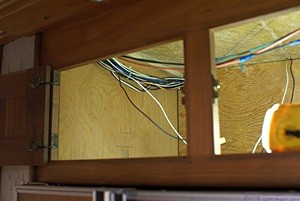
Back at the house Linda made a shopping list and headed to the grocery store while I changed into my work clothes and got to work in the bus.  My focus today was deconstructing the cabinet above the refrigerator.  I could tell from the dimensions that it was probably a box-within-a-box, but did not know how it was built.  I removed all of the carpeting from the inside surfaces, labeling the back of each piece in case I decided to reinstall them.  With the carpet out it became obvious that the floor, sidewalls, and back of the cabinet could be removed as I could see the screws and angle brackets that held them in place.

The cabinet above the refrigerator in our bus with the inside panels removed revealing lots of wiring.

The cabinet above the refrigerator in our bus with the inside panels removed revealing lots of wiring.

The floor was in two side-to-side pieces which were narrow, each sidewall was a single piece, and the back was in two pieces.  All of the pieces were sized to fit through the front openings in the face frame, a very clever design.  There were cleats supporting the floor and spacing the back and side walls out from the larger permanent structure of the refrigerator alcove.  The panels I removed served the dual purpose of getting the bottom and sides to line up with door openings and providing space to run wires while concealing them.  Things got trickier after that.

The walnut face frame was assembled with glue and pocket screws.  It had cleats along both rails and the two end stiles, all of which appeared to be glued and screwed to the face frame.  In addition, the piece of walnut veneered plywood that separated the refrigerator space from the cabinet above was glued and screwed to the underside of the lower rail cleat.  In other words, it was a solid and very professionally assembled cabinet.  The bottom board was attached to the two sides with angle brackets and it appeared that I might be able to remove the face frame and bottom board once the side and top cleats and brackets were unscrewed.  The top rail of the face frame, however, was tucked up behind some ceiling trim, preventing me from pulling the whole assembly straight out.  I loosened the trim and found that pulling it straight out was probably not my best option.  To get it out I would have to drop it straight down which will require the refrigerator to be out of the alcove.

The Aqua-Hot has been on with the thermostats set to 55 degrees F in case it got too cold.  It was cool today so I turned the engine preheat pump on to warm up the main engine.  When it was time for lunch I started the main engine and let it high idle while we ate.  After we were done with lunch I moved the coach backwards (to release the brakes if they were bound up) and then forward enough to put the tires at a different spot.  I set our electronic level on the centerline of the floor and then lowered the front and passenger side rear to level the coach.  When I walked around it actually felt level, which it rarely did when trying to level off of one of the floor tiles or the kitchen counter.

I quit working around 2:30 PM as Linda was getting ready to prep ingredients for the risotto she planned to make for dinner and got cleaned up.  I used to cook a lot but since we switched to a vegan diet Linda has done almost all of our cooking and, except for making coffee, tea, and popcorn, the kitchen has been her exclusive domain since she retired and we moved to the new house.  But I offered to help and she agreed to let me so I diced an onion and five cloves of garlic while she sliced mushrooms and other things.  By the time I was done I had about 40 minutes before Steve and Karen were due to arrive, so I updated my medical history for Root Canal Specialty Associates.  I have a follow up visit with them in Wednesday.

Steve and Karen arrived at 4 PM and we settled in to conversation and munchies (they brought a mixed fruit salad, pistachios, and mixed nuts).  We finished up the open bottle of Malvasia Bianca from Heart of the Desert Winery (Eagle Ranch) in Alamogordo, New Mexico.  After chatting for a while about our respective winters—ours in the Southwest and theirs near Venice, Florida—we gave them a quick tour of the inside of the bus.  It looks quite a bit different now compared to January 2014 when they spent a couple of nights in it at Williston Crossings RV Resort enroute to Venice, Florida.  It will look even more different (hopefully) once we are done with the remodeling.

Linda eventually had to attend to the final preparations for dinner.  Karen helped by stirring the mushroom risotto while Steve and I stayed out of their way chatting in the living room.  Linda roasted refresh asparagus and sliced a baguette to go with the risotto.  I opened a bottle of the 2013 Egri Merlot to go with dinner.  Steve does not drink alcoholic beverages or coffee and Karen prefers drier red wines, but she seemed to enjoy the Merlot all the same.

The weather had been beautiful all day and we sat on the rear deck after dinner enjoying our last sips of wine.  Once the sun dropped behind the trees it cooled off to the point where it was uncomfortable and we went back inside.  I turned on the natural gas fireplace logs but left a window open which seemed to strike the right balance of temperature and mood.  By 10:30 PM we had caught up on travels, families, and hobby interests.  They had a 45 minute drive to get home and usually leave around that time.  We had a long but very satisfying day and were quickly to bed once they were safely on their way home.