Tag Archives: pull-out pantry installation

2015/08/27 (R) In and Out

Linda was up at 5:45 AM and on her way to the bakery at 6:15.   I got up an hour later and also got an early start to my day; early is relative, after all.  After a bowl of granola I brewed some Cafe Europe / Columbian decaf coffee, turned on the gas fireplace, and continued reading Number Theory and its History.  A week ago Jim (N8KUE) e-mailed some questions to us regarding RVing and bus conversions.  I felt that too much time had passed without a response so I settled in at my computer to answer his questions as best I could.  I sent my reply at 9:30 and turned my attention to our bus project.

I got the pull-out pantry (mostly) installed yesterday.  Before we could place the refrigerator in the alcove, however, I needed to do four things:

  1. Install a piece of aluminum angle to prevent the fridge from sliding to the left;
  2. Secure the water line that went to the old refrigerator;
  3. Plug up openings in the cabinet with steel wool; and
  4. Install the 10th drawer slide on top of the pantry to reduce lateral movement at full extension.

I decided to tackle these tasks in that order, which meant a trip to Lowe’s to get the aluminum angle.  I chatted briefly with Mike (W8XH) on the drive and stopped at The Home Depot first but did not find what I wanted.  Lowe’s had a 3 foot length of 1/8″ thick 1.5″X1.5″ angle.  I wanted aluminum because it is light, easy for me to work, and won’t rust or need to be painted, but I wanted the 1/8″ thickness for strength.  While I was there I picked up another foam brush, a bottle of Mineral Spirits, and a package of #8-1.75″ stainless steel self-drilling exterior wood screws.

The road graders were out today in our part of the county and I passed the one working on Golf Club Road going to, and returning from, Lowe’s.  There was also one working on our road that I could not get around, so I followed it slowly until it reached our driveway and I could turn in.

Back home I cut the aluminum angle to a length of 26.5 inches, the same as the depth of the refrigerator base section and the top piece of plywood in the base of the alcove. I selected a drill bit that was just barely larger in diameter than the stainless steel screws.  Starting with the midpoint I drilled holes every three inches along the centerline of one side of the angle.  I then countersunk each hole, checking with a screw until the head was just slightly recessed.  A light back bore with the countersink bit removed any rough edges.

With the pantry pulled all the way out I placed the side of the angle with the holes on the 2nd piece of plywood in the alcove base with the other side of the angle against the edge of the 3rd piece of the base.  Since these pieces of plywood are all 3/4″ thick the vertical side of the angle extended above the plywood by 3/4 of an inch, more than enough to catch the left side of the refrigerator.  I held the angle tight against the edge of the 3rd piece of plywood, with the front edge back about 1/2″, and used the #8 VIX self-centering drill bit to drill a pilot hole in the back hole.  I then secured it with one of the stainless steel screws, penetrating both the 2nd and 1st layers of plywood and probably a heavy 1/8″ of the subfloor.  I held the front of the angle tight and secured the 2nd hole from the front in the same way, as I could not access the first hole due to the pantry.  I drilled all the remaining holes except the first and put in the screws.  I then pushed the pantry all the way in so I could access the front hole and secured it.  The angle was now held in place by nine strong screws fastened into a lot of wood.

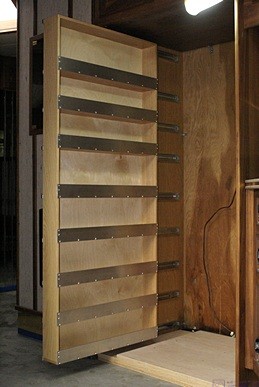
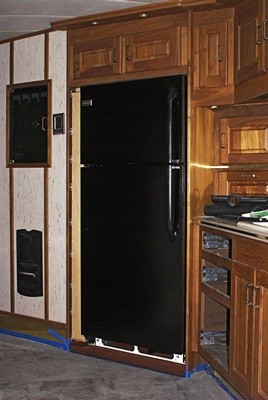
The pantry and refrigerator installed in the alcove.

The pantry and refrigerator installed in the alcove.

The old refrigerator had an ice maker and cold water dispenser in the freezer door so there is a flexible copper water line at the back of the alcove.  The line runs through an inaccessible area and into the cabinet under the kitchen sink so removing it would be difficult and impractical.  It was easier to secure the water line, and besides, we might want to use it again someday.  I found some used screws with broad #2 SR heads and used them to secure cable ties with mounting tabs to the back wall of the alcove.  I re-shaped the copper tube as best I could so it would lie relatively flat against the back of the alcove and used the cable ties to hold it in place.

I noticed when I moved the tube that a little water came out of the end.  That struck me as odd as I had it in my head that the line was out of service.  After a little investigation I remembered that the shutoff valve for this line was still attached to the water inlet tube on the back of the old refrigerator.  If we had pressurized the fresh water system this would have been an open line.  Yikes!

I now had another, unexpected, task that had to be done before I could do anything else.  I gathered up a few tools, parts, and materials, got my head and arms into the under sink cabinet (which is never comfortable), shut off the supply line valves (just to be safe), and disconnected the copper tube to the refrigerator alcove.  I wrapped the threads of the open end of the T-fitting with several turns of Teflon tape, threaded a cap into the fitting, and snugged it up tight.  I did not, however, pressure test it as I did not want to take the time and I did not want to pressurize the fresh water system with the toilet disconnected.

With the water line secured I got one of the old packages of steel wool and used it to stuff the openings in the lower rear corners of the alcove where lots of wires, the water line, and two air lines pass in and out.  I meant to use the #1 steel wool but grabbed the 4/0 by mistake.  It will work just as well but the 4/0 is what Linda is using to clean all of the walnut woodwork, so it was a bit of a waste.

The pull-out pantry is very stable vertically and horizontally except when it is all the way out where it can move side-to-side about 1/2″.  I decided to install the last of the 10 slides on the flat between the top of the pantry box and the ceiling of the alcove, which is also the base of the upper cabinet.  The ceiling of the alcove is not parallel to the floor and so it was not parallel to the top of the pantry box.  I was able to slide a piece of 3/4″ oak veneered plywood between the ceiling and the upper edge of the top slide. With the 10th slide on top of the pantry I had about a 1/8″ gap between the slide and the plywood at the front, opening to about a 1/4″ gap at the rear.

My first attempt at a solution was to try cutting blocks from the end of a 2×4 to be just the right thickness for the front, middle, and rear.  That quickly proved to not be a workable solution without some form of stationary saw.  After further pondering I decided to cut a 4.5″ wide piece of the oak veneered plywood from one of the leftover pieces that happened to be 26.5″ long.

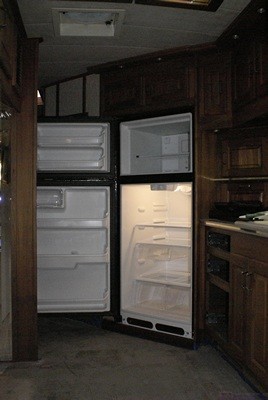
The new refrigerator in the alcove with the doors open.

The new refrigerator in the alcove with the doors open.

I set the piece of plywood in place on top of the two slides, one mounted to the alcove side panel and the other resting on top of the pantry box, and shimmed it with wood shims between the plywood and the ceiling to remove the gap between the plywood and the slide without making it tight.  I pulled the pantry out slightly so I could drill and screw the rear hole of the stationary part of the slide.  I then pulled the pantry all the way out, pushed the center section of the slide part way back in, and secured the front hole of the moveable part of the slide to the top of the pantry.  I used a slot that allowed side-to-side adjustment, just in case.  I also secured the center slot on the moveable slide to the top of the pantry box.

I fiddled with the slide until it went in and out smoothly.  It is tight enough that I don’t think it will come open when driving, but it pulls out easily enough and will be easier once we get a handle on it.  Linda called at 4 PM as I was finishing this task to let me know she was on her way home from the bakery.  It would be 60 to 90 minutes before she got home so I moved on to the next task.

The first piece of underlayment to go in will be a full 4’x8′ sheet minus a notch for the middle air-conditioner drain line and part of one short side that has to fit around the built-in pantry.  I measured for those cuts and then laid the sheet out in the driveway on top of 2x4s (on the flat).  I tried plunge cutting most of the 21″ long by 1″ wide strip off the end with my circular saw without using a guide and finished the cut with my saber saw.  My plunge cut wasn’t very good so I trimmed it with the saber saw.  That edge will go under the mirror tiles against the back of the built-in pantry so it will be OK.

Linda got home around 5:30 PM.  After unloading her car and changing clothes she examined my work for the day and was pleased with the way the pull-out pantry worked.  She helped me carry the 4’x8′ sheet of underlayment into the bus at which point I decided that we needed to get the refrigerator into the alcove before doing anything else.

We set the underlayment aside and uncovered the fridge which we had previously wrapped in painter’s plastic to keep it clean while grinding and sanding.  Linda cleaned off packing tape adhesive with Goo Gone, wiped it off with a wet rag, and then I wiped it off with a dry towel.  We rolled it over to the alcove, shut off the circuit breaker, plugged it in, and secured the cord to the back.  It rolls very easily but to get it into the alcove we had to tilt it forward to get the bottom back edge of the unit onto the 2.25″ high plywood base.  Oops; the left edge of the fridge space overlapped the built-in pantry opposite and prevented the unit from tilting enough to get the back edge up high enough.

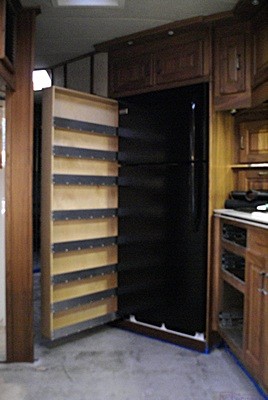
The pantry pulled out with the refrigerator installed.

The pantry pulled out with the refrigerator installed.

We have learned not to panic, and after a moment’s thought we turned it slightly to the right, got the right rear bottom corner up onto the plywood and slid it into the alcove a couple inches.  We were then able to turn it to the left and get the left rear bottom corner onto the plywood base, making sure it was inside the aluminum angle.  Fortunately we had enough clearance above the unit to do that.  (If not we would have used the leftover 3/4″ plywood in front of the alcove, gotten the fridge onto those pieces, and then rolled it straight into its space.).   We lifted the front bottom of the unit and rolled it back into its cubby.  It was a perfect fit; snug to the aluminum angle on the left, tight to the right side of the alcove at the rear with a small (3/16″) gap at the right front, and far enough into the alcove that we can open the three drawers to the left of the sink.  High five!  Good job team.

I turned on the breaker to make sure the refrigerator still worked.  It did, and we were both pleased with how much quieter it is than the old one.  We did not need it running at the moment, however, so I turned the breaker off.  Linda got a towel and propped the doors open.

We got the underlayment flat on the floor and slid it into position.  It needed to be trimmed in three spots and I did not want to get into that at this hour so Linda started preparing diner while I put tools and materials away, locked the bus, and closed up the garage/shop.  I plugged in the old refrigerator (in the garage) to let it cool down overnight as DTE Energy’s recycling program is picking it up tomorrow between 8 AM and noon.

Dinner was mock riblets in BBQ sauce, green beans with onions and carrots, and fresh peaches, all very tasty.  After dinner I worked at my desk.  I replied to several e-mails from Gary at Bus Conversion Magazine, and looked at my Habitat For Humanity article to see if I could split it into two or three parts.  It looked like that was possible so I let Gary know.  I chatted briefly with Steve (N8AR) on the Novi 440 repeater and with Jim (N8KUE) on the South Lyon 2m repeater.  I processed three photos of the finished pantry/fridge installation showing that everything goes in and out and e-mailed it to a dozen people.

I came to bed just before 10 PM.  We watched TV for a while until Linda drifted off to sleep.  I stayed up a bit longer to finish this post.
 

2015/08/26 (W) Delux Delay

We were a bit sore last night, and needed a good night’s sleep, so we both took some Advil PM right before going to bed.  As a result we did not wake up until almost 8 AM this morning.  The Advil, combined with the very cool temperatures, made for good sleeping.

Our son had called yesterday to see if Linda could watch Madeline today while he did some work on the rental property that he and Shawna own.  It was Shawna’s house before they got married, and is a nice little place, but with Madeline on the way they wanted a slightly larger place.  They also wanted to be on the other side of Stadium Boulevard in the attendance area for Burns Park Elementary School and walking distance to both the school and adjacent Burns Park without having to cross any major streets.

Ann Arbor is a major rental housing market because of the University of Michigan and the local government is very involved in this market.  Rental properties must be inspected at least every 30 months and meet code requirements.  The rental house was scheduled for inspection on Friday and needed some minor repairs, so Brendan set aside today to take care of things.  What I find interesting about this inspection requirement is that most of the rental houses our son and daughter lived in while at U of M looked to me like they had not been inspected in over a decade.

Linda was due at Brendan and Shawna’s house around 10:30 AM so she left our house at 9:15.  She took the three books of wallpaper samples with her and went directly to Delux Drapery and Shades in Ann Arbor to return them and placed the order for four bolts (double roll packs) of Sellers and Josephson Just Textures Lamar paper.  Not long after she left Delux I got a call at home from the store.  They were looking for Linda to let her know the wallpaper was back ordered until September 11.  (I’m not the least bit superstitious but September 11.  Really.)  To cancel the order we would have to let them know today but I told them to let it ride.  I then texted Linda to let her know and she agreed with my decision.

I had a feeling this might happen and it’s what we get for waiting so long to look for, select, and finally order a wall covering.  But it is what it is and we were not going to settle for something that wasn’t “right” for our interior just because it was available more quickly.  If the paper actually comes in on the 11th we will have the 12th and 13th to at least install it in a few critical areas before the new seating goes in.  If it doesn’t arrive by then we will deal with it when it does.  Either way the only big issue is that we wanted to paper the wall behind where the desk will go before the desk is installed.  As things stand we will either uninstall/reinstall the desk or paper around it.

The pantry supported by plywood and 2x4s.

The pantry supported by plywood and 2x4s.

There were several small tasks that I could have worked today but the thing that needed to be done was the installation of the pull-out pantry, so that is what I did.  The pantry was already in the coach, which was a good start.  I got two of the small leftover pieces of 3/4″ oak veneered plywood and set them in front of the alcove base.  I then set a 5′ length of 2×4 on the flat in the space where the pantry goes and extending out beyond the alcove by more than the depth of the pantry.  I then set the pantry on the 2×4, pushed it snug to the side of the alcove, and slid it towards the back of the alcove until the front was approximately one inch behind the vertical front edge of the left side panel.

There were two main reasons for using the 2×4.  First, the lowest slide attached to the pantry box extends below the box so the bottom of the box needed to sit on something that was thicker than the amount by which the slide hung down.  Second, a 2×4 on the flat is 1.5″ thick and that turned out to be a good thickness for positioning the pantry vertically in the alcove.

The reveal between the front of the pantry and the front edge of the alcove side panel was wider at the top than the bottom so I placed two wood shims side-by-side under the back end of the 2×4 to raise it slightly and tilt the top of the front out.  I fussed with this for quite a while and each time I adjusted the shims I had to pick the pantry up, set it aside, and put it back.  I eventually got the reveal to be the same along the entire length (height) of the front.

Once I knew where I wanted the pantry to be when it was closed I had to figure out how to mount the slides to the side panel of the alcove.  I pondered this for quite a while.  If nothing else, I have learned that when it is not clear how to proceed the best course of action is to do nothing.  I have also learned that if I ponder long enough I will eventually see a way forward.  Sometimes that takes days or weeks of conscious and subconscious thinking, but luckily the solution came to me relatively quickly.

The pantry box is 27″ deep.  The full extension slides are 26″ deep and they are mounted so they are flush with the front of the pantry box when they are fully closed.  I wanted a 1″ reveal along the front, so I needed to place the back edge of the slides 27″ back from the front edge of the alcove side panel.  With the pantry box out of the alcove I used a metal ruler to measure back at three points and make very fine scratch marks.  I then used the metal ruler to draw a fine pencil line through the three scratch marks.

I returned the pantry to the alcove, pushed it tight to the alcove side panel, and then pulled it out about three inches.  Measuring on the back side outside the alcove I made final adjustments to the shims to get a consistent reveal.  I then pulled each of the nine slides back, carefully aligned the back edge of the slide to the reference line, drilled a hole with a self-centering VIX bit, and secured it with a #6-3/4″ SR (square recessed) screw.  (I was not able to initially secure the bottom slide as the 2×4 was in the way.)  I pulled the pantry out a little farther until the next mounting hole in the top slide was visible and then drilled that hole on all eight slides and secured it with a screw.  I proceeded in this way until all but the bottom slide were attached to the alcove side panel through every available mounting hole; 88 screws in all (11 screws for each slide x 8 slides).

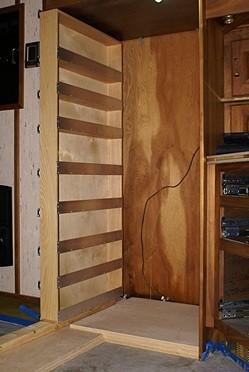
The pantry with the installation boards removed from underneath it.

The pantry with the installation boards removed from underneath it.

To secure the bottom slide I needed to get the 2×4 out from under the pantry.  I slid the pantry all the way in, slid the two pieces of 3/4″ plywood out from under the 2×4, and tried to slide the 2×4 out.  Unfortunately I used a 2×4 that was too long to just slide out as part of the original pantry cabinet is directly across from the pull-out pantry.  So I got my circular saw and cut about 4″ off the end of the 2×4.  Close, but not quite, so I cut off another 2″ and was finally able to slide it out.

With the pantry all the way out I was able to drill and secure the mounting holes for the back half of the bottom slide.  The holes for the front half were a bit tedious as I had to move the box to reveal each one.  To avoid going back and forth between the drill and the screw driver bit I drilled all of the holes first and then put in the screws.  I should also mention that I used the Shop Vac to vacuum up any debris that got in the slides as a result of the drilling.  I also wiped the slides out (carefully, they have sharp edges) with a paper towel.

The pantry slides all the way in and out but is a little tight the closer it gets to being fully closed.  I know that Jarel was very meticulous in attaching the slides to the pantry box so they were all parallel.  My working hypothesis is that either I did not get them attached to the alcove exactly parallel (entirely likely) and/or there is more drag on them because of the one-sided installation (probably, but no way for me to quantify) than there would be if they were installed on both sides of a drawer.

All of the slides are on the same side, which is not how they are normally used.  A pair of these slides is rated to support 100 pounds when used on both sides of a drawer, so four and a half pairs would, conservatively, support 400 to 450 pounds in a normal application.  Even if they will only support 1/3 that much weight in a single-sided application that is still 133 to 150 pounds for our nine slides.  I think the box weighs about 30 pounds so that leaves at least 100 pounds for stored items and I doubt that we could get 100 pounds of stuff in the pantry even if we loaded it with canned goods.  Because the pantry is narrow and tall with lots of slides I suspect most of the load on the slides is vertical, which is what they are designed for, rather than sideways, which would tend to pull them apart, so I suspect that it can safely carry considerably more than 100 pounds of staples.

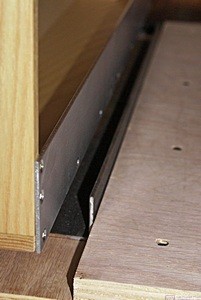
The piece of aluminum angle that will prevent the refrigerator from sliding sideways into the pantry.  It is not installed yet as the plywood refrigerator base is not stained yet.

The piece of aluminum angle that will prevent the refrigerator from sliding sideways into the pantry. It is not installed yet as the plywood refrigerator base is not stained yet.

I had just finished installing the pantry and was cleaning up my tools and materials when Linda got home around 3 PM.  I had skipped lunch and she had a PB&J sandwich while she was out so we agreed to have dinner at 5:30 PM.  Linda picked up where she left off yesterday cleaning and waxing the drawer fronts and the woodwork in the bedroom.  I decided that the oak veneered plywood base in the alcove needed to be painted or stained and then sealed so I went to Lowe’s and got a small can of Rustoleum American Walnut stain, a small can of Rustoleum satin finish polyurethane, and two foam brushes.

I brushed the stain on liberally, working in sections, let it sit for two minutes per the instructions, and then wiped it off with a lint-free cloth.  The stain required mineral spirits for cleanup so I threw the brush and cloth away.  The instructions said to wait one hour before applying a finish.  It was 5 O’clock by then so I went to my office to check e-mail while Linda prepared dinner.

She made a nice salad and grilled a couple of vegan burgers and added some vegan cheese.  Mustard, ketchup, pickles, onions, and lettuce on a nice bun made for a tasty sandwich.  Two deer, a doe and her young fawn, came to our deer block while we were eating and a ruby-throated hummingbird stopped at our plants and feeders.  For dessert we had half of a small, very sweet watermelon.

By the time we were done with dinner it was 6:30 PM so I went back out to the bus and applied the polyurethane.  The directions said to apply it sparingly so that is what I tried to do.  They also said that it could take 48 hours to be usably dry and seven days for a full cure.  Drying time was dependent, however, on temperature and humidity, with higher temps and lower relative humidity promoting quicker drying.

I had run the Aqua-Hot earlier in the day and determined that there was still a little too much coolant in the system as the expansion reservoir overflowed into my catch bottle.  I closed the three windows that were open, leaving them just slightly ajar, turned on the Aqua-Hot, turned on all three thermostats, and set them for about 72 degrees Fahrenheit.  I will not be applying a second coat of polyurethane and cannot spare 48 hours for this one to dry.

I had thought that we might get the first sheet of underlayment installed this evening but decided we had done enough for one day.  It will be the only full 4’x8′ sheet we install but it needs a notch cut out of it before it goes in.  I thought it would require several cuts but then realized I had some floor leveling compound that I had not removed.  I got my chisel and mini-sledgehammer and knocked off the big chunks.  I then used the oscillating sander with 50 grit sandpaper to smooth everything out.  It was 7:45 PM and I was done working on the bus for today.

I went to my office and spent a couple of hours dealing with e-mails.  Linda was still up when I turned in at 10 PM but drifted off to sleep as I finished up this post.  She has to go to the bakery tomorrow which means she will be up very early.