Tag Archives: Once-n-Done (Armstrong)

2015/11/17 (T) Drivable Again

Linda set her iPad alarm for 5:45 AM.  I heard it go off and got up shortly thereafter even though I did not turn out my light last night until 12:30 AM.  She got up at 6 AM and was showered, dressed, and out the door by 6:20.

I tuned in Weather Nation on WILX TV out of Lansing while I folded the clean laundry.  Of all the stations we can pick up this is the only one with a dedicated weather sub-channel.  The current forecast was for two more days with high temperatures near 60 degrees F but high humidity and rain as moisture races north from the Gulf in advance of a cold front.  By the weekend we are looking at highs at or barely above freezing and lows in the low 20’s.  The 10-day forecast has us back in the 40’s by Tuesday so we should not have any weather difficulties for Thanksgiving and the following day when we head south.

We planned to re-install the two front seats in the bus late this afternoon and I plan to take it on a fueling run tomorrow so I can run the Aqua-Hot diesel-fired hydronic heating system instead of running electric heaters.  I will also drain and refill the fresh water tank, but those are tomorrow’s tasks.  I had other things to do today, starting with the laundry.

I needed to wait until late morning to do the final cleaning of the tile in the cockpit and had several things to do that had to wait for the cleaning to be done first.  To make good use of my time I decided to measure, cut, drill, and paint the 1/2″x3/4″ aluminum angle that will serve as a retaining bracket for the refrigerator.  I will install it tomorrow after the front seats are re-installed and out of the way.

With that done I got the 3/4″ piece of walnut that Jarel cut and shaped for me to cover the front edges of the plywood under the refrigerator.  The piece sticks up a little above the top of the top layer of plywood so I wanted to install it in a way that will allow it to be easily removed.  That precluded the use of nails, even small ones.  I did not want the appearance of screw heads and wasn’t interested in drilling deep countersunk holes and using plugs.  (The woodwork in the bus was essentially assembled this way and most of the plugs have come out.  We will probably put them all back in once we are done reconditioning the wood even though I would rather not.)  That left Velcro as the only reasonable option, so I started a shopping list.

My next mini-project was to attach the 1/4″ walnut veneer plywood to the face of the pull-out pantry.  Jarel had ripped two pieces to the proper width for me but neither one was quite long enough to fully cover the front of the pull-out pantry.  Step 1 was figuring out where to have the two pieces meet and then determine how long each piece needed to be.  The next problem to solve was how to attach them.  I decided to use glue, clamp the walnut panels to the front of the pantry, and then secure them using screws from behind.  I looked for my large wood clamps but could not find them so I added face clamps to my shopping list.

The front structure of the pantry is 1/2″ thick ash and I planned to drill countersunk holes from the inside so the screw heads would be flush.  That meant I needed #6 5/8″ screws, which I did not have, as 3/4″ screws would probably puncture the veneer.  I added the screws to my shopping list.  I selected a small drill bit and drilled holes from the inside just below the top board and just below each shelf plus one just above the bottom shelf.  Because of the metal side plates these locations were easier to reach on the inside.  I then switched to my countersink bit and drilled the holes out from the inside.

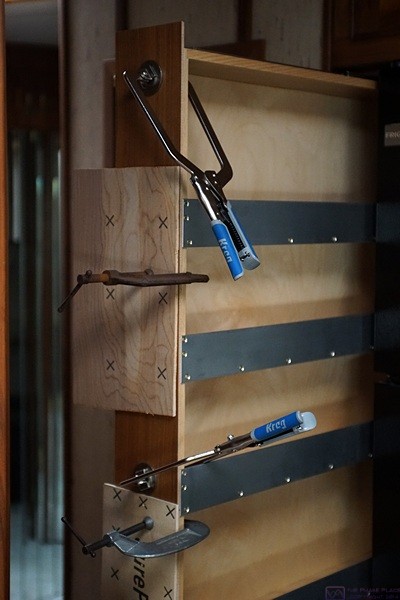
Back in the garage I sprayed a second coat of black paint on the aluminum angles for the refrigerator retaining bracket, moved a load of laundry to the dryer and put another load in the washer, and then took my shopping list and went to Lowe’s.  Lowe’s had a very clever Automax self-adjusting face clamp with a 6″ reach.  It was a little pricier than the 3″ version which was a little pricier than the 3″ manual adjust version, but the size and auto adjustment feature swayed my decision.

On the drive back to house I had a nice QSO with Steve (N8AR) on the South Lyon 2m repeater.  When I got home I had some wasabi/soy almonds and sourdough pretzel nibblers with hummus for lunch.

Returning to the bus work I cleaned the tile in the cockpit using Armstrong Once ‘n Done and rinsed it with a clean sponge and warm water.  I then returned to working on attaching the walnut veneered plywood to the face of the pantry.  I decided which piece to use for the longer bottom section and which portion of the other piece to use for the top section.  In the shop I clamped each piece in turn to a 2×4, set the Boca saw guide, and trimmed them to length.

The 1/4" walnut veneered plywood clamped to the front of the pull-out pantry.

The 1/4″ walnut veneered plywood clamped to the front of the pull-out pantry.

Back in the bus I applied the bottom piece first.  It was slightly curled, lengthwise, so after applying Titebond II glue to the back I positioned it using the two Automax face clamps and then used C-clamps with scrap pieces of underlayment to hold it flat while protecting the veneer.  I then installed #6 5/8″ SR screws from the back to secure the face plywood.  I installed the upper panel using the same procedure.

We are using the same handle for the pantry that we have used throughout the bus.  Jarel made a 4-1/2″ by 8″ piece of 3/4″ walnut with coved edges to serve as a decorative base for the handle and to cover the joint between the upper and lower pieces of veneered plywood.  I marked the vertical centerline on the back and then marked two holes on 3″ centers, centered vertically.  I selected a 1/8″ drill bit, which was slightly larger in diameter than the #8-32 machine screws used to secure the handle, and drilled the holes from the back side using a block of 2×4 as a drill guide to make sure I went straight through the board.  (A drill press would obviously have been the correct way to drill these holes, and I have one, but it is buried behind other things where I cannot get to it.)

I clamped the decorative base to the front of the pantry centered horizontally and vertically on the joint between the two veneered panels.  Using the handle mounting holes I drilled all the way through the front of the pantry.  I bought special handle mounting screws the other night that are 2″ long but can be broken off at 1/4″ intervals.  I needed a 1-3/4″ length, so I inserted the screws through the holes from the back and broke off the first section with a pair of pliers.  I screwed them into the handle, temporarily securing the block.  I then drilled four countersunk holes from the inside of the pantry into the back of the decorative block and secured it with 1-1/4″ self-drilling screws.  I left all of the other clamps in place while the glue dried.

The only thing I did not get done on the pull-out pantry was attaching the door stop to the bottom of the face.  I will take care of that tomorrow.

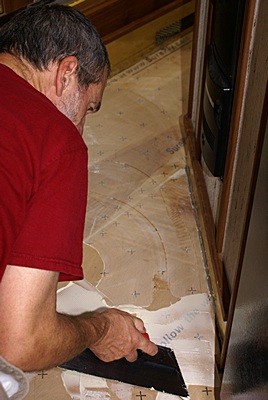
Linda called at 3:30 PM to let me know she was on her way home.  I started working on remounting the accelerator pedal.  I got the pieces of old tile that were installed in that area and used them as templates to mark the location of the mounting holes.

Yesterday I discovered a grease fitting on the steering column.  It is located towards the center front of the bus about 8″ up from the floor.  Joe has never put grease in this fitting when he has serviced the chassis and for all I know it may not have been greased since it left the factory.  I wanted to get some grease into this fitting before I remounted the steering column shroud but I did not have a grease gun so I put that on my next shopping list.

Linda got home a little quicker than usual due to lighter than normal traffic.  After changing into her work clothes and grabbing some pretzels for a snack she came out to the bus to help.  I set the accelerator pedal upside down on top of the brake pedal to get it out of the way and drilled holes at the three points I had marked.  Linda handled the vacuum cleaner as we are trying to keep the coach clean.  I set the accelerator pedal where it belonged and started the three lag screws by hand.  Linda then held the pedal up while I tightened the three screws with a socket and ratchet.  I also drilled a small hole for a screw to secure the cable clamp on the accelerator wiring harness and installed that by hand as there was no room for the Rigid drill/driver.

I did not want to install the steering column shroud until I had greased the fitting but I went ahead and installed the base bracket.  Again using an old tile as a template I lightly marked two of the five holes.  I removed the old tile, set the bracket in place, and lined it up with the two marks.  I then marked the other three holes.  I selected a suitable drill bit, smaller than the diameter of the screws, and drilled through the tile and a little ways into the plywood below.  The screws were 5/8″ pan head Philips so I installed them by hand.

It was finally time to install the two front seats.  We got the base/pedestals from the library and checked to make sure the paint was dry.  It was, so we moved them to the bus.  I was going to install the driver’s seat first but the 3/4″ holes I had drilled in the tile when I installed it were not big enough.  Actually, they were exactly the right size if they had been in exactly the right place.  I needed to enlarge them to 1″ but did not have a 1″ drill bit.  I added that to my shopping list and we proceeded to install the passenger seat.

I set the base over the four captive mounting bolts and put a large/thick washer over each one followed by a substantial lock washer and finally a nut.  I ran the nuts down by hand as far as I could and then used a socket and ratchet to snug them down.

By now it was half past dark.  We needed dinner and stuff for the bus so we headed to Lowe’s where I bought a 1″ twist drill with a 1/2″ shank.  We then went to the new Panera, on the same property as Lowe’s and Walmart, for dinner.  This Panera had a different look and feel than the older ones, which a much smaller bakery section, but the food and coffee were the same and were good.  After dinner I drove across the street to O’Reilly’s Auto Parts and bought a grease gun.

On the drive home I decided to defer greasing the steering column until tomorrow. Our priority was getting the driver’s seat installed.  I used the 1″ twist drill bit in our 1/2″ Craftsman drill to enlarge the four holes.  The base/pedestal has 1″ long alignment tubes on the underside so the holes in the tile and underlying plywood had to be big enough to allow for less than perfect positioning.  With the holes enlarged I dropped the base in place, set a large washer over each hole, and threaded the new bolts into holes in the structure of the bus.  That was the end of the bus work for today.  We retired to the basement recreation room and watched NCIS and NCISNOLA before going to bed.
 

2015/09/09 (W) Move In Day

We had a slow start to our morning.  I was up at 7:30 AM, finished loading the dishwasher, and made a cup of organic English Breakfast tea.  I fed the cats and then settled in to continue reading Oystein Ore’s Number Theory and Its History.  Jasper wanted attention and sat on my lap until Linda got up at 8:30 AM.  I made a cup of tea for her and brewed a second cup for me.

Linda developed a sore throat yesterday and did not feel like working last night so we deferred final cleanup of the grout on the new floor tiles in the bus until this morning.  She was obviously still not feeling well and was tired from not having slept well last night but she was willing to help with cleaning the grout reside off of the new tiles.  Before jumping into that task, however, we stripped the bed so I could launder the sheets and pillow cases.  We needed a mop for the floor cleaning so Linda went to Meijer’s and got one and picked up some blue Scotch Brite sponge pads.  While she was gone I went to the garage, smoothed the top surface of the return air shelf for the built-in sofa with 4/0 steel wool, and applied a second coat of polyurethane.  I had just enough to finish it.  I then started preparing for the tile cleaning.

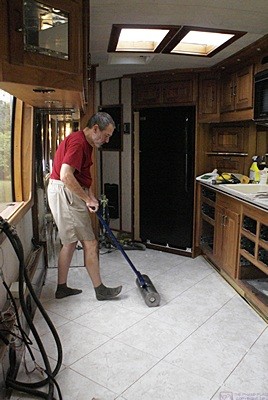
I filled two 5-gallon pails half full of warm water and added 1-1/2 capfuls of Armstrong Once & Done concentrate.  The other pail was clean water for rinsing.  Cleaning the grout residue off of the tiles in the bus involved lightly scrubbing along and across the grout lines as well as the center of each tile.  I then went over the area with the square edged sponge side of the pad.  I went on to the next set of tiles while Linda trailed along behind mopping the area.  It took us a couple of hours to do the entire floor.

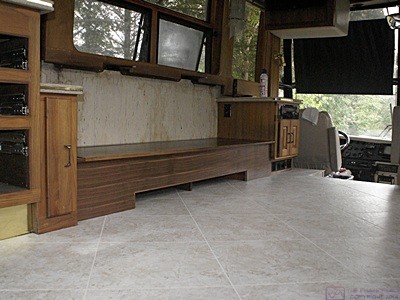
Part of the kitchen and living room floor after being cleaned as viewed from the hallway looking towards the built-in sofa.

Part of the kitchen and living room floor after being cleaned as viewed from the hallway looking towards the built-in sofa.

We moved all eight pieces of the built-in sofa into the bus and set them in place.  They all fit nicely and I was especially pleased that the vertical front panel, which is walnut veneered plywood, would not have to be trimmed.

We needed to strip the wallpaper behind the sofa but could do that later.  We also needed to strip the wallpaper behind the desk and really needed to do that before installing the desk.  Ideally we would have the new wallpaper installed too but we do not have it in our possession yet.  Linda also wants/needs to get back to work on cleaning/waxing the woodwork as we wanted that done before we put the drawers back in the cabinets.  She was very tired by this point, however, and took a much needed nap.

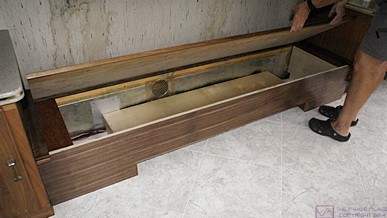
The built-in sofa with the plywood seat raised to reveal the plenum/support boxes on both ends and the center shelf that forms the air return duct for the OTR HVAC.  The empty space will be used for storage.

The built-in sofa with the plywood seat raised to reveal the plenum/support boxes on both ends and the center shelf that forms the air return duct for the OTR HVAC. The empty space will be used for storage.

I had some electrical things to take care of before we could assembly and secure the desk so I worked on those.  There was a 120V AC duplex outlet in a metal box on the wall where the left desk pedestal will go.  There was also a flexible plastic split loom conduit with 11 wires in it that ran from the panel next to the passenger seat to the four switches in the triangular panel and to the first of two door chimes.  This conduit was originally on the floor behind the furniture where it could not be seen but was now very visible and something needed to be done with it.  I started with the AC outlet.

I shut off the power to the AC outlet, tested it to make sure it was off, unwired the receptacle, unscrewed the box from the wall, and got the wires out of it.  I reenergized the circuit and verified which wire pair was the line (source, supply) and which was the load (power was fed from this box to another outlet by the passenger seat).  I was thinking about where to relocate the box so I would have power available under the center of the desk when I realized I had not made any provision in the design of the desk for getting power to that location.  I sat and thought about that for a while but an obvious solution did not present itself so I worked on the other wiring.

I made a diagram of the connections to the four switches so I could remove the wires and be able to put them back in the right place if needed.  All of the connections were spade lugs, male on the switch and female on the wire ends, so they were easy to remove.  The two switches with the most wiring originally controlled a motorized drawer and a motorized table.  The two DC power supply wires also had spade lugs as did the cabling from the switches to the motor connectors so I was able to remove all of that wiring and set it aside after labeling it to match my diagram.

The two wires from the doorbell switch also ran through the flexible plastic conduit to the first door chime.  Another pair of wires was spliced into the first pair and ran back to the bedroom where a second door chime was installed at the junction of the HVAC duct and dresser cabinet.  I cut all the wires at the splice, labeled the pair from the switch, and wrapped the end of each wire.  I wrapped the wires for the front chime around the box.  I then determined that I could pull the wires for the bedroom chime from the bedroom end, after disconnecting them from the chime, and remove them along with the chime box.  I coiled and taped the wires and set them aside with the box.

I now had all of the extra wires out of the way but still did not have a good solution to my electrical issues.  Two of the four switches were still functional, so the switches needed to be installed somewhere, but it was not obvious to me where they could/should go or how to mount them.  I also had two AC cables to relocate.  I decided to go inside and work at my desk.

When Linda got up she wasn’t feeling any better but she was at least somewhat rested.  We had simple, easy, but tasty meal of vegan riblets and corn-on-the-cob for dinner.  I was anxious to see how the desk was going to fit so we moved the nine pieces from the library into the bus.  It was getting near sunset by this time and we had a few moments of spectacular color before the world turned to gray and faded into night.

I folded the two AC cables down so they would be out of the way temporarily (they were still de-energized).  We set the two bases in approximately the right locations and put the two pedestal boxes on top of them.  I need to install a panel to cover the vertical mirror tiles before permanently installing the desk so I left an appropriate space for now.  I need to make a decision about the panel, however, so I can give Jarel the final dimensions for the HVAC duct / wiring chase cover.  With everything snugged up we put the drawers back in the right pedestal and sat on the sofa contemplating the new look and functionality of our bus.

I was also contemplating how I might “force” the pieces into alignment.  My first thought is to use metal or wood plates attached to the back/underside of the two pedestals to position the knee space connector piece.  I will probably also put a piece of 1×1 or a metal angle bracket on the wall to hold the back edge of the connector shelf as it will have a heavy UPS on it along with a NAS.

The installation of the new custom walnut desk may be temporary in that I may not be able to get the fan-coil heat exchangers for the Aqua-Hot hydronic heating system installed until after the upcoming GLCC rally.  I need to attach some sort of screen material to the back of the air inlet and outlet openings.  I also need to install new pieces of heater hose of the correct length and rig up some things to help get the hoses around tight corners.  This, however, will require draining and then opening some of the coolant lines.

Linda was surprised both by how big the desk is but also by how much extra room she will have in the kitchen.  I think that speaks to the inefficiency/inappropriateness of what was there before.  We were discussing the problem of getting AC electrical power to the wall area between the pedestals when the solution presented itself.  There is space at the inside rear of the right pedestal box so I can bring AC wiring from the chase through the bottom of the box, up the inside the left rear corner, and out through a hole just below the counter top and wire it to an outlet strip.  It will be completely invisible unless you get down on the floor and look up in the knee space of the desk.  It will also be conveniently located just below the notch in the center back of the countertop where power and data cables will drop through.

Linda went off to bed a little earlier than normal as she has to go to the bakery tomorrow.  I went back to my office to deal with computer updates, e-mails, and off-loading photos from my camera to my computer and the NAS units.


2015/09/04 (F) 100 Pounds

We set our alarm for 6 AM, got up, had granola for breakfast, and then went to The Home Depot to rent a 100 pound floor roller.  The roller consists of three steel rollers, each about 4″ wide and 6″ in diameter, on a common axle.  A three foot long handle attaches to the axle between the middle and outside rollers.  A pair of small wheels attach to the crossbar at the base of the handle for transport and can be swung up out of the way or removed.  We rolled the roller out to our car and loaded it into the back.  We then went back inside and purchased up a hard edge grout float, a small offset float, sponges, a bucket, and a bottle of Armstrong Once and Done floor cleaning concentrate.

Bruce rolls the floor tiles in the kitchen with the 100 lb. roller.

Bruce rolls the floor tiles in the kitchen with the 100 lb. roller.

Once we got home we got right to work on the bus.  We had a few pieces of vinyl tile that still needed to be cut and installed at the front of the bus and that took us over an hour.  Once that was done it was time to glue the tiles down.  I got the Armstrong S-288 adhesive and the trowel.  We read the directions on the adhesive bucket and finally figured out that I should probably not spread more adhesive than could apply in about 20 minutes as the product is time sensitive.  The adhesive would then have to set until it was tacky but did not transfer to my finger when touched, which would be 10 to 30 minutes, but we would need to have the tiles set within an hour of when I started spreading the adhesive.  The tiles then needed to be rolled with the 100 pound roller.

We started in the center of the coach and installed the tiles as follows:  1) Remove selected tiles; 2) Spread adhesive; 3) Clean up tools while adhesive cured; 4) Lay tiles carefully back in place; and 5) Roll the freshly set tiles.  It sounds easy and straightforward enough, but each step had its own issues.

For Step 1) we had to agree on how to remove and stack the tiles so they were in the correct order for installation and to remove them so as not to disturb the surrounding tiles.  At Step 2) I had to be careful not get adhesive on anything except the area of the floor I was working on.  I also had to make sure the working area was completely covered but also completely troweled off correctly.  In Step 3) the tools needed to be cleaned before the adhesive set so we could use warm soapy water to clean them.  Once set, the adhesive would have to be cleaned off with mineral spirits.  Step 4) was the most critical.  The tiles get installed once the adhesive has set to the touch, i.e. still pliable but no transfer when touched.  The adhesive effectively acts like a contact cement–it is not possible to slide a tile once it is down–so getting each tile correctly positioned on the first try was critical.  Step 5) was the easiest, once we got the 100 pound floor roller out of the car and into the bus.  The tiles needed to be rolled as soon as they were installed, which was easy except for the limited confines of the bus interior.

We ended up doing this six times in the following order:

  1. Kitchen;
  2. Built-in sofa portion of the living room;
  3. Front passenger side of living room’
  4. Hallway;
  5. Foot and front side of bed;
  6. Rear side of bed; and
  7. Bathroom.

This corresponded roughly to the order in which we had done the dry fit and it was critical that the central tiles get installed in exactly the right locations.  We used plastic spacers at all tile intersections and between tile edges where needed.  (The spacers were 2-sided.  One side was an X for use where four tile corners meet.  The other side had three tabs in line for use between the edges of two adjacent tiles.)  These spacers were removed when we pulled the tiles out and replaced when we installed them.  We also divided the job up to keep the number of tiles being set to a small enough number that we could meet the time requirements of the adhesive and to make sure we did not get trapped in the back of the coach.  We finally installed the last piece (for now) at 9 PM.  We had short breaks for lunch and dinner but each cycle of this process took about 90 minutes.

Bruce spreads Armstrong vinyl floor adhesive in the hallway.

Bruce spreads Armstrong vinyl floor adhesive in the hallway.

My knees were sore by the time we quit.  They have never done well with kneeling due to the boney lumps that resulted from Osgood-Slaughter’s disease in my late pre-teens.  Occasionally kneeling down on one of the spacers, which had pointy centers on one side, did not help.  I probably got down and up at least 100 times throughout the day, maybe more, which was hard enough all by itself.  Although I am in better health and physical shape than I was in my 30’s and 40’s at 63 I am certainly not in the prime of my youth.  At one time Linda and I had a hundred pounds or more to lose between us.  Time, use, and the abuse of being overweight have inevitably taken their toll on our joints.  At the end of the day I was left thinking that flooring work is a young person’s game.  Whether hardwood, carpet, tile, or even continuous sheet vinyl, much of the work is done on your hands and knees, or bent over, and it is tough work.

I took a long, hot shower and then Linda took her shower while I checked e-mail.  We had some Coconut Bliss ice cream with fresh strawberries and then turned in.  We watched an episode of Joseph Rosendo’s Travelscope, set the alarm for 7 AM, and went to sleep.