Tag Archives: hummingbirds (at home)

2015/08/26 (W) Delux Delay

We were a bit sore last night, and needed a good night’s sleep, so we both took some Advil PM right before going to bed.  As a result we did not wake up until almost 8 AM this morning.  The Advil, combined with the very cool temperatures, made for good sleeping.

Our son had called yesterday to see if Linda could watch Madeline today while he did some work on the rental property that he and Shawna own.  It was Shawna’s house before they got married, and is a nice little place, but with Madeline on the way they wanted a slightly larger place.  They also wanted to be on the other side of Stadium Boulevard in the attendance area for Burns Park Elementary School and walking distance to both the school and adjacent Burns Park without having to cross any major streets.

Ann Arbor is a major rental housing market because of the University of Michigan and the local government is very involved in this market.  Rental properties must be inspected at least every 30 months and meet code requirements.  The rental house was scheduled for inspection on Friday and needed some minor repairs, so Brendan set aside today to take care of things.  What I find interesting about this inspection requirement is that most of the rental houses our son and daughter lived in while at U of M looked to me like they had not been inspected in over a decade.

Linda was due at Brendan and Shawna’s house around 10:30 AM so she left our house at 9:15.  She took the three books of wallpaper samples with her and went directly to Delux Drapery and Shades in Ann Arbor to return them and placed the order for four bolts (double roll packs) of Sellers and Josephson Just Textures Lamar paper.  Not long after she left Delux I got a call at home from the store.  They were looking for Linda to let her know the wallpaper was back ordered until September 11.  (I’m not the least bit superstitious but September 11.  Really.)  To cancel the order we would have to let them know today but I told them to let it ride.  I then texted Linda to let her know and she agreed with my decision.

I had a feeling this might happen and it’s what we get for waiting so long to look for, select, and finally order a wall covering.  But it is what it is and we were not going to settle for something that wasn’t “right” for our interior just because it was available more quickly.  If the paper actually comes in on the 11th we will have the 12th and 13th to at least install it in a few critical areas before the new seating goes in.  If it doesn’t arrive by then we will deal with it when it does.  Either way the only big issue is that we wanted to paper the wall behind where the desk will go before the desk is installed.  As things stand we will either uninstall/reinstall the desk or paper around it.

The pantry supported by plywood and 2x4s.

The pantry supported by plywood and 2x4s.

There were several small tasks that I could have worked today but the thing that needed to be done was the installation of the pull-out pantry, so that is what I did.  The pantry was already in the coach, which was a good start.  I got two of the small leftover pieces of 3/4″ oak veneered plywood and set them in front of the alcove base.  I then set a 5′ length of 2×4 on the flat in the space where the pantry goes and extending out beyond the alcove by more than the depth of the pantry.  I then set the pantry on the 2×4, pushed it snug to the side of the alcove, and slid it towards the back of the alcove until the front was approximately one inch behind the vertical front edge of the left side panel.

There were two main reasons for using the 2×4.  First, the lowest slide attached to the pantry box extends below the box so the bottom of the box needed to sit on something that was thicker than the amount by which the slide hung down.  Second, a 2×4 on the flat is 1.5″ thick and that turned out to be a good thickness for positioning the pantry vertically in the alcove.

The reveal between the front of the pantry and the front edge of the alcove side panel was wider at the top than the bottom so I placed two wood shims side-by-side under the back end of the 2×4 to raise it slightly and tilt the top of the front out.  I fussed with this for quite a while and each time I adjusted the shims I had to pick the pantry up, set it aside, and put it back.  I eventually got the reveal to be the same along the entire length (height) of the front.

Once I knew where I wanted the pantry to be when it was closed I had to figure out how to mount the slides to the side panel of the alcove.  I pondered this for quite a while.  If nothing else, I have learned that when it is not clear how to proceed the best course of action is to do nothing.  I have also learned that if I ponder long enough I will eventually see a way forward.  Sometimes that takes days or weeks of conscious and subconscious thinking, but luckily the solution came to me relatively quickly.

The pantry box is 27″ deep.  The full extension slides are 26″ deep and they are mounted so they are flush with the front of the pantry box when they are fully closed.  I wanted a 1″ reveal along the front, so I needed to place the back edge of the slides 27″ back from the front edge of the alcove side panel.  With the pantry box out of the alcove I used a metal ruler to measure back at three points and make very fine scratch marks.  I then used the metal ruler to draw a fine pencil line through the three scratch marks.

I returned the pantry to the alcove, pushed it tight to the alcove side panel, and then pulled it out about three inches.  Measuring on the back side outside the alcove I made final adjustments to the shims to get a consistent reveal.  I then pulled each of the nine slides back, carefully aligned the back edge of the slide to the reference line, drilled a hole with a self-centering VIX bit, and secured it with a #6-3/4″ SR (square recessed) screw.  (I was not able to initially secure the bottom slide as the 2×4 was in the way.)  I pulled the pantry out a little farther until the next mounting hole in the top slide was visible and then drilled that hole on all eight slides and secured it with a screw.  I proceeded in this way until all but the bottom slide were attached to the alcove side panel through every available mounting hole; 88 screws in all (11 screws for each slide x 8 slides).

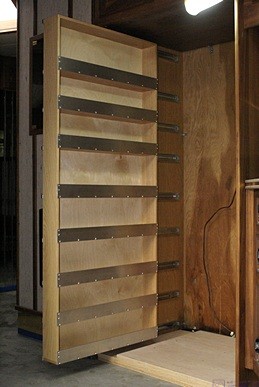
The pantry with the installation boards removed from underneath it.

The pantry with the installation boards removed from underneath it.

To secure the bottom slide I needed to get the 2×4 out from under the pantry.  I slid the pantry all the way in, slid the two pieces of 3/4″ plywood out from under the 2×4, and tried to slide the 2×4 out.  Unfortunately I used a 2×4 that was too long to just slide out as part of the original pantry cabinet is directly across from the pull-out pantry.  So I got my circular saw and cut about 4″ off the end of the 2×4.  Close, but not quite, so I cut off another 2″ and was finally able to slide it out.

With the pantry all the way out I was able to drill and secure the mounting holes for the back half of the bottom slide.  The holes for the front half were a bit tedious as I had to move the box to reveal each one.  To avoid going back and forth between the drill and the screw driver bit I drilled all of the holes first and then put in the screws.  I should also mention that I used the Shop Vac to vacuum up any debris that got in the slides as a result of the drilling.  I also wiped the slides out (carefully, they have sharp edges) with a paper towel.

The pantry slides all the way in and out but is a little tight the closer it gets to being fully closed.  I know that Jarel was very meticulous in attaching the slides to the pantry box so they were all parallel.  My working hypothesis is that either I did not get them attached to the alcove exactly parallel (entirely likely) and/or there is more drag on them because of the one-sided installation (probably, but no way for me to quantify) than there would be if they were installed on both sides of a drawer.

All of the slides are on the same side, which is not how they are normally used.  A pair of these slides is rated to support 100 pounds when used on both sides of a drawer, so four and a half pairs would, conservatively, support 400 to 450 pounds in a normal application.  Even if they will only support 1/3 that much weight in a single-sided application that is still 133 to 150 pounds for our nine slides.  I think the box weighs about 30 pounds so that leaves at least 100 pounds for stored items and I doubt that we could get 100 pounds of stuff in the pantry even if we loaded it with canned goods.  Because the pantry is narrow and tall with lots of slides I suspect most of the load on the slides is vertical, which is what they are designed for, rather than sideways, which would tend to pull them apart, so I suspect that it can safely carry considerably more than 100 pounds of staples.
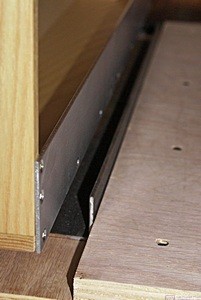
The piece of aluminum angle that will prevent the refrigerator from sliding sideways into the pantry.  It is not installed yet as the plywood refrigerator base is not stained yet.

The piece of aluminum angle that will prevent the refrigerator from sliding sideways into the pantry. It is not installed yet as the plywood refrigerator base is not stained yet.

I had just finished installing the pantry and was cleaning up my tools and materials when Linda got home around 3 PM.  I had skipped lunch and she had a PB&J sandwich while she was out so we agreed to have dinner at 5:30 PM.  Linda picked up where she left off yesterday cleaning and waxing the drawer fronts and the woodwork in the bedroom.  I decided that the oak veneered plywood base in the alcove needed to be painted or stained and then sealed so I went to Lowe’s and got a small can of Rustoleum American Walnut stain, a small can of Rustoleum satin finish polyurethane, and two foam brushes.

I brushed the stain on liberally, working in sections, let it sit for two minutes per the instructions, and then wiped it off with a lint-free cloth.  The stain required mineral spirits for cleanup so I threw the brush and cloth away.  The instructions said to wait one hour before applying a finish.  It was 5 O’clock by then so I went to my office to check e-mail while Linda prepared dinner.

She made a nice salad and grilled a couple of vegan burgers and added some vegan cheese.  Mustard, ketchup, pickles, onions, and lettuce on a nice bun made for a tasty sandwich.  Two deer, a doe and her young fawn, came to our deer block while we were eating and a ruby-throated hummingbird stopped at our plants and feeders.  For dessert we had half of a small, very sweet watermelon.

By the time we were done with dinner it was 6:30 PM so I went back out to the bus and applied the polyurethane.  The directions said to apply it sparingly so that is what I tried to do.  They also said that it could take 48 hours to be usably dry and seven days for a full cure.  Drying time was dependent, however, on temperature and humidity, with higher temps and lower relative humidity promoting quicker drying.

I had run the Aqua-Hot earlier in the day and determined that there was still a little too much coolant in the system as the expansion reservoir overflowed into my catch bottle.  I closed the three windows that were open, leaving them just slightly ajar, turned on the Aqua-Hot, turned on all three thermostats, and set them for about 72 degrees Fahrenheit.  I will not be applying a second coat of polyurethane and cannot spare 48 hours for this one to dry.

I had thought that we might get the first sheet of underlayment installed this evening but decided we had done enough for one day.  It will be the only full 4’x8′ sheet we install but it needs a notch cut out of it before it goes in.  I thought it would require several cuts but then realized I had some floor leveling compound that I had not removed.  I got my chisel and mini-sledgehammer and knocked off the big chunks.  I then used the oscillating sander with 50 grit sandpaper to smooth everything out.  It was 7:45 PM and I was done working on the bus for today.

I went to my office and spent a couple of hours dealing with e-mails.  Linda was still up when I turned in at 10 PM but drifted off to sleep as I finished up this post.  She has to go to the bakery tomorrow which means she will be up very early.
 

2015/07/02 (R) 100,000 Radios

We were tired and did not get up until almost 8 AM.  Linda prepared a tofu scramble for breakfast, as we were almost out of her homemade granola, and served it with some cinnamon raisin toast and fresh grapefruit.  It’s the closest thing we eat to scrambled eggs and she serves it as an occasional change of pace from our standard granola breakfast.

I had my annual appointment with my dermatologist this morning at 11 AM.  I needed to pick up a cable from Scott (AC8IL) at Adams Electronics, which was on my way to the Henry Ford Health System (HFHS) clinic, so I left the house a little after 9:30 AM.  The drive was fine initially and I had a nice QSO (chat) with Steve (N8AR) on the South Lyon 2m repeater.  As I was approaching Wixom Road, however, all lanes of eastbound I-96 were stopped.  I was able to exit at Wixom Road and headed north a short distance to West Road which I took east over to Beck Road where Scotty’s business is located a little north of West Road.  I had a brief chat with Scott about the antennas on my tower before I left.

Two miles north of Scott’s shop I turned east on Maple Road (15 Mile Road).  The HFHS has many clinics around the greater Metro Detroit area and my dermatologist is located at the intersection of Maple and Farmington Roads in West Bloomfield.  That should have been an easy trip but there was construction on Maple Road that had the road down to one lane with flaggers.  There were signs advising motorists to seek other routes but I did not heed the warning.  I patiently worked my way through and arrived for my appointment about seven minutes ahead of time.  Good thing I left as early as I did.

My exam was fairly routine and Dr. Nydorf wrote out a prescription for Doxycycline.  I will try taking it (again) three times a week and see if it helps.  I headed straight for home after my appointment but took a different route.  Once I was back at the house Linda went for a walk.  While she was walking I removed the license plate from her car, took the protective (anti-theft) cover off, and cleaned everything.  When it was dry I put the new registration sticker in the corner, reassembled the cover, and installed the plate back onto the car.  I then started working with the various pieces of the new Yaesu FTM-400DR/DE mobile radio.  When she got back from her walk she heated up a couple of tofu hotdogs for lunch.  These are such simple fare but so tasty (with mustard, onions, and relish) and so appropriate for a summertime lunch.  They are also a really easy lunch to get on the table.

After lunch Linda took her car to the Howell library to get some books and children’s DVDs and then stop at the Meijer’s supermarket to pick up a few grocery items for Madeline’s visit this weekend.  While she was running errands I assembled our new Diamond X-300NA antenna.  Once it was assembled it was over 10 feet long so I stored it by mounting it to the side of the tower.  I put it up as high as I could reach from the ground to get the three counterpoise (elevated ground plane) rods above eye level.  Moving it to the top of the tower as a replacement for the Diamond X-50NA will have to wait until next week or later.  The exact timing will depend on the weather, Mike’s (W8XH) availability, and whether I have acquired appropriate standoffs by then for the X-300 antenna and/or the cellular booster omnidirectional antenna.

With the antenna taken care of (for now) I disconnected the coaxial cable for the X-50 from the radio side of the lightning arrestor and positioned it so I could pull it back into the sump pump room.  From there I fed it into the ham shack, disconnected it from the radio, and coiled it up.  I uncoiled the new 20′ LMR-400 cable with the N-male connector end positioned so I could feed it through the corner of the ceiling in the ham shack (by the ground wire) and into the sump pump room.  From there I fed it through one of the 2″ conduits into the cable entry box.  Back outside I shaped the cable (LMR-400 cable is double shielded and stiff) and connected it to the radio side of the Morgan VHF/UHF lightning arrestor and closed the lid on the box.

Back in the ham shack I attached the PL-259 connector to the SO-239 socket on the back of the Icom IC-7000 GoBox.  I could have gotten away with a 16′ cable but the 20′ length gives me more flexibility with respect to equipment placement.  I turned on the IC-7000 but did not hear anyone on either the South Lyon 2m or the Novi 70cm repeaters so I turned it off.

I disconnected Mike’s Icom IC-2820H and set it aside to make space for the new Yaesu FTM-400DR/DE dual band mobile transceiver.  I moved the new coax to the new radio, powered it up, spent a few minutes configuring some basic things, and then listened to the South Lyon and Novi repeaters.  I tried calling them but was not triggering them so I knew the PL Tone was not set correctly.  I called Mike for assistance and left him a voice message.

Linda was back by this time so she came down to see the new radio.  We then went out to the bus to make our final decisions about upholstery fabric and window shade materials.  In the end we chose the Lambright Notion Linen fabric for all four chairs and the MCD B50 material for the dark out shades.  We brought all the samples back in the house and I e-mailed our choices to Josh at Coach Supply Direct.

I had an e-mail from Scott Neader (KA9FOX) at QTH.com requesting an admin login for the SLAARC WordPress website so I set that up and e-mailed him back.  I had the new radio on and was listening to a conversation on the Novi repeater.  It had just concluded when Mike returned my call.  He walked me through how to set up the PL Tone and Squelch Tone for both of the repeaters on the FTM-400.  We were then able to verify that the radio was working on both bands.

For dinner Linda made a salad and pan-grilled tofu with caramelized onions and barbecue sauce which she served open-faced on hamburger buns.  We had watermelon for dessert, which we have been doing a lot this summer.  I did not care for watermelon as a child but it has become a favorite summertime treat.  I had dropped a small lock washer while mounting the new antenna to the tower earlier so I went to Lowe’s to get a replacement and some spares.  On the drive there I got a call from XPO Delivery Service letting me know that the new refrigerator for the bus would be delivered to Chuck’s shop in Novi tomorrow between 6 and 8 PM.

At Lowe’s I picked up some 6mm x 1.0 Nylok nuts in addition to the lock washers.  I also got some grass seed patching mix, a few more bags of decorative broken brick pieces, and a hummingbird feeder with a red reservoir so Linda can use sugar water without red food coloring.  When I got home the odometer on my car read 100000 so I took a picture of it with my phone.  I then spread the patching mix over the bare dirt I had used to fill a hole and troughs left by the installation of the natural gas line to our house last September.  The rest of the evening Linda read and I worked on completing drafts of blog posts.


2015/05/16 (S) Trucks and Buses

To paraphrase, “If it’s Saturday we must be in South Lyon” and that was, indeed, the case.  Most of the regulars were missing from our weekly breakfast gathering of the South Lyon Area Amateur Radio Club (SLAARC), but six of us showed up and had a great conversation.  By the time we headed towards home it was starting to rain lightly.

We stopped at Brighton Honda to get some information on the Honda Ridgeline pickup truck.  The salesman was very nice, but unfortunately Honda has stopped making the Ridgeline.  They are reintroducing it in the fall of 2016, but we will likely make a decision about a new car/truck sooner than that.  There are still a few in stock around the country but we already have an orphaned Honda Element.  We like the car, but would be happier if they were still being made.  In this case, however, it was a moot point as the Ridgeline is not towable four wheels down.

We drove next door to Brighton Ford to look at F-150 pickup trucks.  We were assisted by Frank Stapleton and he was easy to work with.  He insisted that we meet his new car sales manager, Eric Wilkinson, before we left.  We felt that was unnecessary at this stage in the process, but he also seemed like a nice enough guy.  The entry level XL 2-door may be reasonably priced (not really, but what car is?), but the slightly nicer XLT 4-door short bed with 4-wheel drive, towing package, and off-road package looks like it would price out at $45,000 give or take three grand.  Without X -Plan pricing that is simply not going to happen, and even with X-Plan pricing it is not a sure thing.  Frank really wanted us to test drive one but given the rainy weather we were not in the humor to do that today.

The F-150 is a nice truck, nicer in fact than many cars, and perhaps nicer than a pickup truck needs to be or should be.  On the plus side it certainly has ground clearance, but on the negative side (for us) it is also BIG.  The back seat room in the four door body style is cavernous, made larger by fold up seats, and that would be very useful for us when traveling in the bus.  Between the back seat and the bed we could store a LOT of stuff.  It has well-placed handles by all four doors, and it is a god thing as we both needed them, along with the running boards, to get in and out.  There are several engine options including the 2.7 L and 3.5 L Eco-Boost models, both of which feature twin turbochargers.  These are high-tech engines, with incredible power and torque and decent fuel economy. I liked the sound of that, but unfortunately that technology comes at a significant price premium.  Interestingly, Ford is using an aluminum body and the truck weighs in at about 4,700 pounds.  Our Honda Element weighs over 4,000 pounds and it is not nearly as big as the F-150.  How well the aluminum will hold up is unknown.

We were almost home when we decided to keep driving and visit LaFontaine Nissan.  While not as convenient as the Brighton dealerships, it is only 15 miles from our house, 13 of those headed east on M-59.  Linda checked their hours on her phone and they were open until 4 PM.  The purpose of our visit was to look at the Nissan Frontier pickup truck and the Nissan Xterra SUV, both of which Edmonds.com suggested were viable off-road alternatives to a Jeep Wrangler while Consumer Reports indicated they were more reliable and more practical than a Jeep Wrangler.  Bobby Lundwall, the Commercial Manager, assisted us and we met the General Sales Manager, Don Poley, before we left.  Bobby was very helpful and brought a Frontier and Xterra around front for us to see.  Again, we were not interested in test driving one at this stage, especially in the rain.

The Nissan Frontier pickup has an available 4-door, 4-wheel drive, short bed model.  It is considered a mid-size truck and is noticeably smaller than a Ford F-150 in every way.  The Pro-4X off-road version has 10.1 inches of ground clearance at the differential, which should be adequate for our needs.  It has a transfer case but is only towable four wheels down with the 6-speed manual transmission.  We looked at the Xterra but found it harder to get in and out of, especially the back seat.  It is taller than the Frontier and after due consideration we agreed that we were not really in the market for an SUV.

The Frontier does not have the bewildering array of options that the F-150 has and would be more suitable for the 95% of our driving that is on local paved and dirt roads.  It would be perfectly adequate for hauling materials from Lowe’s to the house and has an available tent option for camping.  We presume that aftermarket bed covers, canopies, and even small truck campers are available but we would check on that before buying one.  Ditto for Blue Ox base plates and the ability to install an SMI Air Force One auxiliary braking system.

We did not test drive one, but it was easy to get in and out of, and comfortable to sit in, at least in the front seats.  It weighs about 4,500 pounds, basically that same as the much larger F-150.  The only negatives at this point are the manual transmission and lack of choice on interior fabric; the Pro-4X only comes with a charcoal interior, either cloth or leather.  The bottom line was that it is probably a better fit for us than a Jeep Wrangler or a Ford F-150 and could be acquired for under $35,000 equipped the way we want it.  Nissan also has zero percent financing available at the monument, although that is often in place of other incentives.  The fact that it requires a manual transmission to be towed four wheels down, however, probably knocks it out of contention.

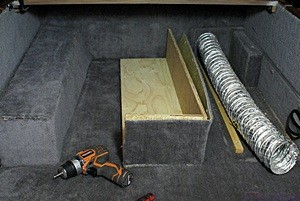
Storage compartment under the lift-up bed platform.  The two boxes concealed and protectd 4" flexible HVAC ducts.

Storage compartment under the lift-up bed platform. The two boxes concealed and protectd 4″ flexible HVAC ducts.

Once we got home we had a light lunch.  I then changed into my work clothes and got back to work deconstructing the inside of our motorcoach.  (I like the term deconstructing as I think it is more descriptive of what I am doing that demolishing or even disassembling.)  My goal for today was to finish removing all of the carpet and all of the carpet tack strips.  I accomplished all of that except for a piece of carpet on the wall behind the driver’s seat and a piece on the front wall of the entry stairwell.  My first task, however, was to cut a short slot in the 3/8″ plywood filler that was under the dinette in order to free an AC electrical cable that ran through it and then through the floor.

Getting the carpet off of the sides of the bed platform was interesting.  There was a piece of wood trim installed along the top edge of the side of the bed base facing the front of the bus and just under the plywood bed platform.  The trim strip is rabbited on the underside and conceals a 12VDC strip light that is tied in with toekick lights in the bathroom and the floor lights in the hallway.  The power for the lights comes from inside the bed base through a small hole in the plywood and carpet.  The trim strip also appeared to be installed over the carpet and needed to be removed to get the carpet loose along the top.

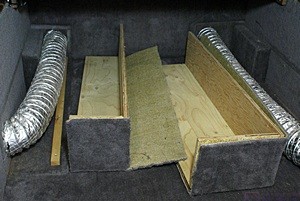
Under-bed storage compartment with bot HVAC ducts uncovered.

Under-bed storage compartment with bot HVAC ducts uncovered.

There was also an adjustable HVAC louver on each side of the bed.  The louvers were installed from the outside and had flexible heater ducts slipped over them on the inside and secured with screws.  The flexible ducts were in the storage area under the bed and were covered by wood boxes to protect them.  The boxes, in turn, were carpeted to match the rest of the storage compartment.  To disconnect the wiring for the strip light and remove the boxes I had to first empty out all of the stuff stored under the bed so I could get in there to work.  The bed platform is hinged about one foot from the head end and the foot end lifts up, supported by two gas struts, so there was plenty of room to work once I emptied it out.

I have disassembled enough of the bus at this point to have some idea of how the conversion was built.  The cover “boxes” for the flexible ducts were actually half-boxes with a long side and top and one small end.  They were installed into a corner using a cleat screwed to the floor that the bottom edge of the long side was then screwed into.  There was a similar arrangement to catch the free edge of the top and it was screwed to the inside wall of the platform base.  All of these screws were put in through the carpet that covered the boxes and were essentially invisible so I had to find the screw heads by touch and back them out.

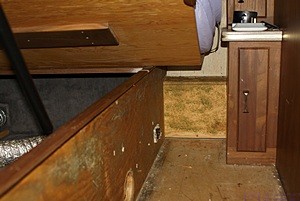
The area just forward of the bed base with the bed platform raised and facing the driver side of the bus.

The area just forward of the bed base with the bed platform raised and facing the driver side of the bus.

Once I got the protective boxes loose I discovered that the floor and wall were also carpeted.  There was a small bump out in each rear corner that served as wiring chases for AC electrical outlets on each side of the bed, and these bump outs were carpeted.  It seemed clear to me that the HVAC ducts, which are part of the OTR HVAC system, may have originally been installed directly into the HVAC chase outside the bed base and later repositioned to the sides of the bed thus requiring the louvers, flexible ducts, and cover boxes.  They also greatly reduced the available storage space under the bed.

The OTR HVAC chase runs along the floor-wall junctions on both sides of the bus for most of the length of the coach and a 12″ section of it is accessible on either side of the bed.  Removing the two flexible ducts, sealing up the openings, and installing the louvers outside the bed platform will free up additional storage space under the bed which is a good thing as we can always use for storage space.  That’s a nice bonus but adds some additional work to the remodeling project.  Such is the nature of remodeling; you never really know what you have until you have completed the deconstruction phase.

The aft side of the bed base.  There is not a lot of room to work in here so I will remove the bed platform when I install the new tile floor.  I plan to use the same tile on the sides of the bed base.

The aft side of the bed base. There is not a lot of room to work in here so I will remove the bed platform when I install the new tile floor. I plan to use the same tile on the sides of the bed base.

It was overcast all day with humidity near 100% and rained off and on into the evening.  It was also warm so I kept opening the roof vents and running the fans to make it more comfortable in the coach, but every time I did it started raining shortly thereafter.  When I was done working on the bus for the day I moved the ten concrete blocks that had been supporting the propane tank for the whole house generator and pulled up the utility marker flags for the underground gas line to our meter.  Keith will be here to cut the grass this coming week and I want him to be able mow these areas.

Linda spent the afternoon thoroughly cleaning the kitchen.  She also prepared a sugar-water solution, filled the hummingbird feeder we bought at Lowe’s the other day, and hung it off the railing of our rear deck.  A hummingbird found it almost immediately which was very cool.  For dinner Linda made pan-grilled tofu slices with caramelized onions and sweet BBQ sauce served on tortillas.  She also sautéed fresh broccoli and sliced up some fresh strawberries and pineapple.

After dinner Linda went to the Edmonds.com website to see if she could get a better feel for dealer cost and Fair Market Value for the Ford F-150 and Nissan Frontier.  While she was at it she looked up the Chevy Colorado (GMC Canyon), and Toyota Tacoma.  The Chevy Colorado was Motor Trend Magazine’s 2015 Truck of the Year.  Both the Colorad0/Canyon and Tacoma are mid-sized pickup trucks.  Toyota’s full-size pickup is the Tundra.

Brendan called while we out to see if Linda could sit with Madeline tomorrow night while he and Shawna had dinner with their friend Jorge.  Depending how the day goes tomorrow I may go to Ann Arbor with her.  We had two episodes of Sherlock left to watch and the DVDs have to go back to the library on Monday, so we watched both of them this evening.  It was a double feature so I made popcorn in-between episodes.