Tag Archives: DTE Energy appliance recycling

2015/08/28 (F) Bye Bye Fridge

The DTE Energy appliance recycling program called yesterday and left a message indicating that they would pick up our old refrigerator between 8 AM and noon today so we got up at 7:30 AM to make sure we were ready if they arrived early.  I was cold last night so I put on my sweats when I got up.  For breakfast we had our usual granola with fresh blueberries and split a banana, had a little glass of juice to wash down the vitamins, and then had coffee in the living room.  I turned on the gas fireplace to chase away the morning chill while I put the finishing touches on yesterday’s post and Linda did her morning check-in with the world beyond our immediate boundaries (and concerns).

The DTE Energy pickup truck called at 9 AM to let us know they would be here around 9:30.  We finished our coffee, got dressed, and awaited their arrival.  Ever since a delivery truck almost took out the telephone trunk line over our driveway last August I try to be in the driveway anytime a truck is headed our way.

Two guys showed up in an Enterprise truck.  Our new refrigerator for the bus was delivered by two guys in an Enterprise truck.  It must make more sense than buying one.  When they opened the back it already had used appliances in it.  The guy handling the paperwork said they usually pick up 30 appliances a day but were scheduled for 32 today.  I signed the acknowledgments and releases on his cell phone and they then unplugged it, cut off the power cord, stuck a hand truck under it, rolled it onto their lift, raised it up and rolled it in next to another side-by-side fridge that was very similar to ours.  They closed the rear cover and were on their way.  I don’t think they were here more than 15 minutes.  It’s nice to have it out of the garage and to know that it will be recycled.  We will also receive a check for $50 in 4 to 6 weeks which beats having to pay someone to haul it away.

Linda picked up where she left off on Wednesday with the woodwork in the bedroom of the bus while I got the tools and supplies ready that we needed to install the Patriot Lumber SurePly underlayment on the floor.  That included getting out the 15 gallon air-compressor, 60 foot air hose, Butch’s Central Pneumatic air stapler/nailer (that I borrowed on our most recent visit to Indiana), and a package of #18 1/4″ crown 3/4″ long staples

Linda finished wiping off the residual Touch of Beeswax from the bedroom woodwork and then helped me get the 4’x8′ sheet of underlayment out of the bus and over to the driveway.  We put this sheet in the bus yesterday so I could determine where to make needed cuts.  I had marked several places where I needed to make notches or take some material off of part of an edge.  I did not want to do the cutting in the bus, however, because we need to keep the floors clean and avoid airborne dust.  I made the cuts and then we moved the sheet back into the bus.

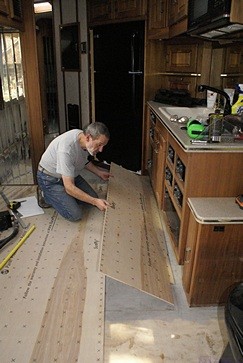
Bruce positions the second piece of underlayment.

Bruce positions the second piece of underlayment.

Per the instructions, we positioned the sheet of underlayment in the corner across from the kitchen sink with the long dimension running fore and aft across the floor joists.  It fit nicely so I connected the air hose to the air stapler and inserted a set of 3/4″ staples.  The instructions for the pneumatic stapler indicated a working pressure range of 70 – 100 PSI, with the pressure controlling the depth of drive, and suggested adjusting it on some scrap material.  It turned out that I had to set the regulator on the air compressor to 100 PSI to get the right depth of drive.

The instructions for the underlayment were very clear about the order in which the sheet should be stapled so that’s what we did.  Linda stood on the sheet to keep it flat while I stapled and we both wore proper safety glasses, of course.  From the corner I put a staple every two inches along the edge by the HVAC duct.  Working out from the same starting corner I then put one every two inches along the short edge.  Working out from the same starting corner I stapled it along the diagonal to the opposite corner.  Again working from the starting corner I stapled the “field” on either side of the diagonal.  The last staples were 2″ apart along the other short edge and up the other long edge.

A week and a half ago we had this same sheet of underlayment in the bus and I screwed it down temporarily with a dozen screws to see how it felt.  I counted the number of fasteners needed for one full sheet and I think it was 352.  That’s when I decided I would staple them.  After installing the first sheet I think it was the right choice.

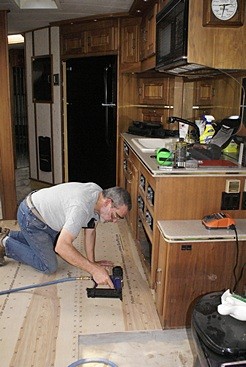
Bruce staples the second piece of underlayment.

Bruce staples the second piece of underlayment.

I got a phone call from my sister so we took a break and while I talked to her Linda started preparing lunch.  She made grilled cheese, with mock turkey, onions, and greens on rye, all vegan of course.  We each had a deliciously ripe fresh pear.  Yum.

The next piece of underlayment to go in filled in the space between the first sheet and the base of the kitchen cabinets.  But first we had to remove the painter’s tape we had put on the base to protect it.  It turned out to be cemented on from the floor leveling compound so I had to chisel it loose.  Linda vacuumed up the debris and then I went over the area with 120 grit sandpaper on the oscillating sander.  Things like this are what cause project timelines to stretch out; when we put the painter’s tape on we assumed we would be able just peel it off.

This second piece was less than half the width of a full sheet and involved a tricky angle cut and a notch so I measured carefully, made a drawing (not to scale), and rechecked the dimensions with Linda verifying them.  We cut the piece outside and brought it in.  It was a very good fit so we stapled it down.
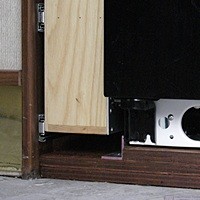
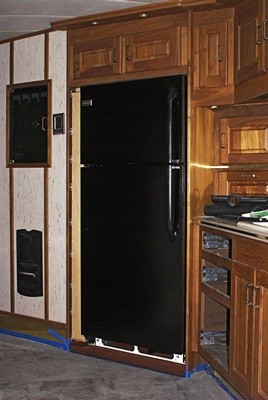
A detailed view of the bottom front end of the pantry and refrigerator showing the aluminum angle that keeps the fridge from shifting to the left into the pantry.

A detailed view of the bottom front end of the pantry and refrigerator showing the aluminum angle that keeps the fridge from shifting to the left into the pantry.

The third piece was much more difficult to figure out and will probably prove to be the trickiest piece overall once we are done.  It was essentially a big triangle with two corners cut off and complex notches along the hypotenuse.  I took a lot of measurements with Linda’s help and made a diagram.  When I laid it out on the underlayment things did not quite line up.  I figured out and corrected one problem but had to go back in the coach and make two more measurements.

At the point where it was close, but not close enough, I decided to cut along the hypotenuse, trim off the two corners, and take it back in the bus to mark the locations of two notches.  With the notches marked we took it back outside and I finished cutting it.  We took it back inside and set it in place.  It was as good a fit as could have hoped for so we stapled it.  Although we had worked for most of the day and only gotten three pieces installed our careful work had paid off and we were very satisfied with what we had accomplished.  It was 5 PM, we were tired, and we were getting hungry so we decided to quit while we were ahead.

I took a shower while Linda prepared dinner.  She made a very tasty whole grain rotini pasta dish with garlic, onion, olive oil, broccoli, sun-dried tomatoes, carrots, mushrooms, and greens.  Now that, Alton Brown, is “good eats.”  We had nice big wedges of fresh watermelon for dessert.

After dinner we went to Lowe’s to buy three more sheets of underlayment and some wallpaper stripping spray.  By the time we got home it was after 8 PM and we settled into the living room to read and write, much the way our day began, minus the coffee.
 

2015/08/27 (R) In and Out

Linda was up at 5:45 AM and on her way to the bakery at 6:15.   I got up an hour later and also got an early start to my day; early is relative, after all.  After a bowl of granola I brewed some Cafe Europe / Columbian decaf coffee, turned on the gas fireplace, and continued reading Number Theory and its History.  A week ago Jim (N8KUE) e-mailed some questions to us regarding RVing and bus conversions.  I felt that too much time had passed without a response so I settled in at my computer to answer his questions as best I could.  I sent my reply at 9:30 and turned my attention to our bus project.

I got the pull-out pantry (mostly) installed yesterday.  Before we could place the refrigerator in the alcove, however, I needed to do four things:

  1. Install a piece of aluminum angle to prevent the fridge from sliding to the left;
  2. Secure the water line that went to the old refrigerator;
  3. Plug up openings in the cabinet with steel wool; and
  4. Install the 10th drawer slide on top of the pantry to reduce lateral movement at full extension.

I decided to tackle these tasks in that order, which meant a trip to Lowe’s to get the aluminum angle.  I chatted briefly with Mike (W8XH) on the drive and stopped at The Home Depot first but did not find what I wanted.  Lowe’s had a 3 foot length of 1/8″ thick 1.5″X1.5″ angle.  I wanted aluminum because it is light, easy for me to work, and won’t rust or need to be painted, but I wanted the 1/8″ thickness for strength.  While I was there I picked up another foam brush, a bottle of Mineral Spirits, and a package of #8-1.75″ stainless steel self-drilling exterior wood screws.

The road graders were out today in our part of the county and I passed the one working on Golf Club Road going to, and returning from, Lowe’s.  There was also one working on our road that I could not get around, so I followed it slowly until it reached our driveway and I could turn in.

Back home I cut the aluminum angle to a length of 26.5 inches, the same as the depth of the refrigerator base section and the top piece of plywood in the base of the alcove. I selected a drill bit that was just barely larger in diameter than the stainless steel screws.  Starting with the midpoint I drilled holes every three inches along the centerline of one side of the angle.  I then countersunk each hole, checking with a screw until the head was just slightly recessed.  A light back bore with the countersink bit removed any rough edges.

With the pantry pulled all the way out I placed the side of the angle with the holes on the 2nd piece of plywood in the alcove base with the other side of the angle against the edge of the 3rd piece of the base.  Since these pieces of plywood are all 3/4″ thick the vertical side of the angle extended above the plywood by 3/4 of an inch, more than enough to catch the left side of the refrigerator.  I held the angle tight against the edge of the 3rd piece of plywood, with the front edge back about 1/2″, and used the #8 VIX self-centering drill bit to drill a pilot hole in the back hole.  I then secured it with one of the stainless steel screws, penetrating both the 2nd and 1st layers of plywood and probably a heavy 1/8″ of the subfloor.  I held the front of the angle tight and secured the 2nd hole from the front in the same way, as I could not access the first hole due to the pantry.  I drilled all the remaining holes except the first and put in the screws.  I then pushed the pantry all the way in so I could access the front hole and secured it.  The angle was now held in place by nine strong screws fastened into a lot of wood.

The pantry and refrigerator installed in the alcove.

The pantry and refrigerator installed in the alcove.

The old refrigerator had an ice maker and cold water dispenser in the freezer door so there is a flexible copper water line at the back of the alcove.  The line runs through an inaccessible area and into the cabinet under the kitchen sink so removing it would be difficult and impractical.  It was easier to secure the water line, and besides, we might want to use it again someday.  I found some used screws with broad #2 SR heads and used them to secure cable ties with mounting tabs to the back wall of the alcove.  I re-shaped the copper tube as best I could so it would lie relatively flat against the back of the alcove and used the cable ties to hold it in place.

I noticed when I moved the tube that a little water came out of the end.  That struck me as odd as I had it in my head that the line was out of service.  After a little investigation I remembered that the shutoff valve for this line was still attached to the water inlet tube on the back of the old refrigerator.  If we had pressurized the fresh water system this would have been an open line.  Yikes!

I now had another, unexpected, task that had to be done before I could do anything else.  I gathered up a few tools, parts, and materials, got my head and arms into the under sink cabinet (which is never comfortable), shut off the supply line valves (just to be safe), and disconnected the copper tube to the refrigerator alcove.  I wrapped the threads of the open end of the T-fitting with several turns of Teflon tape, threaded a cap into the fitting, and snugged it up tight.  I did not, however, pressure test it as I did not want to take the time and I did not want to pressurize the fresh water system with the toilet disconnected.

With the water line secured I got one of the old packages of steel wool and used it to stuff the openings in the lower rear corners of the alcove where lots of wires, the water line, and two air lines pass in and out.  I meant to use the #1 steel wool but grabbed the 4/0 by mistake.  It will work just as well but the 4/0 is what Linda is using to clean all of the walnut woodwork, so it was a bit of a waste.

The pull-out pantry is very stable vertically and horizontally except when it is all the way out where it can move side-to-side about 1/2″.  I decided to install the last of the 10 slides on the flat between the top of the pantry box and the ceiling of the alcove, which is also the base of the upper cabinet.  The ceiling of the alcove is not parallel to the floor and so it was not parallel to the top of the pantry box.  I was able to slide a piece of 3/4″ oak veneered plywood between the ceiling and the upper edge of the top slide. With the 10th slide on top of the pantry I had about a 1/8″ gap between the slide and the plywood at the front, opening to about a 1/4″ gap at the rear.

My first attempt at a solution was to try cutting blocks from the end of a 2×4 to be just the right thickness for the front, middle, and rear.  That quickly proved to not be a workable solution without some form of stationary saw.  After further pondering I decided to cut a 4.5″ wide piece of the oak veneered plywood from one of the leftover pieces that happened to be 26.5″ long.

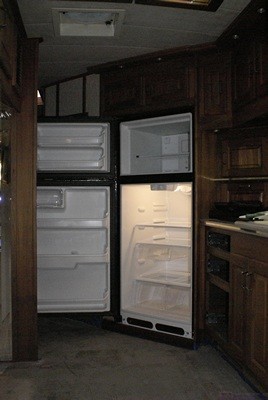
The new refrigerator in the alcove with the doors open.

The new refrigerator in the alcove with the doors open.

I set the piece of plywood in place on top of the two slides, one mounted to the alcove side panel and the other resting on top of the pantry box, and shimmed it with wood shims between the plywood and the ceiling to remove the gap between the plywood and the slide without making it tight.  I pulled the pantry out slightly so I could drill and screw the rear hole of the stationary part of the slide.  I then pulled the pantry all the way out, pushed the center section of the slide part way back in, and secured the front hole of the moveable part of the slide to the top of the pantry.  I used a slot that allowed side-to-side adjustment, just in case.  I also secured the center slot on the moveable slide to the top of the pantry box.

I fiddled with the slide until it went in and out smoothly.  It is tight enough that I don’t think it will come open when driving, but it pulls out easily enough and will be easier once we get a handle on it.  Linda called at 4 PM as I was finishing this task to let me know she was on her way home from the bakery.  It would be 60 to 90 minutes before she got home so I moved on to the next task.

The first piece of underlayment to go in will be a full 4’x8′ sheet minus a notch for the middle air-conditioner drain line and part of one short side that has to fit around the built-in pantry.  I measured for those cuts and then laid the sheet out in the driveway on top of 2x4s (on the flat).  I tried plunge cutting most of the 21″ long by 1″ wide strip off the end with my circular saw without using a guide and finished the cut with my saber saw.  My plunge cut wasn’t very good so I trimmed it with the saber saw.  That edge will go under the mirror tiles against the back of the built-in pantry so it will be OK.

Linda got home around 5:30 PM.  After unloading her car and changing clothes she examined my work for the day and was pleased with the way the pull-out pantry worked.  She helped me carry the 4’x8′ sheet of underlayment into the bus at which point I decided that we needed to get the refrigerator into the alcove before doing anything else.

We set the underlayment aside and uncovered the fridge which we had previously wrapped in painter’s plastic to keep it clean while grinding and sanding.  Linda cleaned off packing tape adhesive with Goo Gone, wiped it off with a wet rag, and then I wiped it off with a dry towel.  We rolled it over to the alcove, shut off the circuit breaker, plugged it in, and secured the cord to the back.  It rolls very easily but to get it into the alcove we had to tilt it forward to get the bottom back edge of the unit onto the 2.25″ high plywood base.  Oops; the left edge of the fridge space overlapped the built-in pantry opposite and prevented the unit from tilting enough to get the back edge up high enough.

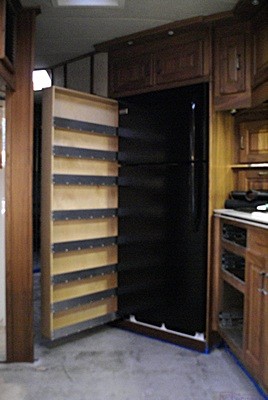
The pantry pulled out with the refrigerator installed.

The pantry pulled out with the refrigerator installed.

We have learned not to panic, and after a moment’s thought we turned it slightly to the right, got the right rear bottom corner up onto the plywood and slid it into the alcove a couple inches.  We were then able to turn it to the left and get the left rear bottom corner onto the plywood base, making sure it was inside the aluminum angle.  Fortunately we had enough clearance above the unit to do that.  (If not we would have used the leftover 3/4″ plywood in front of the alcove, gotten the fridge onto those pieces, and then rolled it straight into its space.).   We lifted the front bottom of the unit and rolled it back into its cubby.  It was a perfect fit; snug to the aluminum angle on the left, tight to the right side of the alcove at the rear with a small (3/16″) gap at the right front, and far enough into the alcove that we can open the three drawers to the left of the sink.  High five!  Good job team.

I turned on the breaker to make sure the refrigerator still worked.  It did, and we were both pleased with how much quieter it is than the old one.  We did not need it running at the moment, however, so I turned the breaker off.  Linda got a towel and propped the doors open.

We got the underlayment flat on the floor and slid it into position.  It needed to be trimmed in three spots and I did not want to get into that at this hour so Linda started preparing diner while I put tools and materials away, locked the bus, and closed up the garage/shop.  I plugged in the old refrigerator (in the garage) to let it cool down overnight as DTE Energy’s recycling program is picking it up tomorrow between 8 AM and noon.

Dinner was mock riblets in BBQ sauce, green beans with onions and carrots, and fresh peaches, all very tasty.  After dinner I worked at my desk.  I replied to several e-mails from Gary at Bus Conversion Magazine, and looked at my Habitat For Humanity article to see if I could split it into two or three parts.  It looked like that was possible so I let Gary know.  I chatted briefly with Steve (N8AR) on the Novi 440 repeater and with Jim (N8KUE) on the South Lyon 2m repeater.  I processed three photos of the finished pantry/fridge installation showing that everything goes in and out and e-mailed it to a dozen people.

I came to bed just before 10 PM.  We watched TV for a while until Linda drifted off to sleep.  I stayed up a bit longer to finish this post.


2015/08/21 (F) Have Fridge Will Travel

I was up at 7:40 AM and made a pot of Costa Rican half-caff coffee.  Linda was up just before 8 AM and washed off some fresh blueberries to put on our breakfast granola.  The Costa Rican is definitely not our favorite coffee and I brewed it with a little too much water which did not improve matters.  But we bought a pound of beans and are not going to throw them out so the sooner we use them up the sooner we can get something that we like.

Harvey Carter (AC8NO), the current President of our South Lyon Area Amateur Radio Club, agreed to help us move the old bus refrigerator from Chuck’s shop in Novi to our house this morning using his cargo van.  He pulled into the parking lot of the shop right behind us at 10 AM.  Chuck and Barb had already left for Oscoda in their bus with their race car trailer in tow.

After opening the shop we had Harvey back his van up to the overhead door.  We brought several lengths of 2x4s planning to use them under the back of the refrigerator but Harvey had two ramps made from 2x12s with a cross piece that spanned the rear bumper.  That looked like a much better alternative to us.  He also had a good hand truck and a ratchet strap.

We decided to truck the unit from the left side because the refrigerant and water lines protrude beyond the back of the case.  We removed all of the trays from the doors and cabinet but left the shelves in place.  We slid the hand truck under the left side of the cabinet and secured it with the ratchet strap.  With Harvey on the hand truck we tilted it back and rolled it out to the ramps.  We adjusted the ramps so the hand truck wheels would be centered on them.  Harvey then pulled the hand truck up the ramp backwards as Linda and I pushed from the bottom, eventually lowering it all the way down as we slid it fully into the van.  I then closed up the shop.

I rode with Harvey in the van and Linda followed us in the car for the trip back to our house where I had Harvey back his van up to the small garage door.  Reversing our procedure from earlier we unloaded the fridge by rolling the hand truck down the pair of ramps and put it just inside the small garage bay near the door.  We plugged it in and it started running so at least we did not break it.

We wanted to put the drawers and door bins back in but could not get the fresh food compartment door open more than a few inches.  I was able to open it just enough to see inside and determine that at least two shelves had come loose and wedged into positions that prevented the door from opening.  The solution was to remove the door.  I undid the three screws that attach the top hinge to the cabinet and removed it, allowing Harvey to lift the door off of the bottom hinge.  I reattached the two shelves to the mounting rails at the rear of the cabinet.  Harvey then set the bottom door hinge pin back in the lower bracket and held the door while I reinstalled the top hinge.  We will plug it in later next week and let it cool off as it has to be running and cold when DTE Energy comes on Friday to pick it up.

While Linda unloaded the drawers and bins from the car and put them back in the refrigerator I gave Harvey the ham radio tour.  We looked at the antennas on the tower, the cable entry box, and the ham shack with the multiple monitor wall mounted track system we installed.  I then gave him a tour of the bus interior.  Linda was getting ready to go for a walk but I suggested we take Harvey to lunch and agreed to go.  He lives in Green Oak Township southeast of Brighton so we went to the Panera on Grand River Avenue at I-96 as it was in the direction of his house and we all like their food.

After lunch we drove to the frame shop in Howell and picked up the last of four paintings we had framed.  We were pleased with our choice of framing material and the owner, Rick, did a nice job assembling it.  We headed back to Lowe’s and looked at thin paneling materials.  Linda got a shield for the bird feeder that is supposed to keep the squirrels from getting to the seed block and I got a recessed outlet that I am considering using for the refrigerator in the bus.  We stopped at the Walmart adjacent to the Lowe’s but did not find the peanut butter filled pretzels we were looking far.  I needed a battery disconnect for the lawn tractor battery but we did not feel like doing anymore shopping today and returned home.

It was late enough in the afternoon that I did not feel like getting the air compressor out and working on the floor of the bus so I went to my office while Linda went for a walk.  I was going to upload a few blog posts but decided to work on an article for Bus Conversion Magazine instead.

I took photographs of two buses at a pair of converted bus gatherings in Quartzite back in January of this year.  Larry and Carol Hall had a very nice GM4106 at the FMCA Western G.M. Coach rally while Byron and Betty Pigg had a gorgeous Model 15 Eagle at the Eagle International converted bus rally.  Larry and Byron are the presidents of their respective groups and the rallies took place at the same time in adjacent sections of the Quartzsite Marketplace dry camp area.  This campground is near the epicenter of RV vendor activities and only a mile from where we were camped.  Gary Hatt, the owner/publisher of BCM, brought his newly acquired Eagle conversion and had his mobile mechanic drive his MC-9 Moose Creek Motor Cabin, which was for sale.  He invited me over so we could finally meet in person, I could meet a few folks, and photograph the buses.  He knew, in particular, that Larry and Byron were interested in having their buses featured in the magazine and figured I could help make that happen.

I had started articles on both buses right after I photographed them and worked on them a bit back in February but I did not get them finished before we had to leave Quartzsite in early March.  Once we pulled up stakes we were on the move and very busy and I did not get back to them before we got home.  Of course, we got even busier once we got home so new articles for BCM were on the back burner with the gas turned off.  But magazines have lead times with deadlines for each issue, and Gary very much wanted to feature both of these buses before 2016 arrived, so I dusted them off and decided to work on the article about the Hall’s GM4106.

Larry had sent me a brief narrative some months ago and I had started filling in the detailed specifications about the bus and conversion.  I had already selected possible photos for the cover and centerfold as well as the article and post processed some, but not all, of them.  I massaged Larry’s narrative, added an introduction of my own, extracted some additional specifications, and then focused my efforts on completing the post-processing of the photos.

I took a break for dinner and afterwards completed the photo processing.  I then started inserting the thumbnail versions of the images into the Word document and writing captions.  There isn’t really any magic to writing an article; it’s just a specific kind of work.  You string words together into sentences, organized by paragraphs, that tell a short story about something interesting and you illustrate it with captioned photos that are hopefully relevant and technically adequate.  It takes time and energy to do this well, however, and I ran out of both around 10 PM.


2015/08/10 (M) Keep on Buss’in

We have a doe and her spotted faun that have been coming in the early morning to the deer block we set in our back yard the other day.  They were there again this morning and the block is close enough to the house that we got a good look at them through the bedroom doorwall.  They must be comfortable with the setting as the faun wandered off towards the western part of our property and the doe let it go while she continued to lick the block.  Eventually, however, the faun was out of sight and the doe headed off in that direction to find it.

We had cinnamon raisin toast and soy yogurt for breakfast, with orange-grapefruit juice to wash down the vitamins.  I used up the last of the Sweet Seattle Dreams half-caff coffee beans for our pot of morning coffee.  Keith usually mows our grass on Mondays and he came to the front door around 9:30 AM to ask if we wanted it cut this week.  That’s the first time he has done that this summer but it was an appropriate and timely question.  We have had very little rain the last couple of weeks so the grass had not gown much since last Monday and was a little brown in places.  We agreed to skip this week, which I think was what Keith was hoping I would say.  There was a high probability of rain starting around noon and I suspect he had another yard he wanted to cut before it started.

We have been very busy the last few days and I have not had time to do more than outline my blog posts.  Linda needed to work on an analysis for the bakery so I spent much of the day filling in the details of my recent posts.  Our days are very full and if I wait too long I cannot capture them accurately.

Linda looked up the information on the DTE Energy “Energy Efficiency” appliance recycling program.  I called the 866 number and was assisted by Reginald.  The earliest available pickup date was Friday, August 28 so I took that.  It took quite a while to arrange the pickup but Reginald appeared to get all the pertinent information and give me a confirmation code and a phone number to reach the truck on pickup day.

Once the refrigerator pickup was arranged I texted Chuck to let him know the details.  That prompted a return phone call and a conversation about refrigerators.  Having seen how our swap went on Saturday he and Barb are also thinking very seriously about replacing the refrigerator in their bus.  The rationale is the same as ours; the fridge is old, so it is noisier and less efficient than newer ones, and having it break on the road would be more than inconvenient.

Replacing a refrigerator in an RV, especially a residential unit in a bus conversion, is not like replacing one in a home.  Access is a major problem and there is not a lot of space to maneuver it or get more than two pairs of hands on it.  If they replace theirs here (in Michigan) their bus will be inside their garage/shop, the forklift will be available to do the heavy lifting, and trusted friends and family will be available to help.  And, most importantly, they won’t be living in it and dependent on the fridge for preserving their food.

Before the day got away from me I pulled up the PDF of the manual for the wireless keypad for the large garage door.  When I installed the new opener for the small garage door and reprogrammed the wireless remotes for our cars I inadvertently rendered the keypad inoperable.  Reprogramming it was simple enough once I had the procedure.  It’s the small, simple tasks like this one that become big burdens if not taken care of in a timely manner.

The predicted rain started around noon and was steady until 3 PM.  It was just the kind of rain we needed; gentle enough to give it a chance to soak in but hard enough to provide a useful quantity of moisture to the ground.  Six to 10 hours of this would have been even better but we were glad for what we got.

I had thought that we might mask off the inside of the coach today with painter’s plastic but with the rain and humidity, and plenty of other things to do, I decided to defer that until tomorrow.  During the afternoon Jarel texted me a couple of pictures and a brief status update on our custom woodworking projects.  Not surprisingly he is already well along on the construction of the pull-out pantry and has spray lacquered the pieces for the built-in sofa.

One of the photos showed one of the 1/8″ thick aluminum plates that will form the side rails for each shelf in the pantry.  He applied a brushed finish to the plate and countersunk the screw holes so the heads would not protrude beyond the surface.  Jarel did metal work at one time before he became a cabinet maker so he knows how to do this kind of stuff.  He is also meticulous and takes great pride in his work.  Given a choice I would always prefer to hire a craftsman who cares as much, or more, about the quality of their work as I do.

When I know I am going to have a long full day, such as this coming Wednesday, I will try to “write ahead” on my blog, basically outlining the plan for the day but obviously not filling in the details of things that have not yet happened.  Along the same lines, I often use future blog posts as a planning tool.  As things occur to me that I need to do I will note them in the draft of a future post.  If the thing actually gets done on that date I flesh out the details, and if not, I move it to a new date.

I think I did several loads of laundry today and spent some time editing and uploading blog posts during the evening, but as I am finishing this post later in the week I have lost the details and will just end here.


2015/08/07 (F) Arrangements

We had our usual, but never boring, homemade granola with fresh blueberries for breakfast.  I brewed a pot of the Costa Rican half-caff coffee we bought yesterday without tasting it first.  We found it to be somewhat bitter, which is not our taste in coffee, so we probably will not buy more after this batch is gone.

We spent a good part of the morning researching cabinet pulls on the Cabinet Service Hardware (CSH) website.  We found a pull on the CSH website that appeared to be identical to the one from The Home Depot, which is a Rockefeller Antique Brass from Liberty Hardware.  The one from CSH was a Belwith Keeler HH.P135-AB for $2.47 each.  The one from The Home Depot was $2.48 plus tax but no S&H.  Since we have the one from THD in hand and like how it looks we will probably buy them locally.

Many of the drawers in the bus have the pulls attached to the walnut face and then the face attached to the front of the drawer box.  Thus, the only way to remove the pulls is to first unscrew the box from the face.  I took the face off of one drawer and installed the new pull.  It fit perfectly, confirming that the mounting hole spacing is 3″ center-to-center.   The one from THD comes with 1″ and 1.5″ #8-32 machine screws but it looks like we will need something shorter than 1″ for the framed drawers and shorter than 1.5″ for the solid drawers.  The cabinet doors have 3/4″ thick frames so the 1″ machine screws may work for those.  Thus we should be able to use some of the machine screws that come with the pulls from THD but will have to buy some as well.  The pulls from CSH do not come with screws so we would have to buy those anyway.

Linda left around noon to meet Diane in Livonia to see a movie (Ricki and the Flash) starring Meryl Streep, Kevin Kline, and Rick Springfield.  I went on an errand run while she was away.  At The Home Depot in Howell I found 10 packs of the drawer pull we like so the price came out to under $2 per pull compared to $2.48 when purchased individually.  We need 58 to replace all the ones in the coach plus at least four for the new desk drawers so I bought six 10-packs.  We have not decided if we will replace the single screw round pulls on the two TV cabinet doors with the double screw pulls.  If we do we will need a couple more pulls.  If not, we will need two round pulls in the same style and finish, which THD also carries.  I bought small packs of #8-32×3/4″ and #8-32×1-1/4″ lengths so I can figure out what lengths work best in each location.

Jarel called while at was THD.  The plans for the built-in sofa had arrived in today’s mail and he had a few questions.  We talked through the issues and came to the conclusion that it would be better for us to come down on Wednesday instead of Tuesday to pick up the desk.  That will give him time to cut the sofa pieces and do some minor assembly and finishing.  The plywood seat and side pieces need to be stained to resemble the walnut hardwood and a 3/4″x3/4″ piece of walnut hardwood needs to be attached to the front edge.  He also needs to cut the piece of walnut veneered plywood for the front and then spray everything with the same lacquer he has used on all of the walnut desk pieces.

As I was finishing up at THD I also got a call from Chuck letting me know that everything was on track for the refrigerator swap tomorrow.  My next stop was at the Howell Lowe’s for a 4′ x 4′ sheet of 3/4″ plywood but I did not like their selection any better than THD.  I ended up buying two quarter sheets (24″ x 48″) of birch plywood.  This plywood has a lot of thin layers, so it is very flat and dimensionally stable, with defect free surfaces that are sanded smooth and very clean edges.  These sheets will go on the bottom of the refrigerator alcove in the bus to elevate the new refrigerator above the new vinyl tile floor.

Back home I texted Josh at Coach Supply Direct, called Terry at A-1 Upholstery, and called Butch regarding the change in our visit date for next week.  Linda got home shortly thereafter and helped me reattach the edge trim to the two doors of the old refrigerator and load them into the back of my car.  We covered everything with blankets and then loaded all of the drawers, shelves, racks, and bins.  Once the old fridge is out of the bus we will clean it, reassemble it, plug it in, and make sure it is cooling.  We will then call DTE Energy to arrange pick up through their recycling program.

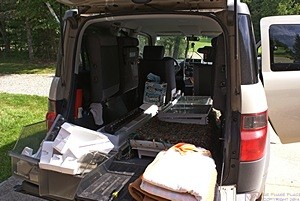
Loading pieces of the old refrigerator into the back of the Element to take to Chuck's shop.

Loading pieces of the old refrigerator into the back of the Element to take to Chuck’s shop.

Linda bought an Amy’s Roasted Vegetable Pizza while she was out and cooked it for dinner.  It is our favorite store bought pizza, and much better (for us) than what we can usually get at restaurants and pizzerias (with the exception of Satchel’s in Gainesville, Florida), but not as good as the pizza we had while Mara was here.  That pizza was memorable.

After dinner I got a shower and then worked on the design/drawings for the seat and back cushions for the built-in sofa for the bus.  I started editing blog posts for July but did feel like uploading them.  We went to bed earlier than usual as we had to up at 7 AM tomorrow to go to our weekly ham radio club breakfast.


2015/07/22 (W) Chucking Junk

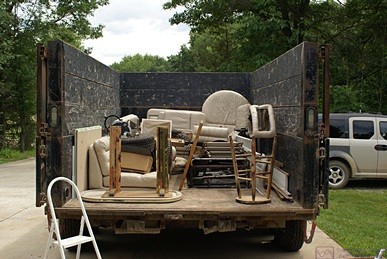
After our usual breakfast and coffee we sat for a while in the living room.  This is part of our morning routine and I often use the time to finish up my blog post from the previous day but the last couple of weeks we have been busy and I have not always had time.  We enjoyed the time until about 9 AM and then got serious about loading our “junk” into the Chuck It Junk Removal dump trailer.

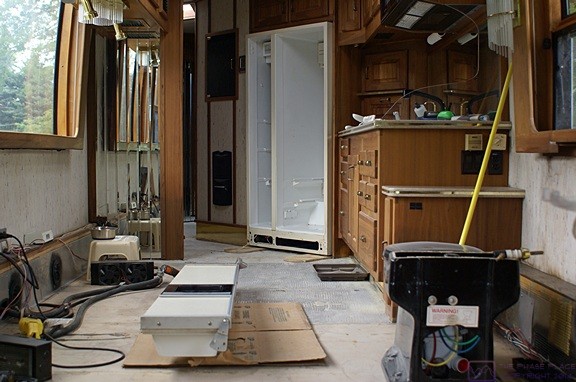
Our bus refrigerator with the doors off in preparation for removing it from the coach.

Our bus refrigerator with the doors off in preparation for removing it from the coach.

Mara checked with Cummins Bridgeway and they told her to bring her motorhome in at 11 AM so she broke camp at 10 AM and backed out of the driveway at 10:15 AM.  Cummins Bridgeway put several technicians and mechanics to work on her rig to re-install the genset, install new shock absorbers, and service the transmission (filter and fluid).  She was out in a few hours and stopped at General RV to return the Camco refrigerator vent cover which did not fit her base on the roof.

The Chuck It Junk Removal dumpster trailer with some of our stuff in it.

The Chuck It Junk Removal dumpster trailer with some of our stuff in it.

We took a break from chucking junk and extracted the old refrigerator from its alcove in the bus, which was a 2-person job.  I got some scraps of 1/2″ plywood to set in front of the elevated alcove base as I did not want to walk or slide the unit across the bus sub-floor, especially with the residual thinset mortar.  First we had to walk it out a few inches which was hard because it only had 3/8″ clearance on each side.  Once it was out far enough we were able to open the doors enough to remove all of the shelves and bins, which Linda took into the house and garage.  I then disconnected the water and electric that ran up into the left (freezer) door at the bottom hinge corner for the ice/water dispenser and light.  With those disconnected and pulled out of the bottom of the case we unscrewed the bottom and top hinges and removed the two doors.  Linda collected all of the small loose parts as we went and put them in a plastic container as we knew we would have to reassemble the unit at some point.

The doors had 1/4″ walnut veneer plywood face panels and we wanted to salvage those to use with the new pull-out pantry.  Normally you just remove the handle trim from the edge of the door and slide the panel out.  The fridge door panel would not budge so we removed the trim from all four edges of the door.  The panel had been stuck in place with strips of double-sided tape so we carefully peeled it loose.  The freezer door had two smaller panels, above and below the ice/water dispenser, and they slide out easily after removing the handle trim.  We carried the doors, trim, and panels to the garage and then walked the case completely out of the alcove.

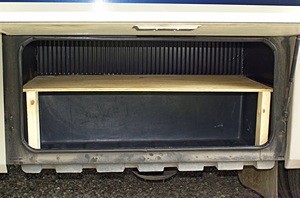
The shelf I built for one of the storage bays on Mara's Fleetwood Bounder.

The shelf I built for one of the storage bays on Mara’s Fleetwood Bounder.

I spent some time pondering what would be required to disassemble the refrigerator enough to get it out through the door of the bus but decided not to do anything until I had talked to Butch.  Just before dinner I had a long chat with Chuck about the refrigerator swap and he reminded me that DTE Energy (the electric power utility for this region) will pick up old refrigerators and freezers and pay you $50 for them.  Linda checked this out online and learned that they have to be plugged in and operating or they won’t take them, so we have a double incentive for getting it out in one, operating piece.

Our revised plan is still to get the case out in one functioning piece through the side window frame but it won’t be this weekend.  The guy with the sunroom business in the building in front of Chuck’s shop is still in the process of moving to his new place and has trucks, cars, people, and junk all over the place making ingress/egress to Chuck’s shop difficult to impossible.  The business is supposed to be gone by the end of the month so we will wait another week and plan for Saturday August 1st assuming I can get the window frame open.  In the meantime I need to get back to work on the bus floor, so I will have to spend part of next week sanding and start installing the 1/4″ underlayment for the new vinyl tile.

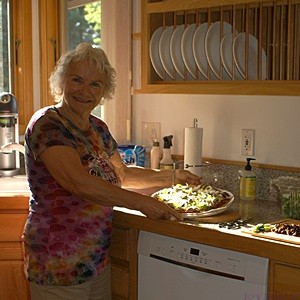
Mara in our home kitchen with her wonderful pizza.  This thing was truly good eats.

Mara in our home kitchen with her wonderful pizza. This thing was truly good eats.

Mara and Linda made another pizza for dinner and it was every bit as good as the first one.  Mara has been a wonderful house guest.  We have left the house open to her and she has made herself comfortable in the kitchen and using the hall bathroom and laundry.  It helps that Linda is not possessive about the kitchen.  Whenever we have visitors who want to help in the kitchen Linda welcomes their participation.  It’s been fun for both of them and they have each learned a few knew things and deepened their friendship.