Tag Archives: drawers (H3-40)

2015/09/14 (M) Final Prep (for now)

We were up at 8 AM and had breakfast but I did not take the time to make coffee.  I gathered up the laundry and started a load.  I then headed to Lowe’s to buy an outlet strip that I could easily hardwire.  I looked at angle iron to support the upper back edge of the interpedestal desk cover at the wall but did not buy any.  The iron has holes and slots manufactured into it that I thought might allow me to adjust its location vertically without having to move the location of the screws.  Alas, the slotted openings were horizontal rather than vertical.

Linda was cooking a batch of granola when I got home and made a pot of coffee.  I decided to tend to some travel preparation items before getting back to work on the remodeling project.  I wanted to check/adjust the tire pressures while it was still cool.  The tires were all down about 1.5 PSI, which was very good given how long it has been sitting.  I used the new 6-gallon air-compressor to bring them up to the pressures I like to run and it worked OK.  I will have to pause a little more often while it re-pressurizes but it is less than half the size of the 15-gallon DeWalt and will travel with much more easily.

My next task was to unload the front bay which I did while Linda continued to work on our food for the week.  We find it much easier to deal with food at rallies if she “cooks ahead” and “reheats to serve.”  I set everything in the driveway in front of the bus and tried to sort it into two groups; things were staying home for this trip and things that were going with us.

I then opened the drain valve on the fresh water tank, which goes through the floor of the water bay, and let the water run onto a container lid so it wouldn’t dig a hole in the gravel driveway.  I was getting ready to deploy the fresh water hose(s) when I noticed that they were in need of some serious cleaning.  Linda agreed to take care of that and cleaned their storage tub too.  Ditto for the waste water (sewage) hoses and their storage tub.  Her taking on this task allowed me to return to working on the installation of the desk.

I had a 12″ long piece of 1/8″ aluminum angle and decided to use it to support the upper back edge of the interpedestal shelf/cover.  I drilled and countersunk five holes in one of the flanges.  Linda finished cleaning the hoses and then got our wireless thermometer from the house.  It has a base thermometer and two wireless remotes so she put one remote in the freezer and the other one in the fresh food compartment.  We wanted to monitor the temperature and dial it in to where we needed it before loading the refrigerator with food.
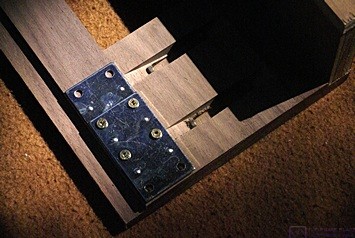
The stacked mending plates used to create a tongue-&-groove alignment system between the center cover and both the left and right desk pedestals/bases.

The stacked mending plates used to create a tongue-&-groove alignment system between the center cover and both the left and right desk pedestals/bases.

I removed the interpedestal cover and set the left pedestal aside so I could complete the AC wiring connections.  I mounted the outlet strip to the wall centered between the two pedestals and about two inches below the level of the underside of the plywood that will support the Corian top.  The outlet strip had a 15 foot cord.  I determined how much of that length I needed to get through the right pedestal and forward along the wiring chase to where the other wires were located.  I cut off the extra length, routed the power cord into the right pedestal at the left upper rear corner, down the inside left rear corner, and out the left end of the upper base.  From there it ran forward to the other wires where I connected them.  I turned on the circuit breaker and then turned on the outlet strip.  The switch lit up, indicating the presence of 120V AC.  I used my Etcon tester to check the duplex outlet by the passenger seat.  It also had power so the wiring was good.

I set the interpedestal shelf/cover back in place, aligned with the right base, and then aligned the left base to it.  I checked the distance from each end of the base to the HVAC duct and adjusted it to be the same.  We then adjusted the position of the left pedestal until we were satisfied with the alignment with the interpedestal cover.  We checked the alignment of the front top edges of the pedestals with a 6′ metal ruler.  Everything looked OK so I secured the pedestal to the base using two screws that will be hidden by the laser printer in normal use.

I needed to screw the pedestal to the wall in the two upper corners to minimize the visibility of those screws.  It was not flush to the wall at those points so I used a shim in the upper right.  We will have to cover the vertical gap at the left rear with molding.
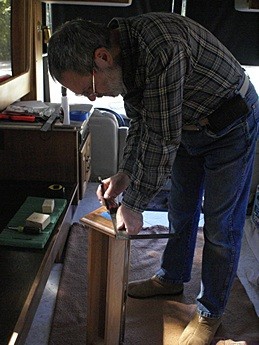
Bruce finds the center of a drawer front by finding the point where the diagonals of the face intersect.  The handle mounting holes were located horizontally 1-1/2” to either side of this center point.

Bruce finds the center of a drawer front by finding the point where the diagonals of the face intersect. The handle mounting holes were located horizontally 1-1/2” to either side of this center point.

We put the removable plates back in the bottom of each pedestal.  I drilled the holes for the pulls in the four desk drawers, installed the pulls, and put the drawers back in the desk.  To find the correct location for the holes Linda suggested that we put a piece of painter’s tape in the center of the face and then draw a small segment of the two diagonals to find their intersection.  For the two small drawers that was all we needed as they got single knob style pulls.  For the two larger drawers we needed to locate the holes 1-1/2″ to either side of the center on a line through the center parallel to the top and bottom edges.  I measured carefully and I think we did a pretty good job.

Sometime during the morning I texted Jarel the dimensions for a 3/4″ thick piece of walnut 1-7/8″ high by 34″ long to use as a face for the edges of the three layers of plywood under the refrigerator.  He texted back and said “no problem” which lead to an exchange of a dozen e-mails clarifying just exactly what I wanted.  I did not mind, better that than assumptions that result in wasted time making parts that don’t fit.  Jarel is an experienced cabinet maker and is meticulous in his work.  He knows all the questions to ask about things I did not specify and does so before cutting any wood.

Our last construction task before departure tomorrow was rehanging the bathroom door.  I measured the distance from the bottom hinge to the bottom edge of the door and compared it to the distance from the hinge in the door frame to the floor.  It looked like it should fit without rubbing so we hung the door.  (The old ceramic tile rubbed as the door was swung to its fully open position, but the thickness of the underlayment and vinyl tile is less than the ceramic and thinset, at least in that area.)

Linda was still trying to prepare our food for the rally as there will be very little of the included food that we can eat.  She made a grocery run while I returned to emptying out the front bay of the bus.  I plan to leave most of the stuff that was stored in that bay at home so Josh has access to the ceiling to see if we can through-bolt mount the two captain’s chairs in the living room.  I might also store all of the GLCC stuff down there as Linda will be coming down on Wednesday in the car with the cats and we want to minimize the amount of other stuff in the car.

I thought about sanitizing the fresh water system by using the 12V DC water pump and the winterizing valves/tubes to draw a dilute chlorine solution from a bucket and pump it through the fresh water pipes.  I decided against it based on available time and higher priority items that needed to be done.  I connected the clean fresh water hoses to the coach and started filling the tank.  I checked that the fuel polishing pump was off and checked the air springs and latch on the generator.  I made a mental note that the aft air springs (front of the Yanmar diesel engine) needed air and made sure the slide tray was latched in place.  I was going to start the generator and let it power the air conditioners but decided to forego for now that as well.

We had unlatched and removed the towbar from the bus receiver earlier in the summer.  I used one of our hand trucks to move it over by the car.  I put the passenger side rear seat down and loaded the towbar in behind it along with the bag that holds all of the other pieces.  That left plenty of room for the two cat carriers, litter tray, and any miscellaneous things she may bring along on Wednesday.

We put the mattress back onboard and Linda made the bed, but forgot the electric heating pad.  Linda did some cleaning and then we loaded clothing and food.  Computers, cameras, and other technology will go on first thing tomorrow morning.  We then got the various GLCC items out of the garage and staged them by the passenger side of the bus.  I loaded our personal items onto the driver’s side half of the slide tray and loaded the GLCC stuff onto passenger side half.

Our goal was to be done by 5 PM but it was 6 PM when I finally had the pressure washer ready to use.  It took me a little over an hour to spray the car and the coach and I wrapped up for the day at 7:30 PM.  We had seitan stroganoff for dinner with the 2013 Egri Merlot and had watermelon for dessert.  It was another long day but we got a lot accomplished and most it did not require me to work on my hands and knees, for which I was grateful.
 

2015/09/12 (S) Making It Usable

In spite of all that we still have to get done on the bus we got up at 7:15 AM and went to our SLAARC breakfast.  We did not get to go last week because our grand-daughter (Madeline) was here and we won’t get to go next week because we will be at an RV rally.  We did not hang around like we sometimes do and left at 9 AM, but at least we got to go.

When I quit working on the toilet in the bus at 10 PM last night I had come to the conclusion that I had spent six hours trying to fix the wrong thing.  I assumed that the leak was due to a faulty O-ring or a misalignment of two pieces with the slip fit, presumably caused by the 9″ piece of Qest pipe with 1/2″ NPT lavatory fittings on each end.  After hours of effort and numerous attempts it occurred to me that the problem could be the threaded fitting in the first piece.  The fitting is unusual in that it is hollow and has an inside hex shape.  I got my SAE and metric Allen wrench sets but the largest wrenches, 3/8″ and 10mm, were too small and would not engage the fitting.

After dropping Linda at home I went in search of a 7/16″ and 1/2″ Allen wrenches.  I stopped at our bank for a little cash and then went to The Home Depot as they are next door to one another.  No luck there, but I did buy a 20″ flexible supply line with 1/2″ FIP threads.  I tried Lowe’s next but that was another strike out.  I tried O’Reilly’s auto parts store, the Tractor Supply store, and the Sears store across the street.  Nope, nada, nothing.  The guy at Sears suggested ACE hardware back in Howell so I headed that way but pulled into an Advance Auto Parts.  They had a set of Allen wrench (hex key) stubs, with 1/2″ drive sockets.  It included sizes smaller and larger than what I was looking for, in addition to the ones I was looking for, so I bought it.

Back home we installed the three large drawers in the rear of the bedroom.  I then spent several more hours working on the toilet while Linda changed out the handles on all of the cabinet doors.  She even figured out how to remove the handle on the built-in laundry hamper in the bathroom. As I have said here before, she is a clever girl.  I unscrewed the insert with a 7/16″ hex key, cleaned off the old thread compound, wrapped the threads with Teflon tape, and screwed it back in.  I mated the air/water sequence valve with the vacuum breaker and got them mounted to the support bracket, getting them aligned and snug in the process.

The last step was to attach the 20″ flexible supply line to the air/water sequence valve and water supply line.  I attached it to the air/water sequence valve first, looped it around, and attached it to the incoming water supply fitting.  Easy to say but tough to do.  There is a lot of stuff crammed into the back portion of this toilet and there is barely room to get one hand in there to work, never mind two.  To make matters worse (for me) the only hand I could get in there was my left one.  Being right-handed that made a difficult task even more so.

I turned on the water and checked for connection leaks.  I did not see any so I applied air pressure and initiated the flush cycle but it did not work.  Nothing, nada, zilch, no movement of the valve, drain flapper opening, and no flow of water.  The air-water sequence valve is mounted to a horizontal plate.  It installs from underneath and is held in place by a large nut that threads over the top.  I thought perhaps this nut was too tight and causing the valve to bind so I loosened it and the valve started working.  I flushed it several times looking for leaks and did not see any.  We made tiny adjustments to the location and decided to screw it down.  It was 3 PM.

I found the four screws that were originally used to mount the toilet to the floor.  They are very large and quite unusual.  They are 2.25″ long with coarse threads and hex heads with large Philips screwdriver slots.  The center of the heads, where the screwdriver slots cross, are drilled and tapped and there are four black caps with screws built into them that screw into them to conceal them and give the toilet a finished look.  I was concerned, however, about their length.  The underlayment and tile are somewhere between 5/16″ and 7/16″ thick, slightly thinner than the ceramic tile I removed, and the bus subfloor is (presumably) 3/4″ thick.  Anything that penetrates the tile by more than 1″ risks coming through the bottom side of the plywood and potentially screwing into something it should not.  I measured the base of the toilet and it was an honest one inch thick so I decided I would reuse the screws when we got to that point.

At this point we took about 45 minutes to clean up tools and put things away in the garage.  We then turned our attention to getting the built-in sofa installed.  I removed a piece of expanded metal mesh and cut a piece of aluminum sheet metal to cover a hole and used heavy duty double sided 3M tape to attach it to the HVAC duct.  While Linda cut pieces of felt to go under any pieces of the sofa that touched the floor I cut and attached foam weatherstripping to the back edges of the two plenum/support boxes and the return air duct/shelf.

We put the two plenum/support boxes in place against the end cabinets and HVAC duct but did not take the time to cut and screen openings into the duct.  We set the return air duct/shelf in place and put in the vertical front panel but the shelf held it out so I removed the weatherstripping from the back edge.  We also did not take the time to drill the 4″ holes at either end of the vertical panel for the round diffusers as there was no point doing this until the HVAC duct was modified.

We secured each of the plenum/support boxes to the wiring chase with a single angle bracket and to the front panel with a pair of brackets.  I drilled and countersunk a three foot length of 1/8″ aluminum angle and we installed it against the inside of the vertical panel and the top of the shelf.  The shelf is 45″ wide (side-to-side) and there is a 3″ high by 44″ long piece of the vertical panel missing at the floor and centered side-to-side.  The aluminum angle will transfer vertical loads on the central portion of the vertical panel to the shelf, which is 3/4″ plywood with full depth pieces along each edge and a slightly shorter central support piece.

We had been making a list throughout the day of parts that we needed.  When we got to a point with the sofa where we did not have the screws we needed we took a break.  We went to Qdoba in Howell for dinner, our first visit to this particular eatery since we moved to the Brighton/Hartland/Howell area, and both had vegan taco salads.  The salads were good enough although the taco shell bowels were not the best we have had.  The servers seemed a bit stingy with the various ingredients but in the end the salad was substantial and tasty.  It was also a convenient and efficient location being on an out lot of the Meijer’s supermarket property and right across the street from Lowe’s.

After dinner we went to Lowe’s and bought felt drawer/door bumper pads, screws, and two more angle brackets.  Back home we worked on the built-in sofa until 9 PM and called it quits for the night.  I spent two hours at my desk and finalized a featured bus article for Bus Conversion Magazine on Larry and Carol Hall’s GM4106.  I uploaded the article and photo files it to my Dropbox BCM folder, and then e-mailed the publisher, editor, layout person, and Larry to let them know it was there.

I try to finish these posts each night before I go to sleep or first thing the next morning.  If I fail to do that I quickly lose the sequence of events and details.  I tend to be up too late as a result, but if I fall behind by even one day it is very difficult to catch up while also trying to keep up.  As much as I have enjoyed the remodeling project I will be glad to not be so busy this winter and be able to write shorter posts about the interesting people, places, and things we experience.


2015/09/11 (F) Reassembling

I’m sure everyone who is old enough to remember September 11, 2001 remembers exactly where they were and what they were doing that morning.  Along with Pearl Harbor and the Invasion of Normandy 9/11 is certainly one of the most somber days of the year.

I was up late last night so I did not get up until 8 this morning.  I took a warm shower which was very refreshing.  (It was chilly overnight.)  I then fed the cats and made the coffee.  Linda got up and washed the blueberries, and we had granola for breakfast.  She worked at her desk while I researched expanded metal mesh.  It is readily available online in a wide variety of forms and basic stuff is apparently in stock at The Home Depot in Howell.

Linda needed to make deposits at two banks in Howell so we added The Home Depot to our errand run.  We picked up two small sheets of decorative metal screen and some other miscellaneous items.  By the time we got back to the car I had already decided that would probably not use the metal screens but we took them home anyway.

We finally got busy in the bus at noon.  Linda started putting the drawers back in and changing the handles in the cabinets.  It turned out that we needed #8-32×3/4 machine screws for at least some of the cabinet doors.  It also turned out that every drawer in the coach fit in a unique location.  In most cases it was obvious where a drawer went, but not all.  While she dealt with that I worked in the bathroom.

A portion of the OTR HVAC return air grill in the bathroom had been cut out, presumably by Royale Coach, but was not being used to pass plumbing or wiring.  It was yet another point of access for mice to get into the coach via the HVAC system (if that’s how they are getting in) but I wanted to seal it up while I had the chance (just in case it was).  I wanted to preserve the return air flow functionality of that area, however, buy covering it with expanded metal mesh.  I had salvaged some from the old furniture but had already used it as temporary screening on the HVAC duct by the living room sofa.  I had to uninstall a piece from there and cut it down to the right size.

It took way too much time to find my metal shears but I eventually did, in a tub with garden tools of all places.  I hate it when that happens.  It was an inauspicious and inefficient start to the day’s work.  Some of the inefficiency in this project can be directly attributed to the fact that we are still not fully moved in to this house after 2-1/2 years and do not have all of the tools and supplies unpacked and organized in a proper shop.  We spend too much time looking for things and even more time driving to the store to buy something we probably already own but cannot find.

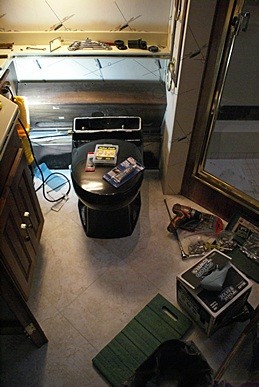
The Microphor LF-210 air-flush toilet set back in place in the bathroom.

The Microphor LF-210 air-flush toilet set back in place in the bathroom.

We moved the toilet from the bedroom storage box to the bathroom and set it approximately in place.  We left the wood cover off the HVAC/wiring chase and then moved the toilet into position as far as possible.  Final positioning required the drain to be connected.  It was difficult to disconnect and even more difficult to reconnect.

The toilet outlet and the drain pipe get connected by a rubber sleeve with a stop in the middle.  A metal compression sleeve with two integral worm gear band clamps then goes around the rubber sleeve.  In order to get this assembled I left the compression sleeve off and got the rubber sleeve over both pieces.  We were the able to move the toilet back and make sure the two pipes were fully seated but it was a lot harder than this makes it sound and took a lot longer to do that it did to write these few words.

To get the compression sleeve on I had to unwind the worm screws until the bands popped out.  I spread it open and slipped it over the rubber sleeve.  I then put a zip tie around it to compress it and hold it in place while I bent the compression bands around and back into the worm gear.  Once I got them to “bite” I was able to use a 5/16ths socket on a very long extension to reach inside the back housing and tighten the bands.  Again, it was a lot harder to do than this description suggests and took quite a while to accomplish.  There is very little room to work inside the back of his toilet and the drain/clamps are at the very bottom near the floor with the only access being from above.

Next was hooking up the water and that was ordeal in its own right as I could not get the water line to line up with the plumbing in the toilet.  I eventually realized that the tile floor extended back over the bottom flange of the HVAC duct where the water supply line used to sit.  We heated the tile behind the toilet with a hair dryer and I then used sharp utility knife to trim it.  The nine inch piece of Qest pipe with nuts on both ends still did not want to line up with the supply pipe or toilet connection.  I eventually got it connected but it was a struggle.

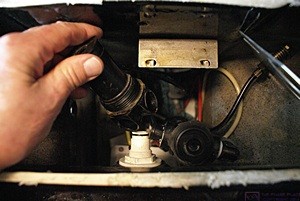
The vacuum breaker (L, in my hand) and the air/water sequence valve (R) as viewed looking straight down into the back of the toilet.  The Microphor LF-210 toilet does not have a water tank.  The entire back of the toilet is full of valves, air lines, and water lines.

The vacuum breaker (L, in my hand) and the air/water sequence valve (R) as viewed looking straight down into the back of the toilet. The Microphor LF-210 toilet does not have a water tank. The entire back of the toilet is full of valves, air lines, and water lines.

Last, but not least, was the air.  The Microphor LF-210 is an air-flush toilet that uses 1/2 gallon of water per flush.  I started the bus to pressurize all of the air systems.  Once the auxiliary air tank was full I had Linda hold a rag over the open end of the air line and gave it five good blasts of air to blow out any debris that might have gotten in there.  I then shut off the air supply and connected the air tube to the flush actuator.  I turned the air supply back on, turned on the water pump, and opened the water valve.  Everything looked OK so I flushed the toilet.  Everything worked but we had a leak between two components where we had never had a leak before; at least not as far as I knew.  It was 4:30 PM and it was now obvious that we were not going to accomplish most of what we planned/needed to get done today.

The leak was between two of the fresh water components, the air/water sequence valve and the vacuum breaker.  The air/water sequence valve has a pipe with an O-ring that slides into a matching hole on the vacuum breaker and the leak was at that junction.  The vacuum breaker has a second hole, at a right angle to the first one, which slides over another stub with an O-ring that is screwed into the back of the toilet (inside) and feeds water to the bowl.  I ASSumed that the leak was due to the O-ring between the two parts having failed.  All told I spent another 6 hours on trying to fix the leak, including trips to various stores for O-rings, etc.

About 1/2 hour before I quit working for the night it occurred to me that the leak might not be the O-ring as the pipe with the O-ring is threaded into the air/water sequence valve.  It’s a pipe, so it’s hollow, but it threads into something and is smooth on the outside with nothing to put a wrench on.  Looking in the end, I saw that internally it was a hex socket.  I got my Allen wrench sets to see if I had the right size, but I didn’t.  My hex keys only go to 3/8″ and this was bigger than that.  It was 10 PM and I had spent 10 hours working on the installation and repair of the toilet without successfully completing the task.  Some days are like that and you have to take them in stride.  If you can’t (or won’t), converting (or reconverting) a bus is probably a bad choice of hobby.  For that matter so is owning a house and trying to maintain it yourself.  I guess life really is easier if you can just throw money at problems.

Given the progress of the work today we realized that we would have to delay our departure for Edwardsburg/Elkhart until at least Tuesday morning, and might not be able to leave at all if I could not get the toilet repaired without ordering parts.  We considered alternatives, including me taking the bus by myself to Coach Supply Direct and then bringing it home, skipping the GLCC rally in Elkhart.