Tag Archives: Daiya non-dairy cheese

2015/08/24 (M) Skimcoating

For a change of pace we had granola with vegan yogurt for breakfast.  I made seven cups of the Cafe Europe / Columbian decaf blend but Linda only had one mug as she was meeting Diane at Kensington Metropark at 9 AM to walk.  After she left I gathered up the laundry, sorted it, and started the first load.  I then turned my attention to the bus.

My first task was to cut one of the 8″x8″ sheets of #80 sandpaper in half, put it on the orbital pad sander, and go over all of the Universal Patch and Skimcoat (UPS) that I applied yesterday.  The 80 grit worked well and I only needed the one half sheet.  I swept the floor clean of loose debris and then assembled my tools and materials to patch a few gouges I missed yesterday and then skimcoat the entire portion of the floor that used to have ceramic tile on it.  I mixed 24 ounces (by volume) with 12 ounces of water (by volume), half as much UPS as I did yesterday.  I tried to work more quickly and got most of it applied.  I cleaned up my tools and let them dry while the compound cured.  That also gave me an opportunity to move laundry from the washer to the dryer and start another load in the washing machine.

I had a call from Chuck so I took a break to chat with him.  He and Barbara spent the weekend racing at the old Air Force base in Oscoda, Michigan.  Their bus and race car both ran well and he turned in some very good times.  He had installed a new turbo boost gauge in the bus and based on my experience had selected a 0 to 15, PSI VDO unit.  Apparently 15 PSI is not high enough for his engine.  I have seen the boost on my gauge, which is a 0 to 30 PSI model, go as high as 17, but not often.  For most of our trip to Arizona and back this past winter it did not go over 15 PSI.

The only issue they have with their coach at the moment is their old Amana residential refrigerator.  The freezer is apparently not keeping things as cold as it should and the ice maker is not working.  They use a lot of ice and generally have the freezer stocked, so those are problems.  They bought a bag of ice for the weekend but it appeared to get warm enough to develop surface moisture and then refroze into large chunks, inconvenient at best.  I think they have decided to replace it and want to do so before they leave for the winter and while they still have the shop and the forklift.

Chuck is also going to contact the glass installer and see if he would be willing to install bus windshields.  Both of his lower windshields need to be replaced as do both of ours.  We have five replacements at his shop, two for him and three for me.  I also have new gaskets but he needs to get two sets.  We discussed late September as the best time for me and he will see if the windshield guy will do all four of them on the same day.

I mixed the remaining USP, about 12 ounces (by volume) with 6 ounces of water (by volume) and finished the skimcoating of the bus floor.  I used the last little bit of compound to patch some screw holes and small gouges in the living room floor where carpet had been installed.  There may be a few more but instead of opening another bag of UPS I will probably return it and buy a quart of the premixed compound.  I then cleaned up my tools again and left them in the sun to dry.

Linda got home about this time.  It was just after noon, so we had a light lunch of vegan deli slices with lettuce, onion, and Daiya non-dairy cheese, on thin buns.  A pluot provided a nice, sweet finish to lunch.

We measured for wallpaper the other day so I took the notes and created an Excel spreadsheet to figure out how many rolls of wallpaper to order.  While I did that Linda worked on cleaning and reconditioning drawer fronts with Touch of Oranges and Touch of Beeswax.  After examining the wallpaper in the bathroom (of the bus) I think we need to replace it too.  We took a few minutes to get those measurements and I added them to the spreadsheet.

The wallpaper we have selected is the Lamar (#699-3377R) from the Just Textures collection of Sellars and Josephson.  It is an off-white color with a small texture pattern designed for reverse hang, random match installation.  It is only sold in 2-roll bolts 27″ wide and 4.5 yards long.  We will need more than six rolls to replace all of the wallpaper so we will have to order eight rolls even though we may defer doing part of the hallway and the bathroom for a while.  Fortunately it is not too expensive (as wallpapers go) and is scrubable, which was one of our requirements for use in the bus.  Linda will return the sample books to Delux Drapery and Shade Company in Ann Arbor on Wednesday morning and place the order.

Linda reheated the leftover fajita veggies from last night and fixed some white rice to go with them.  We had fresh strawberries and a little Coconut Bliss non-dairy ice cream for dessert.  Coconut Bliss ice creams are not too coconuty, and are appropriately named.  They are as good as I remember Hagan-Daas being.

I took a little time to add lines to my floor tile layout drawing showing the location of the underlayment sheets.  It looks like I may need at least eight sheets.  I have four sheets in the garage and will install those before buying more.  I spent the rest of the evening working on the article for Bus Conversion Magazine about Larry and Carol Hall’s GM4106 bus conversion and finished it around 10 PM.  I spent another 1.5 hours catching up on e-mail and checking in on the status of Technomadia’s bus renovation project at MasterTech in Elkhart, Indiana.  The weather has turned cool and should be perfect for working on the bus tomorrow.  We need to have long, productive days, so I had a snack and got to bed at midnight, played a few games, and went to sleep.
 

2015/07/11 (S) Impactful Tools

We had a small crowd for our SLAARC breakfast this morning but good conversation.  After breakfast we drove to Chuck’s house and picked up the manual impact screwdriver.  Barb was up in the thumb visiting her brother-in-law who recently lost his wife (Barb’s sister).  We lingered for a while and then left for home, stopping for gas on the way.

Back at the house I started a load of laundry and then went to work on the stop block screws.  Linda helped steady the ladder and pass tools and parts back and forth.  I got three of the four screws out of the two stop blocks but the head stripped on the forth one so I was only able to remove the aft stop block.  I tried different bits and even tried drilling a small hole in the center of the head to allow the bits to go in farther but it did not work.  The next approach will be a screw extractor, but first I have to go buy one.

We had soy yogurt for lunch with red grapes and I had a few pretzels with roasted red pepper hummus.  I kept trying to get to the basement to work on the desk design but kept getting detoured.  Once I finally reached my office I found that the mouse trap that I had placed under one of my desks was out in front of it.  The food was gone but there was no mouse, only mouse poop.  I realized that the trap was upside down which allowed the door to swing open.  Our best guess is that a mouse was trapped and the cats pulled the trap out from under the desk and accidentally turned it over while pawing at it trying to get the mouse.  Since there was no sign of a mouse having been caught by one of the cats my best guess is that it escaped, for now.

I checked e-mails and found the one with the credentials and instructions for the QTH.com web-hosting of SLAARC.com so I shared those with the other members of the SLAARC website team and then logged in to check out the log file I had created the other day as a test.

I decided to reconnect the Yaesu FTM-400 radio to the Diamond X-50 antenna on the tower so I could monitor the Novi and South Lyon repeaters while I worked in my office.  I had quite a mess on the ham shack desks and decided the best way to deal with it was to install Mike’s Icom IC-2820H in my car in place of our Icom V-8000 2m rig.  At least that would get the 2820 off the desk.  I checked that the mounting brackets and they were identical so I removed the V-8000 but left the mounting bracket installed in the car.

Mike had modified the power cord on his radio by cutting off the T-connector and replacing it with Andersen PowerPoles so I had to modify the power cable in my car to match as I could not modify Mike’s radio.  I removed the fuse from the positive (+12VDC) lead and then cut off the T-connector, leaving about 6″ of wire so I can add PowerPoles and make it into an adapter cable.  I brought my Hakko soldering station up from the basement, set it up on the floor behind the center console, ran an extension cord from the garage, and used it to solder PowerPole contacts to the two wires.  I then inserted them into the black/red housing pair and snapped them in place.

I mounted the IC-2820H, connected the power cable and connected the coax from the antenna.  I reinstalled the fuse in the positive lead, started the engine, and turned the radio on.  A couple of hams were chatting on the Novi repeater, one of whom I knew (Jim, KB8TAV).  When they finished I gave Jim a call and he came back to me, the first time I have been able to use the Novi 440 repeater from my car.  Jim signed off and I switched to the South Lyon 2m repeater and gave a general call.  Steve (N8AR) came back to me and we had a short QSO that verified the radio/antenna was also working on 2m.  As we were wrapping up Linda started fixing dinner.

Linda fixed a simple salad and Dr. Praeger’s vegan hamburgers with Daiya non-dairy cheese.  These patties were also squishy rather than firm and, like the ones at Zingerman’s Roadhouse the other night, where not very satisfying.  They tasted OK, and we ate them because we are not inclined to waste food, but there is a lot more to what makes food satisfying than just taste.  Sight, smell, and texture (mouth feel) are also important.

Linda had several TXT messages from Mara letting us know that she would be arriving tomorrow sometime before 2 PM as she wanted to watch the Wimbledon finals at that time.  Linda and I considered how best to accommodate Mara’s motorhome and finally decided to just pull our bus straight forward until the nose was at the edge of the concrete driveway.  That created more than enough space on the level part of the pull-through driveway for her to park and plug in to our 50 amp service.  The only loads we have in the bus at the moment are battery chargers so we used our 15 amp cord to plug it into a garage outlet.  Since I had to start it to move I switched it to high idle once I had it positioned, leveled it, turned on the OTR air-conditioning to put a load on the engine, and let it run for 30 minutes.

I returned to my office after dinner and work on the desk design for a while but by this point I was tired and not really in the mood.  The last time I updated the BCM page on our website was after the February 2015 issue came out.  I have had articles in the March, April, and May issues and will have articles in the June and July issues.  I captured the covers from March, April, and May and updated the page.

I exchanged e-mails with several people and spent some time looking at dual and triple monitor stands on EBay.  We rarely use EBay and the site made me change our password before it would let me log in.  There was a large selection of products but none of them were exactly what I am looking for.  There wasn’t any rush so I decided to revisit this tomorrow.


2015/06/20 (S) Cable Entry Box

We had not been to our local ham radio club breakfast the last two Saturdays because of the GLAMARAMA rally and a visit from Linda’s brother, Ron, and his wife, Mary.  The club was conducting VE testing today, rather than the usual 4th Saturday of the month, because the ARRL Field Day event is next weekend.  When we got to breakfast at 8 AM there were already a lot of people there and seven more came in after us.  We did not take a head count but it was somewhere between 25 and 30 people.  We also did not have our usual waitress but the substitute very efficiently got everyone’s order taken and delivered.

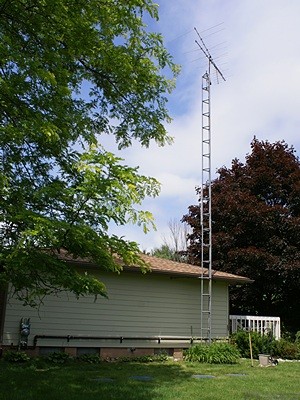
The 40 foot tower on the east end of the house with the old OTA TV antenna on top.

The 40 foot tower on the east end of the house with the old OTA TV antenna on top.

I checked with Mike (W8XH) and he is available to help us get the antennas mounted on the small tower on Monday or Wednesday, assuming I have the cable entry box (CEB) installed and all of the necessary coaxial cable on hand.  Getting the CEB mounted was my main goal for today, but not the first thing I had to do.  I called Chuck as we were leaving breakfast at 9:15 AM.  He was at home and suggested we stop by there and pick up a key to his shop.  He was working on landscaping when we arrived so we did not stay long and we were back home by 10 AM.  Linda finalized her shopping list and headed off to gather the things she needed to prepare tomorrow’s brunch.  I changed into my work clothes, gathered up the laundry, put a load in the washer, and got to work on the CEB.

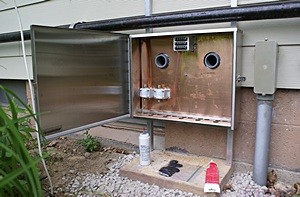
The CEB is designed to mount on the outside of the house, allowing wiring to pass between the inside and outside of the house in a way that is weather tight and animal proof.  Coaxial RF cables and control lines enter through the bottom, connect to lightning arrestors in the CEB that provide a path to ground if/when needed, and then continue through the wall of the house and thence to various devices.  Those devices might include cellular phone signal boosters, Wi-Fi systems, TV sets, satellite receivers, personal weather stations, or amateur radio gear such as radios, remote antenna switches, and antenna rotators.

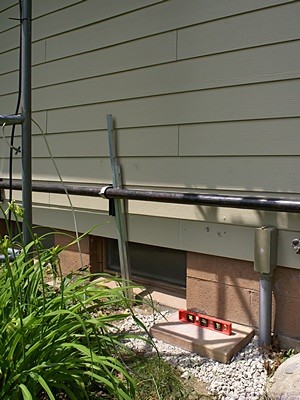
The general area on the east end of the house at the base of he 40' tower where the CEB will be mounted.

The general area on the east end of the house at the base of he 40′ tower where the CEB will be mounted.

Superficially the installation looked simple.  With the copper back plane removed there were four mounting holes, one near each corner, and two large holes in the back.  All we had to do was hold the box against the wall, mark the locations of the four mounting holes and the big cable entry holes, set the box aside, drill the holes, put the box back up and secure it.  Right.  Sort of, but not exactly.  Mounting the box took seven hours to complete.

The first step was to remove the copper back plane with the three lightning arrestors installed on it.  I took care of that yesterday.  The next issue was that the house has shiplap siding, i.e., the east wall where I needed to mount the CEB was not a flat surface.  I decided to use 1″ square aluminum tube, installed vertically along the back of the box at the outside edges, to span multiple siding boards, ensuring that the CEB would be plumb.  I also decided to leave the tube long enough to go all the way to the ground and use it to support some the weight, in effect creating legs for the CEB.  That was Linda’s idea.  She’s a smart girl and a licensed amateur radio operator.

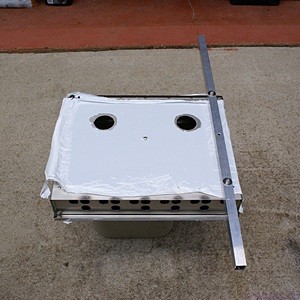
The back of the CEB with one of the vertical mounting bars.

The back of the CEB with one of the vertical mounting bars.

We had some surplus pavers and garden blocks and I found one that was just wide enough to catch the bottom of the legs.  I also had some left over paver base material, which meant I did not need to make a trip to the store.  The paver base material was from a project long, long ago (in a place far, far away) and I used it to create a base for the foundation paver, which was approximately 18″ x 12″.  I leveled the base side-to-side and pitched it away from the house for drainage.

Yesterday I purchased a 3′ long aluminum tube at Lowe’s and a 4′ long tube at The Home Depot.  Three feet turned out to be a good length, so I cut a foot off of the 4′ tube.  Things then got trickier.  The positioning of the CEB was critical as the two large holes in the back were for adapters for 2″ plastic conduit.  I was going to have to cut 3″ diameter holes through the bond that would come out above the plate on top of the concrete block foundation.  In the chosen mounting location the bottom corner holes in the CEB would be below the siding.  The lower right leg would be at least an inch away from the concrete block foundation and the lower left hole would be in front of a basement window opening so neither of these were going to be screwed into anything.

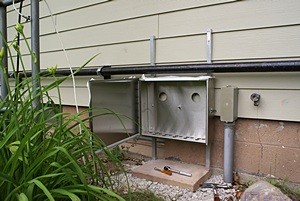
The CEB in position on the east end of the house with the door open.  The copper backplane has been removed.

The CEB in position on the east end of the house with the door open. The copper backplane has been removed.

I wanted the CEB anchored at more than two points so I decided to drill two additional holes in the back, one on each side, approximately half way between the existing top and bottom holes.  I measured the spacing between the top and bottom holes as carefully as I could.  I measured down from the top end of each leg a distance for the top holes that was just sufficient to make sure the door of the CEB was below the 2″ iron gas pipe that runs horizontally along the outside of the house.  I measured down from there for the new middle hole and the bottom hole.  I then drilled the three holes through each leg by drilling opposing sides.  I had to use a powered hand drill for this work as my drill press was stored behind a large pile of RV furniture that we took out of the bus and was inaccessible.

I attached one of the legs to the back of the box using two short bolts through the top and bottom holes.  I then used the middle hole in the leg as a guide and drilled through the back of the CEB.  I repeated this procedure for the other leg.  I drilled the holes in the legs as accurately as I could but they did not quite line up so I had to enlarge them slightly by using the drill bit like a router bit.  Not ideal, to be sure, but aluminum is relatively soft and it worked.

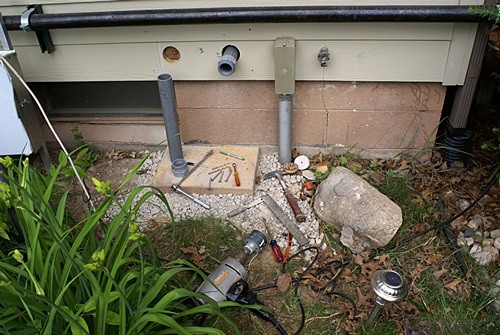
The east end of the house with two 2" holes for the conduit.

The east end of the house with two 2″ holes for the conduit.

I attached each leg to the back of the CEB using 1.5″ 1/4-20 bolts through the bottom corner holes.  I snugged these up but left them loose enough that we could move the legs.  The top and middle holes were located in positions that would allow lag screws to be screwed into the siding and underlying plywood.  We had to tilt the legs to get them under the 2″ iron gas pipe and then straighten them and set them on the foundation paver.  We had to do this multiple times but it was easy once we figured out how to do it the first time.

With the CEB in position I marked the location of the holes for four 3″ 1/4-20 lag screws.  We removed the CEB so I could drill the holes for the lag screws and then put it back in position and screwed it to the wall.  I marked the locations of the two holes for the conduit as best I could and then unscrewed the box and removed it again.  I used our 1/2″ Craftsmen corded drill for the 3″ hole saw.  I bought this drill in 1978, along with a lot of other Craftsmen tools, when we moved into our house in Farmington Hills.  I still have almost all of those tools and they all still work.

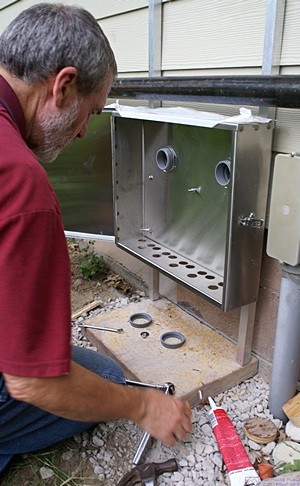
The CEB in position with both pieces of conduit through the back.

The CEB in position with both pieces of conduit through the back.

With the conduit holes drilled I cut one of the 18″ lengths of conduit in half, inserted the pieces into the adapters, and placed them in the holes.  We then put the CEB into position, got the adapters through the holes in the back of the CED, and tried to line up the holes in the legs.  The conduit was being forced up as it went through the bond, especially the one on the left, and would not allow the holes in the CEB to line up with the holes in the legs.  We took the retaining rings off of the adapters and removed the CEB, again.

I shortened the conduit pieces to approximately 5″ and checked the fit in the holes.  We wrapped two bands of adhesive backed foam weather-stripping around each piece of conduit and placed them back in the holes.  I then applied a bead of adhesive caulk all the way around each adapter at the wall.  We put the CEB in position for the final time, got the conduit adapters through the holes, snugged up the retaining rings, and put the four lag screws in.  After tightening the four lag screws I tightened the two bolts in the lower corners.  I then tightened the adapter retain rings and put the open end caps on.  The conduit ended up getting pulled back out of the wall a bit so I used the thin end of a 10″‘wood shim to try and force the caulk back into the gap around the conduit adapter.  It did not go back in very well so I will have to figure out something else to seal around the conduit.

The CEB was finally installed and very solidly anchored.  I got the copper base plate and remounted it to the five studs (four corners and one center) using some antioxidant/anti-seize compound on the stud threads.  The last step (for today) was to install the snap in covers for the 16 cable entrance holes in the bottom of CEB.  I also ordered 16 grommets and will remove the caps and replace them with grommets as I install devices and run their cables and wires into the CEB.

The CEB with the copper backplane installed and the three Morgan lightning arrestors mounted (two lower left, one top center).

The CEB with the copper backplane installed and the three Morgan lightning arrestors mounted (two lower left, one top center).

The two pieces of conduit open into the sump pump room (large closet) in the northeast corner of the basement just above the wood plate that sits on top of the concrete block foundation.  I plan to install the SureCall Fusion5s 5-band cellular booster (amplifier) in this room to keep it close to the CEB and because there is AC power available there.  I bought an installation kit for the Fusion5s that includes a lightning arrestor which will get mounted in the CEB.  I also bought an amplifier for the OTA TV antenna that will mount on the tower a few feet below the antenna.  The amplifier will get its power through the coax from a power inserter that doubles as a lightning arrestor and will be installed in the CEB with the AC power supply (wall wart) in the sump pump room.

I did not get these two additional lightning arrestors installed today.  By the time we got the CEB installed we were tired.  The high temperature was OK (near 80?) but the relative humidity was very high.  I was also very sore the whole time, especially my left knee, undoubtedly the lingering after effect of using the power chisel earlier in the week to remove thinset and mastic from the floor of the bus.  Getting down and up at least 50 times during the afternoon did not improve matters, but we got it done.

Even though she was also tired, once we reached a point where I could finish up alone Linda got busy making several food items for tomorrow.  In the midst of all that she heated some Amy’s Lentil Soup and made grilled cheese sandwiches with Diaya cheese or dinner.  Diaya makes an excellent non-dairy cheese that works well cold or cooked into dishes.

After dinner I returned a call from Butch to find out more about their new property and buildings, and discuss bus and ham radio projects.  One of the things Linda made was an apple pie so we stayed up until it was cool enough to wrap up.  That turned out to be 10 PM, by which time we ready to turn in for the night.


2014/03/20 (R) The Spring Equinox

Winter officially yielded to spring today but we did not really notice.  Today was another beautiful day here in north central Florida, just like yesterday and just as tomorrow was forecast to be.  We hung around the RV resort and did quiet things.

We went to Satchel’s in Gainesville, Florida for dinner with John and Ali.  Linda had leftover pizza from there after she returned from Michigan, but this was her first visit to the place.  She agreed that it was uniquely charming.  The service was excellent once again.  We split part of a salad and ate half of a pizza, saving the leftovers for another meal.  The pesto base pizza with Daiya vegan cheese, mushrooms, onions, and sun-dried tomatoes was excellent.  The crust is the best I’ve had since we quit eating St. Louis style pizza from Imo’s, which is unfortunately not vegan.  Their brownies are vegan and we split one for dessert; no leftovers for this item.

We drove separately from John and Ali as we both had shopping to do, but not the same kind.  We stopped at Publix on our way back to Williston and stocked up on fresh fruits and greens.  We put everything in the refrigerator when we got back and I noticed during the evening that the refrigerator compartment was a bit warmer than normal.  Adjusting the thermostat was not having the desired effect.

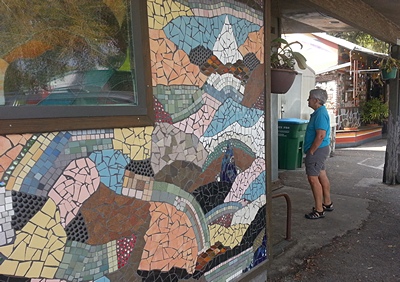
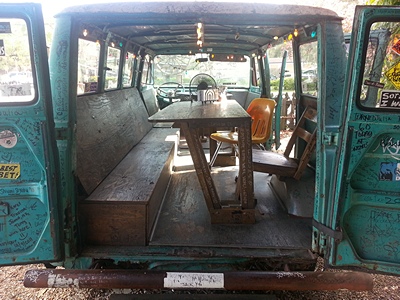
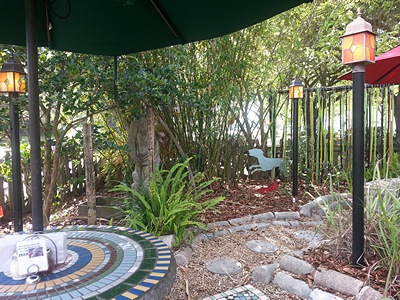
Here are a few more photos from Satchel’s, all  taken on my Samsung Galaxy S III smartphone and post-processed using Faststone Image Viewer software:

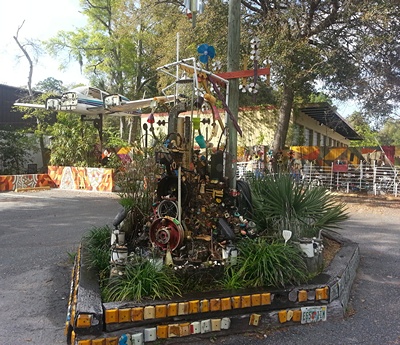
Rear parking lot art at Satchel's in Gainesville, FL.

Rear parking lot art at Satchel’s in Gainesville, FL.

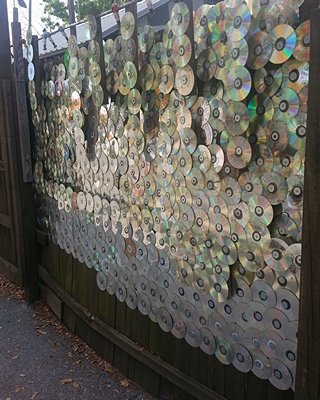
Ever wondered what to do with old CDs?  Now you know.

Ever wondered what to do with old CDs? Now you know.

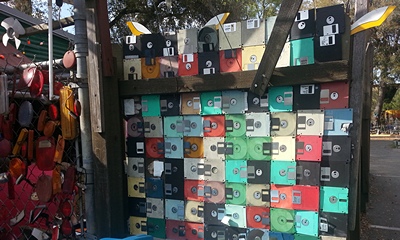
Remember 3.5 inch floppy disks?  Now they are wall art.

Remember 3.5 inch floppy disks? Now they are wall art.

Part of the tile work at Satche''s in Gainesville, FL.  Linda studying the bulletin board.

Part of the tile work at Satche”s in Gainesville, FL. Linda studying the bulletin board.

Yes, you can be seated here for your meal at Satchel's in  Gainesville, FL.  It's actually a difficult table to get.

Yes, you can be seated here for your meal at Satchel’s in Gainesville, FL. It’s actually a difficult table to get.

Part of the front outdoor seating area at Satchel's in Gainesville, FL.

Part of the front outdoor seating area at Satchel’s in Gainesville, FL.