Tag Archives: bed platform (H3-40)

2015/09/13 (N) Club Business

Linda is still fighting her cold and I was up way too late last night so we slept until 9 AM this morning.  Because we were getting a late start, and neither of us was hungry, I made coffee but we skipped breakfast.

It was 51 degrees F in the bus so I turned on all three electric toe kick heaters and put on my zip front sweatshirt that I use to work in cool situations.  We took all of the freezer packs out of the house refrigerator freezer compartment and moved them to the freezer compartment in the bus fridge.  Linda also filled four large containers with water and snapped the lids on.  We put those in the refrigerator compartment on the bus, turned on the power, and put the wireless remote thermometer in the freezer compartment.

I was going to raise the front of the refrigerator until the top hinge for the freezer door just touched the ceiling of the alcove but our relatively inexpensive model apparently lacks that adjustment.  Linda was also concerned about how we will latch the doors for travel.  She remembered seeing a very clever latch for a fridge with doors like ours at the GLAMARAMA rally in early June and found a picture of it on her phone.  It is actually fairly simple and if custom made could be installed using the holes for the center hinge (between the doors) on the handle side (right side) of the fridge.

(I still like Scott Bruner’s solution best.  He devised an electromagnet system that is activated by turning the ignition on but has an override switch.  He and Tami have a cafe door, bottom freezer drawer unit.  One electromagnet holds plates on top of the cafe doors where they meet at the center of the fridge.  A second electromagnet is mounted on the right side of the lower case and holds a plate on the side edge of the freezer drawer front.  Very clever, and very fail safe.)
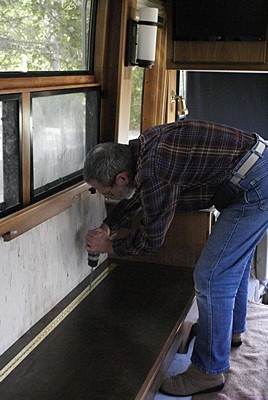
Bruce installs the fixed side of the piano hinge to the top of the wiring chase above the OTR HVAC duct.

Bruce installs the fixed side of the piano hinge to the top of the wiring chase above the OTR HVAC duct.

Our first construction task for today was to finish installing the built-in sofa.  This was a semi-permanent installation with everything in its final place and screwed in.  We will have to disassemble it once to finish cutting it and screening off the openings in the OTR HVAC duct and to drill the 4″ diameter holes in the vertical front panel for the circular registers.  We also need to find a pair of suitable length lifts to support the seat in the open position.  Finally, we need to find and mount some 12V DC LED lights and replace the momentary contact switches in the aft end cabinet with on-off versions.

It took us until 12:25 PM to finish the sofa (for now).  We took a brief break and had an apple for a snack.  Our next task was to put the plywood bed platform back in the coach.  That sounds simple enough but we knew from taking it out that it would be difficult to put back in.  The platform is the size of a queen size mattress, in two sections joined by a piano hinge.  It’s big, bulky, and very heavy, with no good handholds but we managed to get it into the bedroom and setting flat on the storage box base.

The physically hard part was behind us but now we had to get the fixed part of the platform screwed back down to the base, requiring us to put 18 screws back in the holes they came out of.  I rewired the aisle lights before we did that as I was easier to get to the wires.  We used two screws to index the location, checked the reveal along the length of each side, and screwed it down.  I then reconnected the two gas springs while Linda held the platform up.  I also connected the wiring for the two cargo lights but they did not come on.  I will have to change the bulbs and see if that’s the problem but for now we had more pressing tasks.
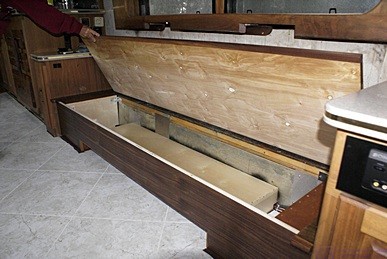
A view from near the co-pilot/navigator seat of the built-in sofa with the hinged seat base lifted up to reveal internal pieces and storage space.

A view from near the co-pilot/navigator seat of the built-in sofa with the hinged seat base lifted up to reveal internal pieces and storage space.

We went inside, each had an apple, and then returned to the bus.  I had planned to temporarily mount two 12V DC switches but did not have time to fabricate a temporary mounting plate.  We needed the switches hooked up so I just reconnected the female spade connectors on the cable to the spade lugs on the switches and draped the wires over the arm of the passenger chair.

Our next task was to temporarily install the desk.  The installation was only temporary in the sense that we would need to disassemble it to get the Aqua-Hot fan-coil heat exchangers installed in the bases.  My preference was to get the heating system configured as part of the desk installation but we ran out of time before our appointment at Coach Supply Direct.

Our first sub-task was to cut the 1/4″ Baltic birch plywood spacer to fit on the right side of the right pedestal/base.  I cut it to be shorter than the desk and not as deep as the base, which is recessed at the front to create a toe kick space.  I cut the lower back corner out so the space would fit around the HVAC duct / wiring chase.  We peeled off some clear tape from the mirrors in the right rear corner down below the level of the top of the desk and set the spacer in place.

Our next task was to redo some AC wiring to get power to the space between the pedestals and reconnect the passenger side front duplex outlet.  To get power to the interpedestal space I decided to run 2C+G (Romex) cable from the wiring chase through a hole in the bottom of the pedestal, up the inside rear left, and out through a hole in the upper rear left side.  This hole and cable will not be visible unless someone crawls under the center of the desk.

In order to get the cover/shelf in the foot well aligned with the left and right pedestal/base components I decided to use mending plates attached to the back side of the bases and pedestals.  We started with the right hand components.  I attached a plate to the back side of the left rear base projection and one to the underside of the left end of the upper bottom section of the pedestal.  We set the base in place, put the pedestal on top of it, and set the cover/shelf in place.

We carefully shifted the components until we had them aligned the way we wanted.  I then secured the pedestal to the wall (which is 5/8” or 3/4″ plywood not sure which) with a single screw through the back panel centered from side-to-side and a couple of inches down from the top edge.  We double-checked the alignment of the pieces and then secured the pedestal to the base with three screws.  The base is not screwed to the floor or anything else except the pedestal.

We set the left base and pedestal in place and fussed with the alignment for but it was already 4:15 PM.  We had planned to quit working at 4 PM to get cleaned up for our SLAARC meeting and have dinner.  We still have a lot to do tomorrow for me to be ready to leave on Tuesday morning, but it should be manageable.

We went to Panera in Brighton for dinner and both had the Edamame Soba Noodle Bowl.  It was a generous serving that was tasty and filling even though it was only 390 calories.  It was very high in sodium, a common but unfortunate problem with most of Panera’s food, so not something we would eat often.

We arrived at the South Lyon Witches Hat Depot Freight House at 6:30 PM for the monthly meeting of the South Lyon Area Amateur Radio Club (SLAARC).  We had a larger group than usual, at least 30 people.  The business meeting was brief and followed by a program by Steve (N8AR) on the Yaesu Fusion technology.  Steve and several other club members brought different radios to demonstrate and let the attendees try.

We left in time to get home by 9 PM and watch an episode of Sherlock on Detroit PBS, followed by Rick Steve’s Europe and then Music Voyager.  We’ve been working long, hard hours and it was nice to take an evening to relax and do something other than work on the bus.
 

2015/08/04 (T) Back to Busics

The weather finally turned cooler yesterday and the overnight lows dropped into the upper 50’s; perfect sleeping weather.  We had the house open all day and left windows open overnight.

After breakfast and coffee we worked in the bus for the rest of the morning.  I wanted to clean out all the remaining items from the drawers and cabinets before we start sanding the residual thinset and mastic.  Our first task was to get the refrigerator out of the way.  We laid it down on its face with cardboard under it and slid it forward and over to the passenger side behind the co-pilot seat.

We surveyed all of the storage areas and decided it would be easiest to remove all of the drawers from their slides with the stuff still in them.  The drawer boxes release from the two side-mounted slides at the front via a plastic clip.  The back edge of the part of the slide attached to the box then slides out from under a small tang, allowing the drawer to be lifted out.  An added benefit to removing the drawers is that it will be easier both to clean them and clean the face frames on the built-in cabinetry.

Linda decided to go through all of the stuff as it came into the house, sorting it initially according to whether we should keep it or and throw it away.  Of the things she thought we should keep the next step was to clean them if needed, or queue them up for cleaning.  That included almost everything related to the kitchen.  She reorganized the stuff that was already in the small bedroom, putting cardboard boxes in the recycle pile while I took some ham radio related stuff down to my office.

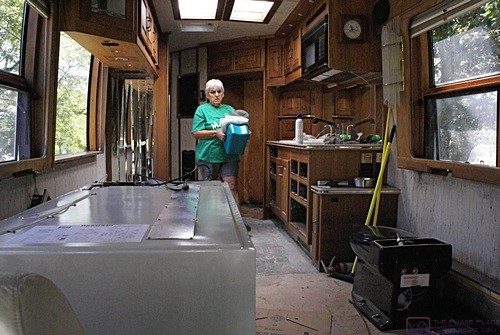
Linda emptying the inside of the bus.

Linda emptying the inside of the bus.

By noon we had the kitchen and part of the bathroom cleaned out.  I decided to take a break from bus work and install the new bottom weather seals on the garage doors.  I unscrewed the mounting track from the bottom of the 16 foot wide door and removed it.  It had years of accumulated dirt in it so I cleaned it out.  With Linda’s help we got the new seal installed, using soapy water as a lubricant, and reattached the track to the bottom of the door.

Our luck did not hold up with the 8 foot wide door.  Both doors are Wayne Dalton products but the 8 footer is not as thick.  The bottom track for the weather seal is only about an inch wide and the replacement seal, which is designed for a “T” channel would not fit.  Closer inspection suggested that the proper seal would have a cylindrical edge rather than a “T.”  We checked online and found a supplier through Amazon but held off ordering until we had a chance to check for local sources.

We had lunch, after which I went to The Home Depot to see if they had any garage door seals that were different from the one’s at Lowe’s.  They did not.  There is a branch of our bank adjacent to The Home Depot so I stopped there and then headed to Lowe’s where I returned the weather seal for the 8′ door.  I then bought a 400 foot long roll of 9 foot wide 0.31 mil painter’s plastic and four roles of 2″ painter’s tape.  We will use this to mask off the cabinetry before we start sanding the floor or taking on other parts of the interior remodeling project that might affect the woodwork or furniture.

Back home I continued emptying out the house portion of the bus.  (The basement bays are a whole other story.)  In order to remove one of the last three drawers in the bedroom we needed to remove the bed platform.  It is 3/4″ cabinet grade plywood sized to support a queen size mattress, definitely a two-person job.  It is hinged about 18″ from the head end, so we folded that piece over and secured it on both edges with tape, shortening the total length by that much.  It was still heavy and very awkward to handle, especially getting it through the cockpit and down the entrance stairs, but we managed to get it out.  I used a hand truck to move it to the garage for safe storage.  Linda commented that perhaps we should cut it down and switch to a full size mattress.  I think that is an idea worth considering as it would give use more aisle space.

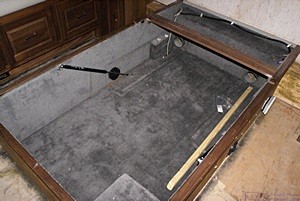
The storage base for the bed with the plywood platform removed.

The storage base for the bed with the plywood platform removed.

The plywood platform is 80″ L by 58″ W so even after removing the 18” piece at the head end is 62” x 58”.  That means it was not cut from a 4’ x 8’ sheet of plywood and would be almost impossible to replicate.  Our mattress is approximately 78″ L by 60″ W whereas the foundation box (storage compartment) is 72″ L by 43″ W.  Our full size mattress in the middle bedroom is 72″ L by 52″ W.  Cutting the plywood platform down to full size (or building a new one) would gain us 8″ of isle space at the foot of the bed and 3″ on each side.  That may not sound like much, and would be irrelevant in most bedrooms, but it would be a significant difference in the aft cabin of our land yacht.  If we do this I would keep/store the existing plywood and build a replacement.

With the bed platform out of the bus I was able to remove the last three drawers across the back.  The one farthest to the driver side, in particular, could not be removed with the platform in place.  Another reason for building a new bed platform is that I can hinge it closer to the head end and use longer gas springs.  This would allow it to open far enough to provide easier access to things stored under the bed and be able to install and remove the three drawers whenever needed.

Linda heated up some frozen breaded mock fish fillets for dinner.  She made fresh vegan tartar sauce to go with them, boiled some corn-on-the-cob, and roasted some potatoes in the oven.  It was a simple but very satisfying meal.  After dinner I uploaded more blog posts, getting two of the three that cover the ARRL Field Day event done.  That means I am almost through the month of June!


2015/07/30 (R) Number Theory

We awoke to a decidedly different air mass than we have been experiencing the last week or so; cool with noticeably lower humidity.  Linda turned off the air-conditioning and we opened up the house for the first time in a week.  We had a light breakfast of grapefruit and cinnamon raisin toast and then spent an hour enjoying our coffee.  I finished the little treatise on cryptology yesterday at Panera and started reading Oystein Ore’s “Invitation to Number Theory.”

Linda needed to make a quick grocery run for miso so I worked for a while on the sofa design, laying out the pieces that will be cut from a 48″ x 96″ sheet of 3/4″ plywood.  When she returned from her errand she went for her daily walk while it was still cool.  After her walk she made a cold black bean salad and then made roll up sandwiches using multigrain pita bread.  It was delicious and healthy; the bread alone had nine grams of protein.  After lunch Linda attended to some nutritional calculations related to the dinner she planned to fix and I gathered up the tools I thought we would need to take care of some things in the bus.  That included some small zip lock bags for small parts.

My first task was to remove the screws that secure the shorter head end of the bed platform to the foundation.  The platform is in two pieces joined by a piano (continuous) hinge.  After doing this I lifted the other end and was reminded that I had already disconnected the two gas springs that normally hold it open.  I also realized that the wires which supply 12VDC power to the two compartment lights on the underside of the platform were routed under a fixed cross member and cable-clamped to the other piece of the platform.  I already knew, or assumed, that they were hard-wired and had spade lug crimp connectors ready to go.

\With Linda’s help I was able to detach the wire loom at several points to create some slack.  The +12VDC wire was connected to a microswitch with a spade lug so it was easy to unplug.  I clipped the neutral wire, stripped both free ends, and attached an insulated male spade connector to one and an insulated female spade connector to the other.  With that the entire platform could now be removed from the bus to get it out of the way while we install the new floor tiles.

In the kitchen area of the bus we unscrewed and removed the walnut trim around the fixed window on the passenger side.  I reinstalled all of the screws so we would not misplace them while Linda took the trim to the garage to store it.  I removed the screws that held each of the three reading lights to underside of the upper cabinet in front of the fixed window.  They were wired with very clever little insulated terminal strips which made them easy to disconnect and will make them equally easy to reconnect.  Linda bagged each fixture and its parts separately in one gallon zip lock bags.

The AC light fixture was trickier to remove.  First I turned off the circuit breaker on the inverter sub-panel and verified that the light no longer came on.  By lifting the false bottom of the cabinet I could see that the fixture was installed onto a ceiling junction box.  That meant there was probably a post threaded into a cross bracket with the post protruding down through the center/mounting hole in the fixture and held in place by the decorative nut.

I was not able to turn the decorative nut by hand so I got the faucet wrench.    I have had this unique and specialized tool for a very long time.  It is designed to reach up behind a sink and grab the retaining nut on the underside of a faucet 12 inches away.  The head is spring loaded and flips over to allow the wrench to be used to tighten or loosen the nut.  Occasionally, like today, it finds an alternate use.  I like it when that happens.

\With the fixture loose I was able to color code the neutral wires with white tape, untwist the wire nuts, and then put the wire nuts back on the two supply wires.  Linda took the fixture to the garage and figured out way to store it safely using an unused waste basket.  We talked about the built-in sofa and some HVAC details for the passenger side of the cockpit before wrapping up our bus work for today.

While I put the tools away Linda started working on dinner.  Tonight’s special creation was vegan Pad Thai.  Regular Pad Thai was a favorite of ours for many years even after we switched to a vegetarian diet as we were still eating eggs.  The dish has a lot of ingredients, so it is a lot of work, and a good vegan version is a real challenge, but Linda executed the dish quite well.  We finished up the watermelon for dessert, which was sweet but light and refreshing.

I try to write every day while the sequence and details of the day’s events are still clear and my thoughts and feelings about them are somewhat “in the moment.”  But I don’t usually finish a post and upload it the same day.  I often finish it the next morning which means I have a chance to sleep on in it.  We have been so busy with the bus remodeling project that I have barely had time to write the drafts of my posts and I have not had the time to transfer them, edit them, select photos and post-process them, and upload everything to the blog.  I don’t like getting so far behind, but there are only so many hours in a day and I do need at least seven hours sleep a night.

After dinner I e-mailed Josh to see when we might get the extra fabric we ordered to make seat and back cushions for the sofa I am designing for the bus.  I then settled in to read about number theory before drifting off to sleep.