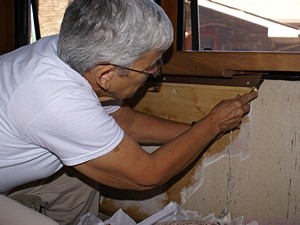
We were up at 7:30 AM and had fresh grapefruit and cinnamon raisin toast for breakfast. We turned the fireplace on and drank our coffee in the living room. After taking care of a few chores we got to work on the bus. Linda started stripping the old wallpaper while I finished soldering two 45 degree copper street elbows. I then got my tools out and gathered up supplies I needed to disconnect the fan-coil heat exchangers and heater hoses.
I started by trying to connect a 1/2″ i.d. clear vinyl tube to the drain stub on the Aqua-Hot. The stub points straight down, is approximately 3/4″ long, and the open end is about 3/4″ above the base. There is a hole in the base of the unit at that point, provided by Aqua-Hot for a drain line, but Royale Coach installed one of the CruiseAir condenser units directly beneath the Aqua-Hot and did bother to provide a hole in the shelf or make alternate arrangements for draining the unit. I could not get the vinyl tube over the stub and with a limited amount of time to spend on this minor annoyance moved to Plan B.
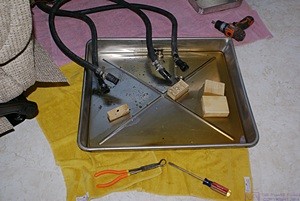
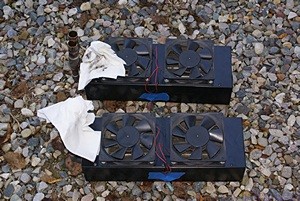
We have had a large stainless steel photo processing tray, approximately 2′ X 3′, for years. Today we used it to catch antifreeze and protect the new floor. Linda got some scrap towels and we put them under all of the edges of the tray. I then set the heat exchangers on pieces of 2×4 in the tray to keep them up out of the antifreeze. Linda held the heater hoses as I undid each of the band clamps in turn and worked them loose from the exchangers. We emptied the coolant from the exchangers and hoses into the tray, wiped off the heat exchangers, took them outside, and set them in the driveway.
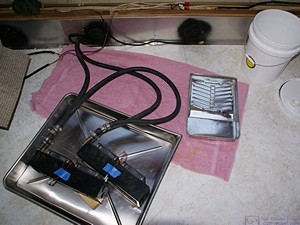
We made sure the hose that connected the two units was drained, wiped it off, and took it outside. This hose has bleeder valves at each end that I will have to remove as I need to reuse one of them. We drained the two remaining hoses as best we could and put the open ends in the metal photo tray. I bought a bucket yesterday with a gasketed lid that has a built in spout. I picked the band clamps and pieces of 2x4out of the antifreeze and put them in the bucket. We then carefully poured the antifreeze from the tray into the bucket and put the lid on. We carried the tray outside and set it in the driveway and then took the bucket outside.
Linda took a break from stripping wallpaper and went to the bank to deposit proceeds from the recent rally. There wasn’t anything else I could do in the coach and I turned my attention to cleaning up the work surface in the garage. I took the two desk bases to the garage and started working on the installation of the grates and heat exchangers. I had not worked through the details of this in advance so I had to figure them out now. I started with the left base, which has an angled front.

The coolant hoses with the heat exchangers removed. We were able to contain the coolant in the tray and not get any on the new floor tiles.
The heat exchangers needed to be spaced up 1/2″ off the floor to better align with the openings in the sides so I cut pieces of 1/2″ plywood to put under them. The exchangers have two holes on the bottom front edge that were probably created by Royale to mount them. Actually, it appears that Royale mounted them upside down, presumably to position the coolant connections where they needed them. I say they were upside down because I discovered labels on the “bottom” indicating they were made by “Vantage Products, Exclusive U. S. Distributor of Primus Hydronic Heating Products.” I designed the desk bases so that the exchangers would mount the same way Royale had them. As such they will remain “upside down” but it will not affect their operation.
My plan was to put 3/8″ wide by 1/4″ thick dense foam self-stick weather stripping around the edge of the discharge side of the exchangers to seal them to the base and reduce vibration noise due to the fans. I cut the 1/2″ plywood large enough to provide room for mounting brackets to attach the plywood inserts to the base in locations that I could reach with the heat exchangers in place. The exchangers had to be screwed to the plywood before it was set in place inside the base since the grates blocked access to the two mounting holes.
By now it was mid-afternoon Keith showed up and mowed the grass so I took a little time out from my work to chat with him. When I returned to the makeshift workshop in our garage I cut the brass-colored decorative aluminum grates to size and secured them on the inside of the base using small screws. I also wanted to add a layer of the plastic gutter mesh I bought yesterday. After cutting the first piece to size I decided to use double stick tape. The only tape I had was 3M Extreme Duty Mounting Tape so I drove to Lowe’s to get something more appropriate. I found a 1″ wide clear tape and decided to try it.
Half inch wide tape would have been better so I tried cutting the 1″ tape in half lengthwise. I removed the discharge grate, applied the tape to the edges on the back side, and pressed the plastic mesh into it being careful to keep it as straight as possible. I then screwed the whole assembly on the inside of the base. The screws did not like going through the tape or the mesh so I was quickly disabused of this assembly process and decided to use the tape as it came off the roll.
For the air intake grate I first screwed the metal sheet to the inside of the base. I then applied shorter pieces of tape around the edges in-between the screw heads. I carefully positioned the pre-cut plastic mesh, peeled the protective layer off of the tape, and stretched/pressed the mesh in place.
I needed to clean the 3/4″ copper inlet and outlet pipes on the heat exchanger so I got Linda to help me at this point. She held the heat exchanger as I used a strip of plumber’s sandpaper to remove heater hose rubber that had stuck to the pipe.
Because of the grates on the air openings in the base I positioned the plywood spacer and then marked/drilled the holes for the mounting brackets. I set the exchanger in place, made several alignment marks, removed the exchanger, and took out the plywood. I attached the brackets to the inside of the base and then attached the weather stripping to the front of the exchanger case. I positioned the case and Linda held it while I secured it with two screws. I slipped the plywood/exchanger assembly back into the bottom of the base and Linda pulled it tight to the front while I secured the brackets to it. One base done, one base to go.
Keith was done mowing about this time and stopped to see what we were up to and pick up his check. He normally mows our property on Monday morning but had some service issues with his truck that put him back a day. He had some string trimming to finish and our dinner was ready so he went back to work and we went inside to eat. Dinner was salad and Whole Wheat ABC Pasta Veggie Soup. The soup was a North Bay Trading Company mix that Linda got at Whole Foods. She added kale and tomatoes to make a very tasty and nutritious dish.
After dinner I was closing up the bus for the evening and noticed that the two large MCD shades in the living room had come loose from their front mounting brackets. This undoubtedly happened Sunday on Hacker Road as we returned from the rally in Elkhart, Indiana. Linda helped me move one of the desk pedestals on the sofa so I could get to the shade on the driver’s side of the coach. Once I could get to it the mounting rail snapped into the clip fairly easily but I will have to figure out why it popped out in the first place and make adjustments if needed/possible.
I checked e-mail and replied at length to one from Gary at BCM. We then settled in to watch the season opener of NCIS and NCIS New Orleans (NCISNOLA) followed by several shows on CreateTV (PBS). I multi-tasked, working on blog posts at the same time.
My work yesterday and today was not as physical as what we have been doing for most of the summer so it did not feel like I had done much but the evidence suggested otherwise. These seemingly small tasks often have a lot of steps that have to be done carefully in the right order and take time to do. There was also a certain amount real-time problem-solving and a trip to the store in the middle of the work. I hope to finish the other base tomorrow, get both of them back in the coach, and get them plumbed with the new heater hose. That may have to wait a day or so, however, as Linda needs to finish stripping the wallpaper in the area behind the desk and we need to hang the new paper before re-installing the desk. There is a definite order to this work that cannot be circumvented.


